Subscribing to Inband Channel Occupancy Events
Ably’s global platform organizes all of the message traffic within its applications into named channels. Channels are the “unit” of message distribution; clients attach to any number of channels to publish or subscribe to messages. Every message published to a channel is broadcast to all subscribers.
In addition to the messages on a channel, the channel can be configured to also publish channel occupancy data, such as the number of publishers and subscribers. In this tutorial, you’ll learn how to subscribe to inband channel occupancy events.
Channel occupancy reveals the number and type of occupants of a particular channel. This includes the number of connections, publishers, subscribers, presence connections, presence members, and presence subscribers. When you subscribe to the inband occupancy events via the realtime library, you’ll receive updates whenever the occupancy changes, in other words, the count of one of these parameters changes. However, you can alternatively make a one-off request via the Ably REST library, to retrieve the occupancy data for the channel in question.
Step 1 – Create your Ably app and API key
To follow this tutorial, you will need an Ably account. Sign up for a free account if you don’t already have one.
Access to the Ably global messaging platform requires an API key for authentication. API keys exist within the context of an Ably application and each application can have multiple API keys so that you can assign different capabilities and manage access to channels and queues.
You can either create a new application for this tutorial, or use an existing one.
To create a new application and generate an API key:
- Log in to your Ably account dashboard
- Click the “Create New App” button
- Give it a name and click “Create app”
- Copy your private API key and store it somewhere. You will need it for this tutorial.
To use an existing application and API key:
- Select an application from “Your apps” in the dashboard
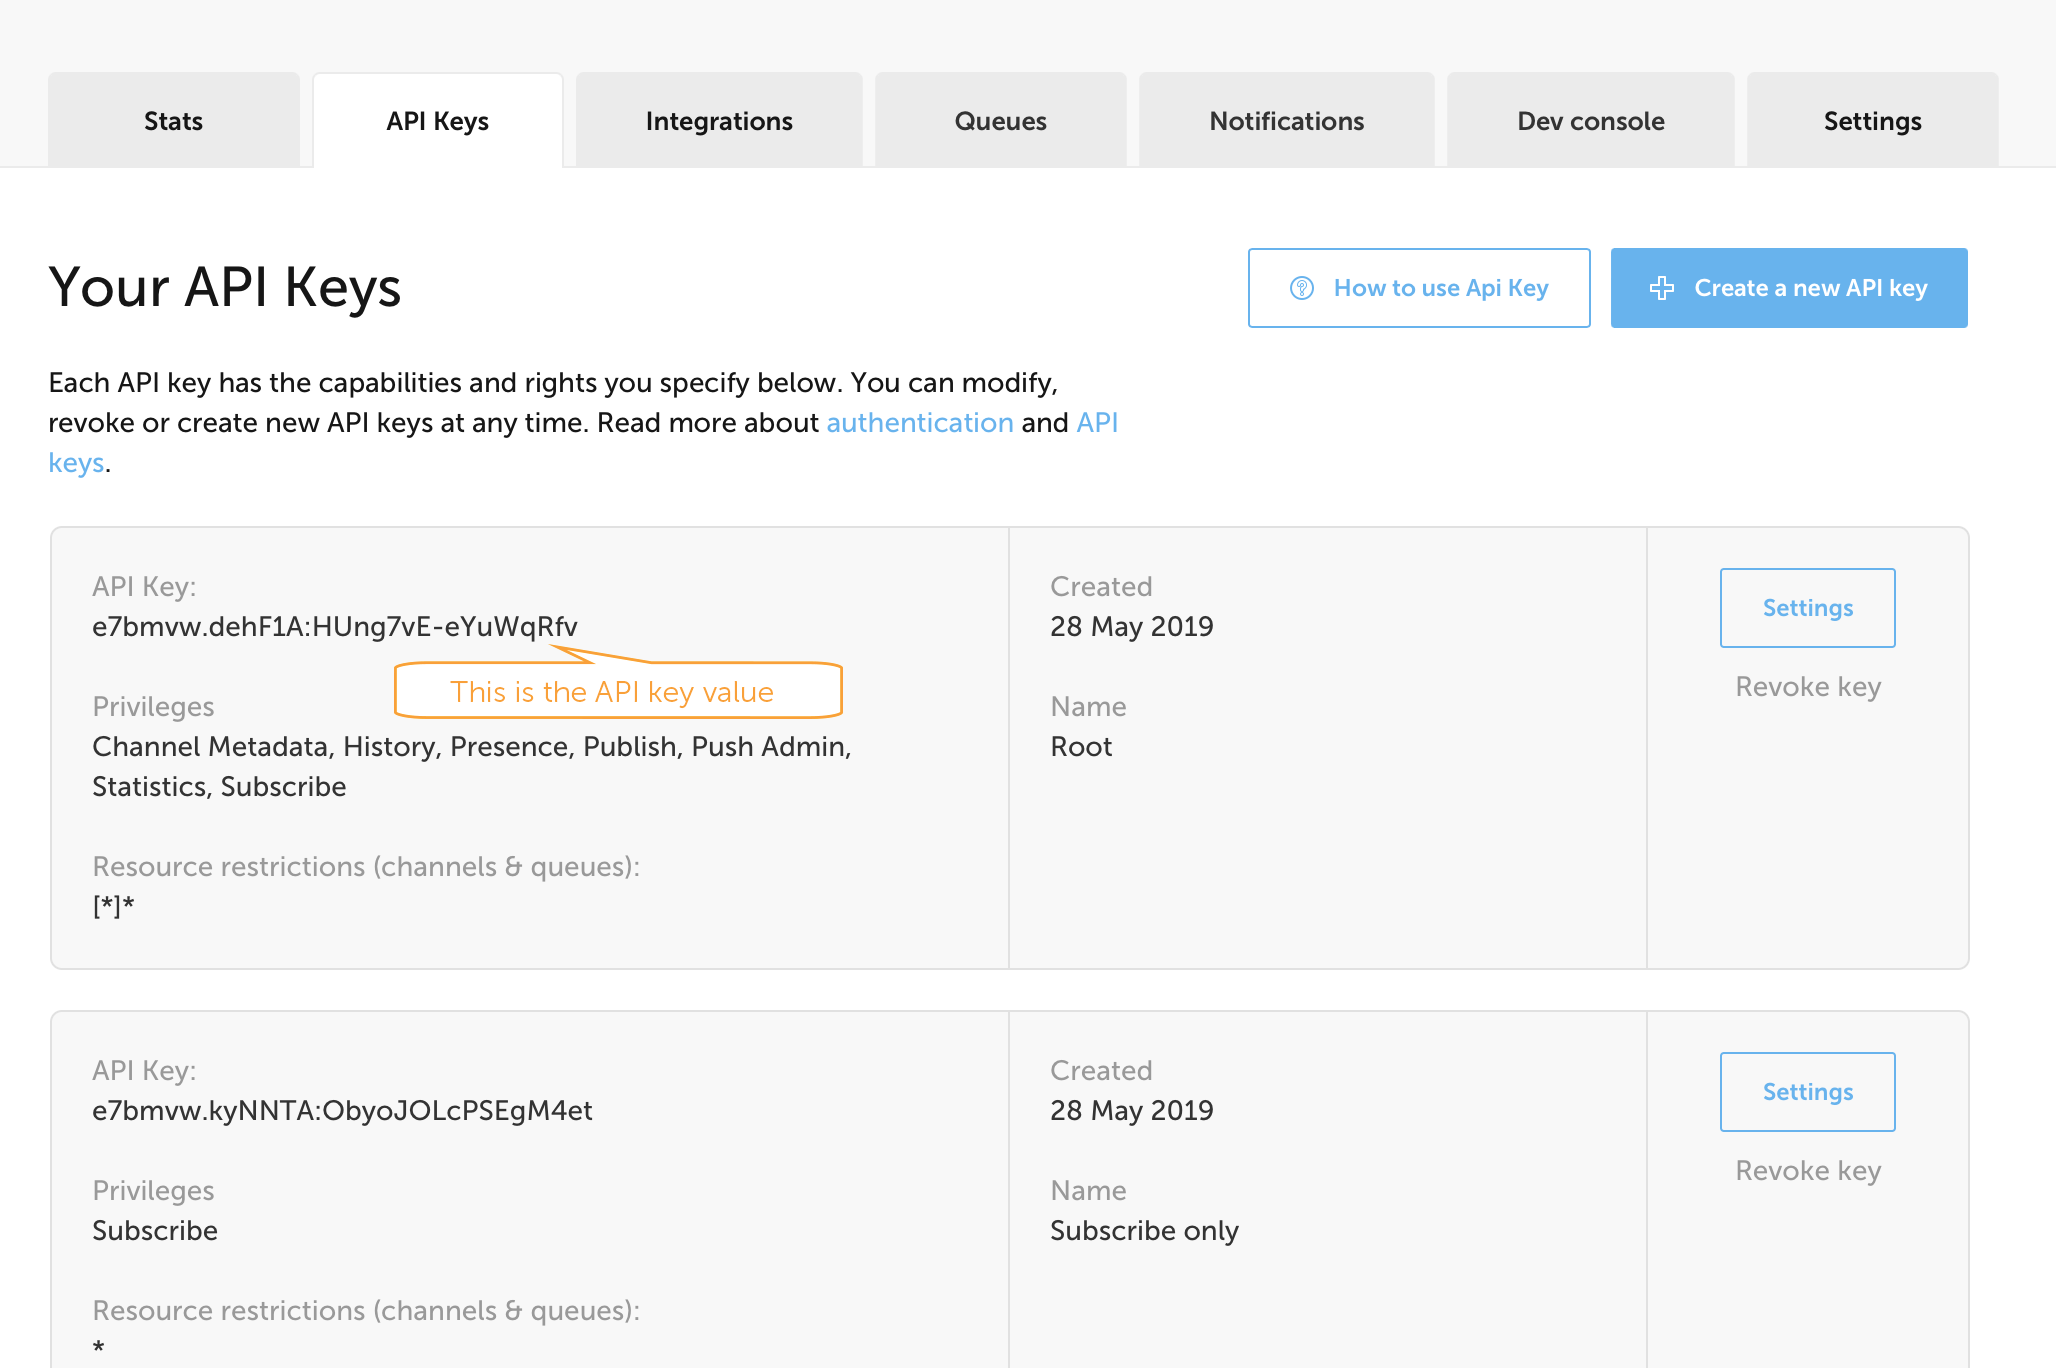
- In the API keys tab, choose an API key to use for this tutorial. The default “Root” API key has full access to capabilities and channels.
- Copy the Root API key and store it somewhere. You will need it for this tutorial.
Step 2 – Setting the right permissions on your API key
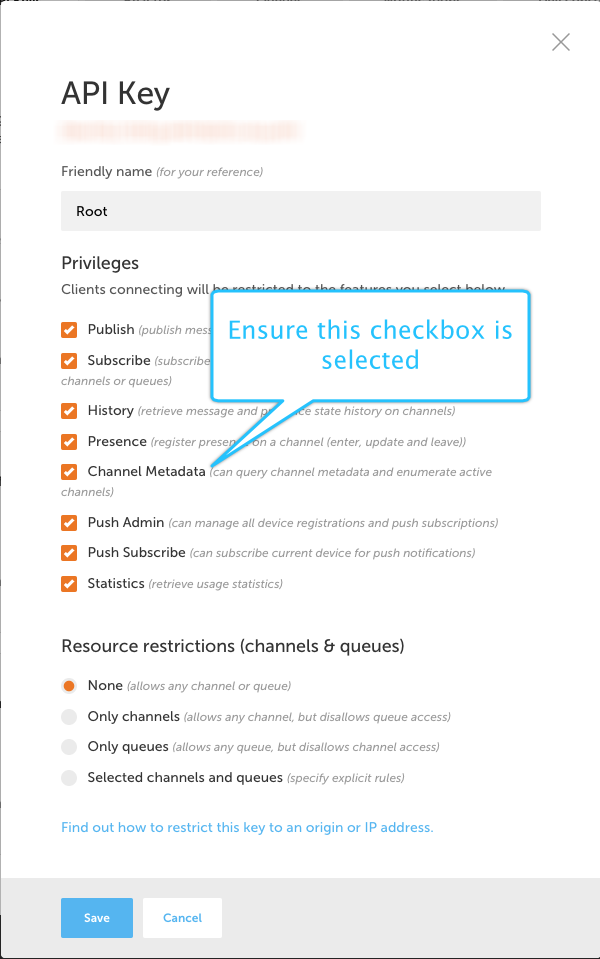
In order to be able to use the inband occupancy data you’ll need to ensure that the Channel Metadata capability is enabled on your API key. Capabilities restrict your API key to performing specific actions only, such as publish-and-subscribe or publish-only. These capabilities can be set on your API key via your account dashboard. Navigate to the ‘API Keys’ tab of your dashboard as shown in the image below and click on the ‘Settings’ button against an existing API key that you’d like to use or create a new one.
Step 3 – Creating a basic HTML page to display the results
Since you’ll be using JavaScript in this tutorial, the best way to display the results, is in a browser. Paste the following HTML into a file named index.html:
HTML<html>

<head>
    <title>Inband Channel Occupancy Events</title>
    <script src="https://cdn.ably.com/lib/ably.min-1.js" crossorigin="anonymous"></script>
</head>

<body style="padding: 60px; font-family:Arial, Helvetica, sans-serif; text-align: center;">
    Ably Inband Channel Occupancy Events - Demo
    <br/>
    <br/>
    <div style="text-align: center; padding: 10px;">
        <button style="padding: 5px; width: 150px" id="add-publisher-instance" onclick="addPublisherInstance()">Add publisher instance</button>
        <button style="padding: 5px; width: 150px" id="add-subscriber-instance" onclick="addSubscriberInstance()">Add subscriber instance</button>
    </div>
    <div style="text-align: center; padding: 10px;">
        <button style="padding: 5px; width: 150px" id="add-publisher-instance-presence" onclick="addPublisherInstanceWithPresence()">Add publisher instance and enter presence</button>
        <button style="padding: 5px; width: 150px" id="add-subscriber-instance-presence" onclick="addSubscriberInstanceWithPresence()">Add subscriber instance and enter presence</button>
    </div>
    <div>
        <br>
        <textarea id="result" rows="30" style="width: 100%; margin-top: 10px; font-family: courier, courier new; background-color: #333; color: orange;  overflow-y: scroll;"
            disabled>
        </textarea>
    </div>
    <script src="main.js"></script>
</body>

</html>
Note this HTML includes two JavaScript files: the Ably Library, referenced via the CDN, and main.js which includes the main logic. Results are displayed in the text area defined in the HTML.
Step 4 – Subscribing to inband occupancy events using Ably’s Realtime Library
For simplicity, this tutorial uses Basic authentication to authenticate the client. However, it is strongly recommended you use Token auth to authenticate production client-side applications in order to protect your API key.
First, you need to instantiate the Ably Realtime client library using your API key. Create a new file called main.js and add the following code:
JavaScriptlet apiKey = '<YOUR_API_KEY>'
let ably = new Ably.Realtime({
    key: apiKey
})
Remember to replace the text ‘
JavaScriptlet apiKey = 'xVLyHw.CQ_aNg:fL1Nn8CnuWzXfiHwLtX5waDNMwbrXCtJlXNWkXGyfNU'Next, set the channel parameters to enable inband occupancy events:
JavaScriptconst regularChannelName = 'channel-' + Math.random().toString(36).substr(2, 16)
const channelOpts = { params: { occupancy: 'metrics' } }
const channel = ably.channels.get(regularChannelName, channelOpts)
Note that in this example you just generate a random channel name, as in this case you are only interested in inband occupancy events that are going to occur on this channel.
Then you need to reference the text area you added in the HTML:
JavaScriptconst resultArea = document.getElementById('result')
resultArea.scrollTop = resultArea.scrollHeight
This text area is where your results are displayed.
You now need to subscribe to the inband channel occupancy events. You can display the results returned in the callback in the text area defined in your HTML:
JavaScriptfunction localLog(msg) {
    const logDate = new Date().toLocaleTimeString()
    const template = `\n\n[LOCAL LOG - ${logDate}] - ${msg}\n`
    resultArea.value += template
    console.log(msg)
}

function logData(channelName, metrics) {
    const logDate = new Date().toLocaleTimeString()
    const prompt = `\n\n[METADATA - ${logDate}] - Occupancy on channel ${channelName} has been updated: \n`
    const template = `Connections: ${metrics.connections}
Publishers: ${metrics.publishers}
Subscribers: ${metrics.subscribers}
Presence Connections: ${metrics.presenceConnections}
Presence Members: ${metrics.presenceMembers}
Presence Subscribers: ${metrics.presenceSubscribers}`

    return prompt + template
}

channel.subscribe('[meta]occupancy', (msg) => {
    const occupancyMetrics = msg.data.metrics
    if (occupancyMetrics && msg.name.includes('[meta]')) {
        resultArea.value += logData(regularChannelName, occupancyMetrics)
        resultArea.scrollTop = resultArea.scrollHeight
    }
})
In the previous snippet, the code subscribes to ‘[meta]occupancy’ inband events for the channel. Then, it displays the data returned in the text area. You can also see two logging functions that are used. One for local logging in the button callbacks you will add later, and the logData function to simplify updating your result area. The structure of the occupancy metrics are defined in the occupancy documentation.
Step 5 – Add button functionality
In index.html you defined several buttons to provide a way of adding publishers, subscribers and presence members. You now need to add the handler code for those buttons. Add the following code to your main.js file:
JavaScriptfunction addPublisherInstance() {
    const str = 'Adding new publisher instance'
    localLog(str)
    const ably = new Ably.Realtime({
        key: apiKey,
    })
    const regularChannel = ably.channels.get(regularChannelName)
    regularChannel.publish('test-data', {
        data: 'Dummy Data',
        time: Date.now(),
    })
}

function addSubscriberInstance() {
    const str = 'Adding new subscriber instance'
    localLog(str)
    const ably = new Ably.Realtime({
        key: apiKey,
    })
    const regularChannel = ably.channels.get(regularChannelName)
    regularChannel.subscribe('test-data', (data) => {
        console.log('Subscription working')
    })
}

function addPublisherInstanceWithPresence() {
    const str = 'Adding new publisher instance with presence'
    localLog(str)
    const myId = 'clientId-' + Math.random().toString(36).substr(2, 16)
    const ably = new Ably.Realtime({
        key: apiKey,
        clientId: myId,
    })
    const regularChannel = ably.channels.get(regularChannelName)
    regularChannel.publish('test-data', {
        data: 'Dummy Data',
        time: Date.now(),
    })
    regularChannel.presence.enter()
}

function addSubscriberInstanceWithPresence() {
    const str = 'Adding new subscriber instance with presence'
    localLog(str)
    const myId = 'clientId-' + Math.random().toString(36).substr(2, 16)
    const ably = new Ably.Realtime({
        key: apiKey,
        clientId: myId,
    })
    const regularChannel = ably.channels.get(regularChannelName)
    regularChannel.subscribe('test-data', (data) => {
        console.log('Subscription working')
    })
    regularChannel.presence.enter()
}
You are now ready to test your code. You can run the code locally by loading index.html directly into your web browser. Then click the buttons provided to add occupants. Observe that the occupancy metrics update accordingly.
The following provides a basic explanation of the occupancy metrics:
- connections
- the number of connections to the channel.
- publishers
- the number of connections attached to the channel that are authorized to publish.
- subscribers
- the number of connections attached that are authorized to subscribe to messages.
- presenceSubscribers
- the number of connections that are authorized to subscribe to presence messages.
- presenceConnections
- the number of connections that are authorized to enter members into the presence channel.
- presenceMembers
- the number of members currently entered into the presence channel.
You can also see the complete code for this tutorial.
Step 6 – Live Demo
Using the live demo, you can add new occupants through clicking the available buttons. You can then monitor the inband channel occupancy events generated.
Ably Channel Occupancy Events – Demo
Next Steps
The following links provide some suggested next steps, so you can find out more about Ably:
1. If you would like to find out more about how channels and publishing or subscribing to messages work, see the realtime channels & messages documentation.
2. If you would like to check out the other related tutorials to work with channel metadata, see the Channel Lifecycle Events and Channel Enumeration tutorials.
3. Learn more about Ably features by stepping through our other Ably tutorials.
4. Gain a good technical overview of how the Ably realtime platform works.
5. Get in touch if you need help.