Implementing Push Notifications on iOS devices
Ably can deliver Push Notifications to iOS devices using Apple’s Push Notification service. Push Notifications, unlike our channel-based Pub/Sub messaging, do not require the device to maintain a consistent connection to Ably because the underlying platform or OS is responsible for maintaining its own battery efficient transport to receive Push Notifications. Therefore, Push Notifications are commonly used to display visual notifications to users or launch a background process for an app in a battery efficient manner.
In this tutorial, we’ll see how to set up and send Push Notifications to your iOS devices using Ably’s Push Notification service.
Before getting on with writing any code, there are some setup steps involved. To enable and publish Push Notifications on iOS devices via Ably, you will need the following:
- P12 certificates from Apple’s Push Notification Service (APNs)
- An Ably account (could be a free one)
- Correct client permissions in your Ably app
- Correct channel rule for enabling push on certain namespaces/ channels
After we get set up with the above, we’ll look at the API methods to implement Push Notifications in your iOS app.
Step 1 – Generating P12 certificates from APNs
P12 certificates are used by Ably to authenticate with the Apple Push Notification Service (APNs) on your behalf. This is required to enable delivery of push notifications to your iOS devices. In this step, we’ll see how you can generate a new certificate in the required format and add it to your Ably application.
To generate a P12 certificate, you’ll need an AppID from your paid Apple developer account. You can use an existing AppID or follow along to see how to create one from scratch.
Step 1a – Creating an Apple AppID
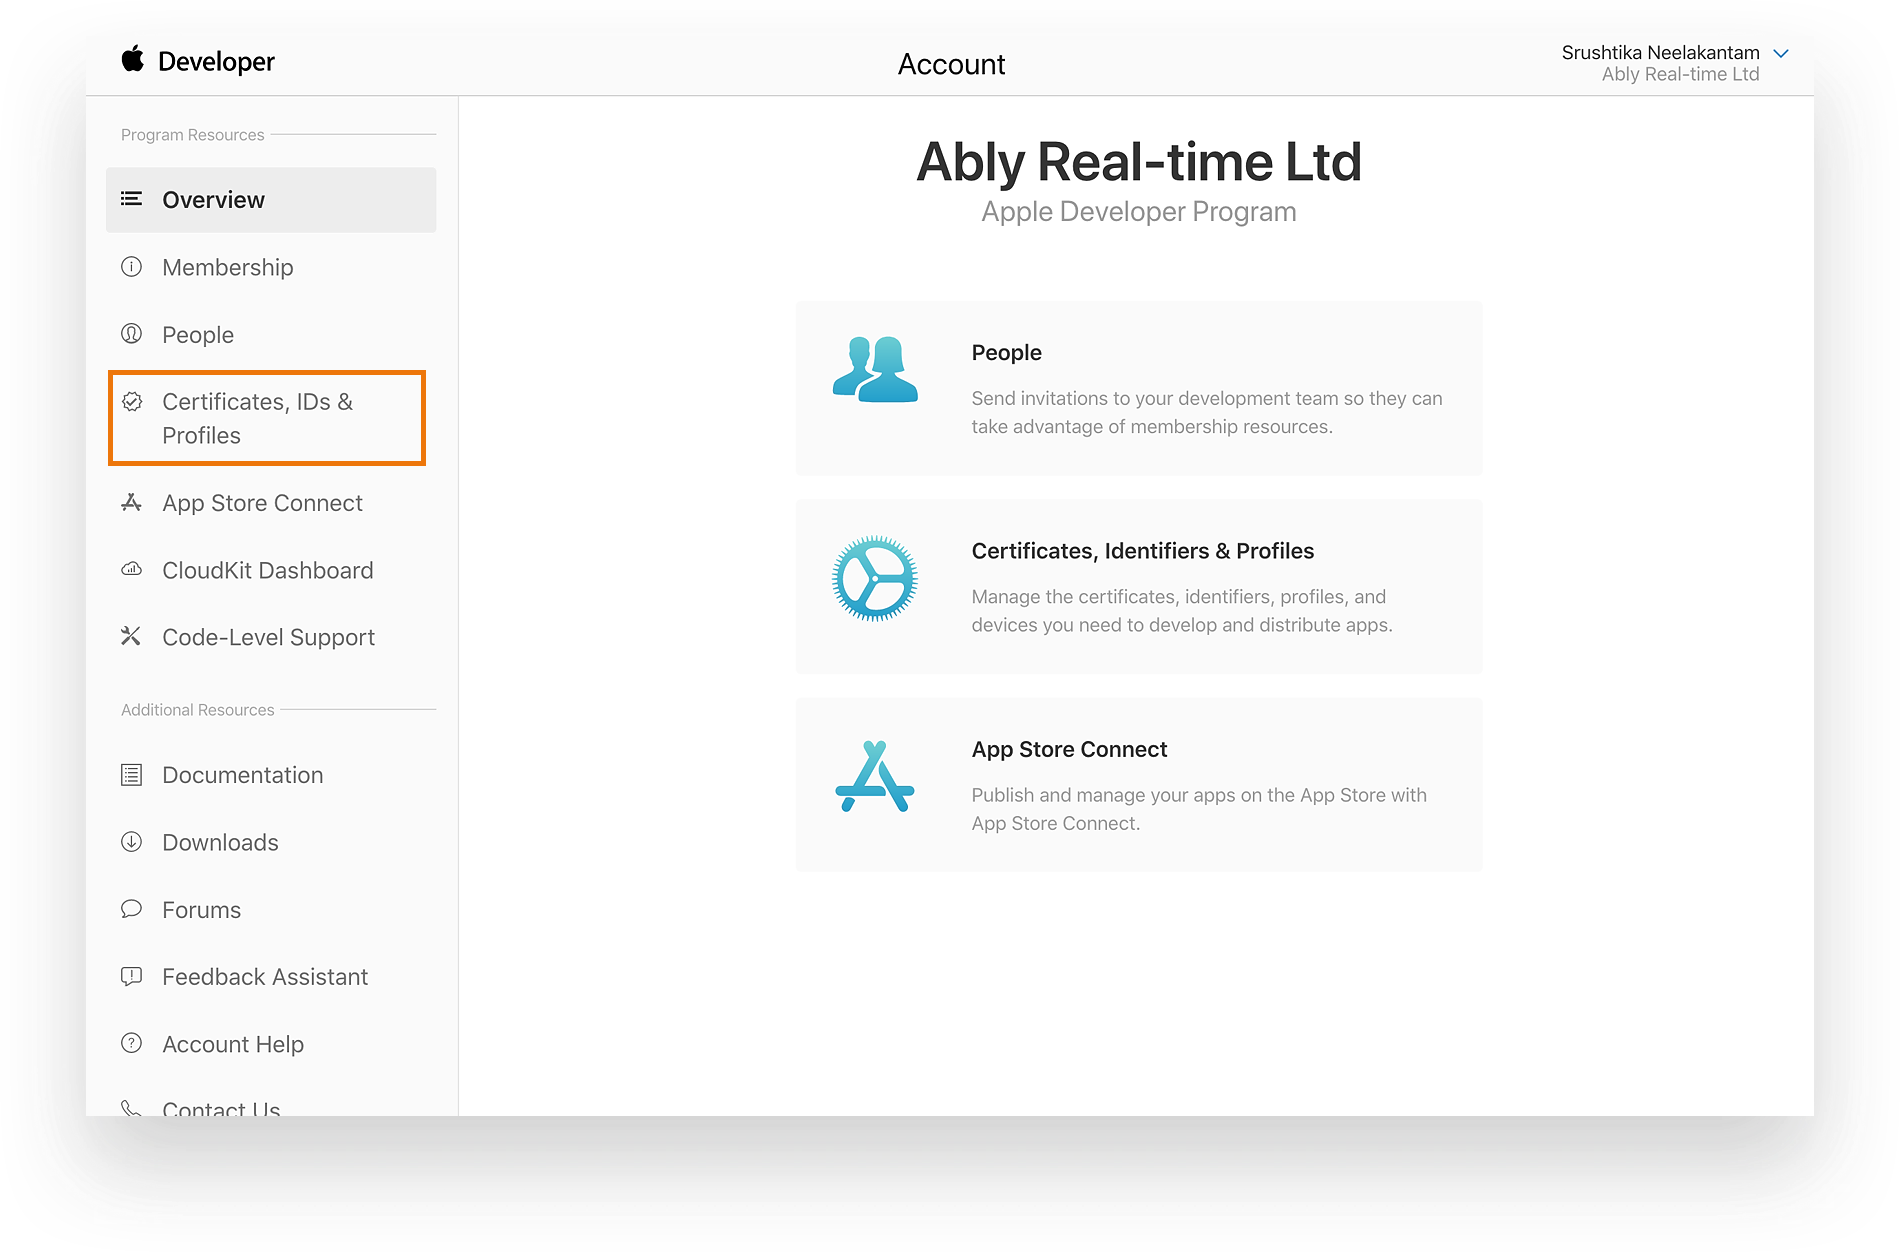
Login to your Apple developer account and click on “Certificates, IDs and Profiles” as shown below:
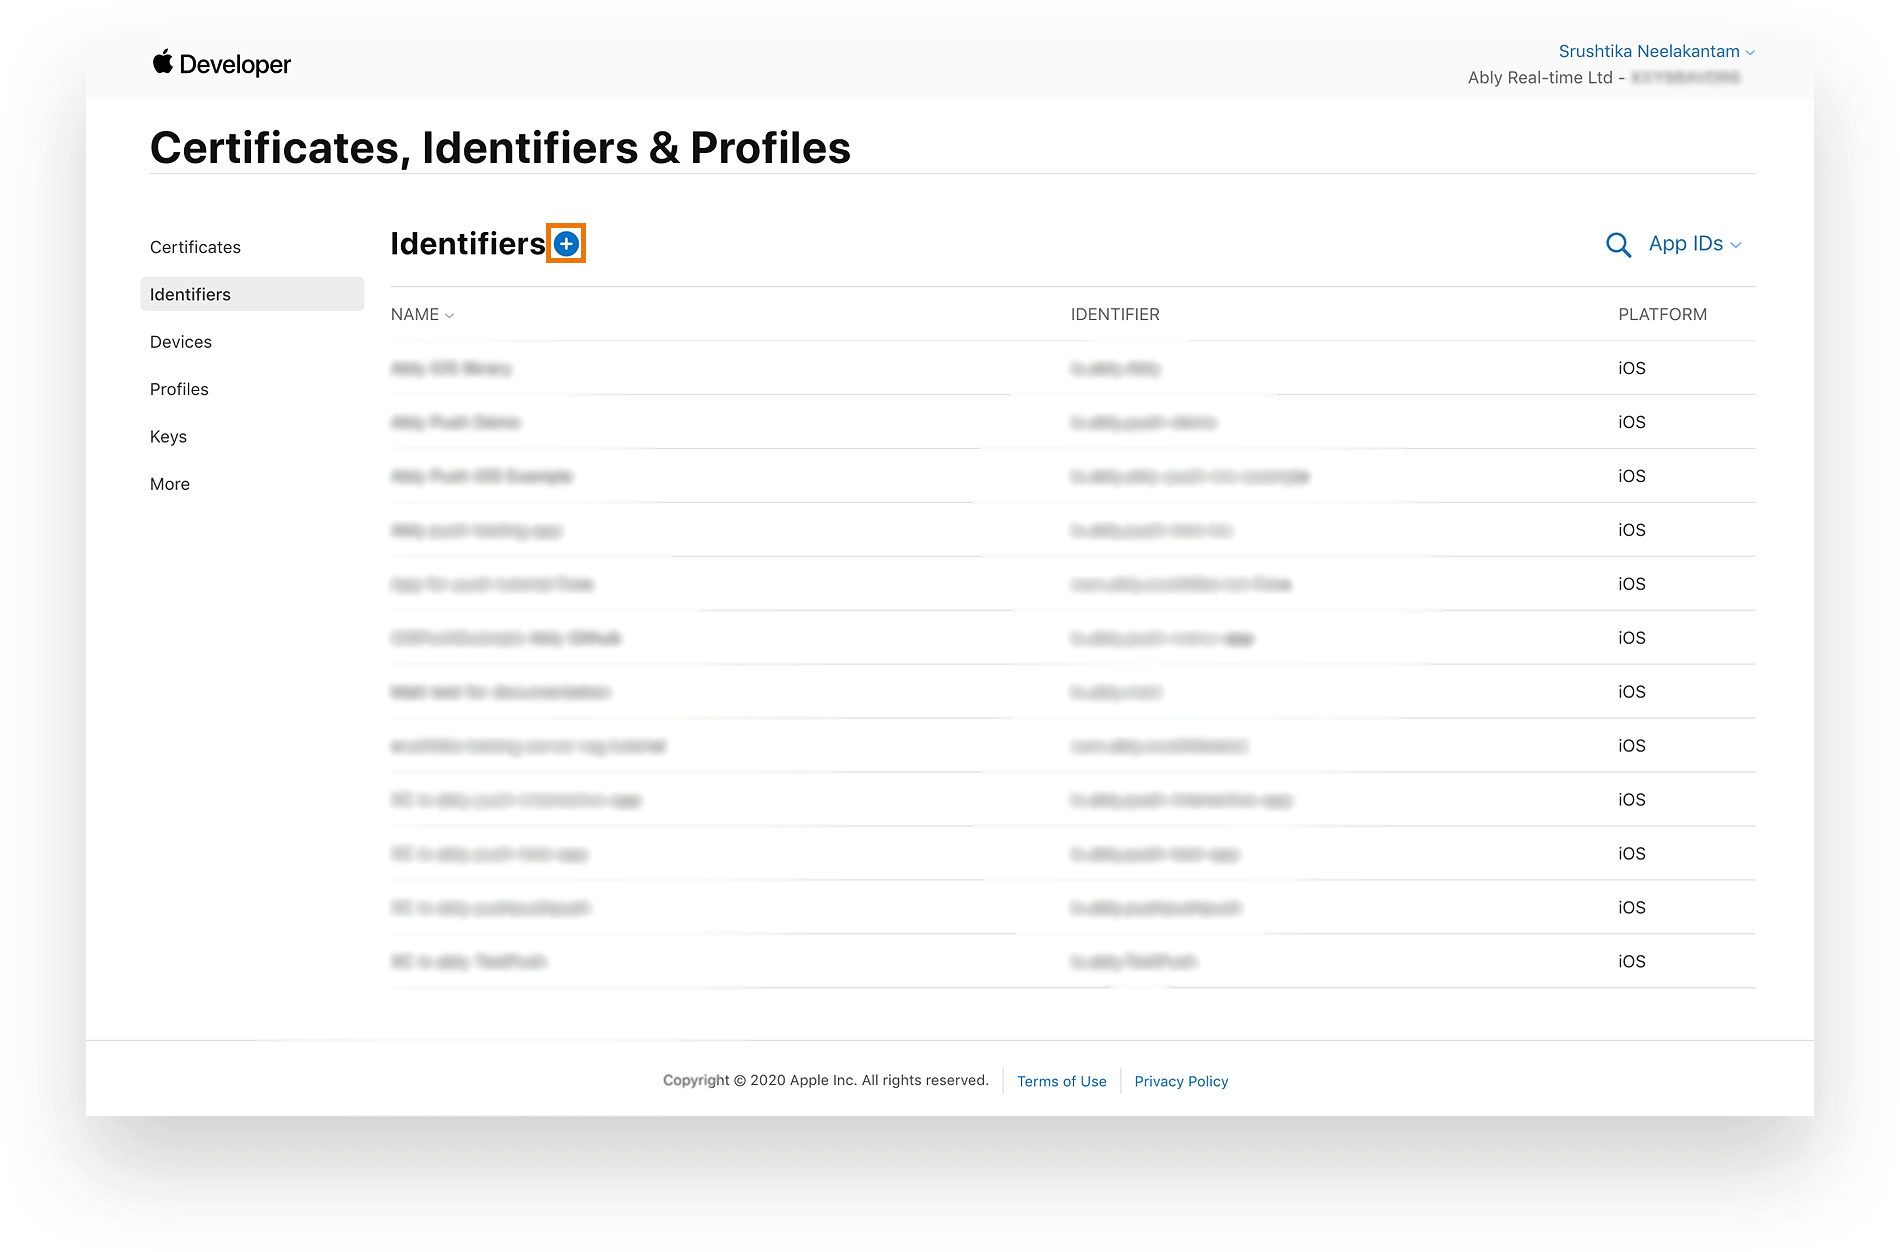
In the ‘Identifiers’ tab on the left, click on the plus button to create a new identifier, as shown below:
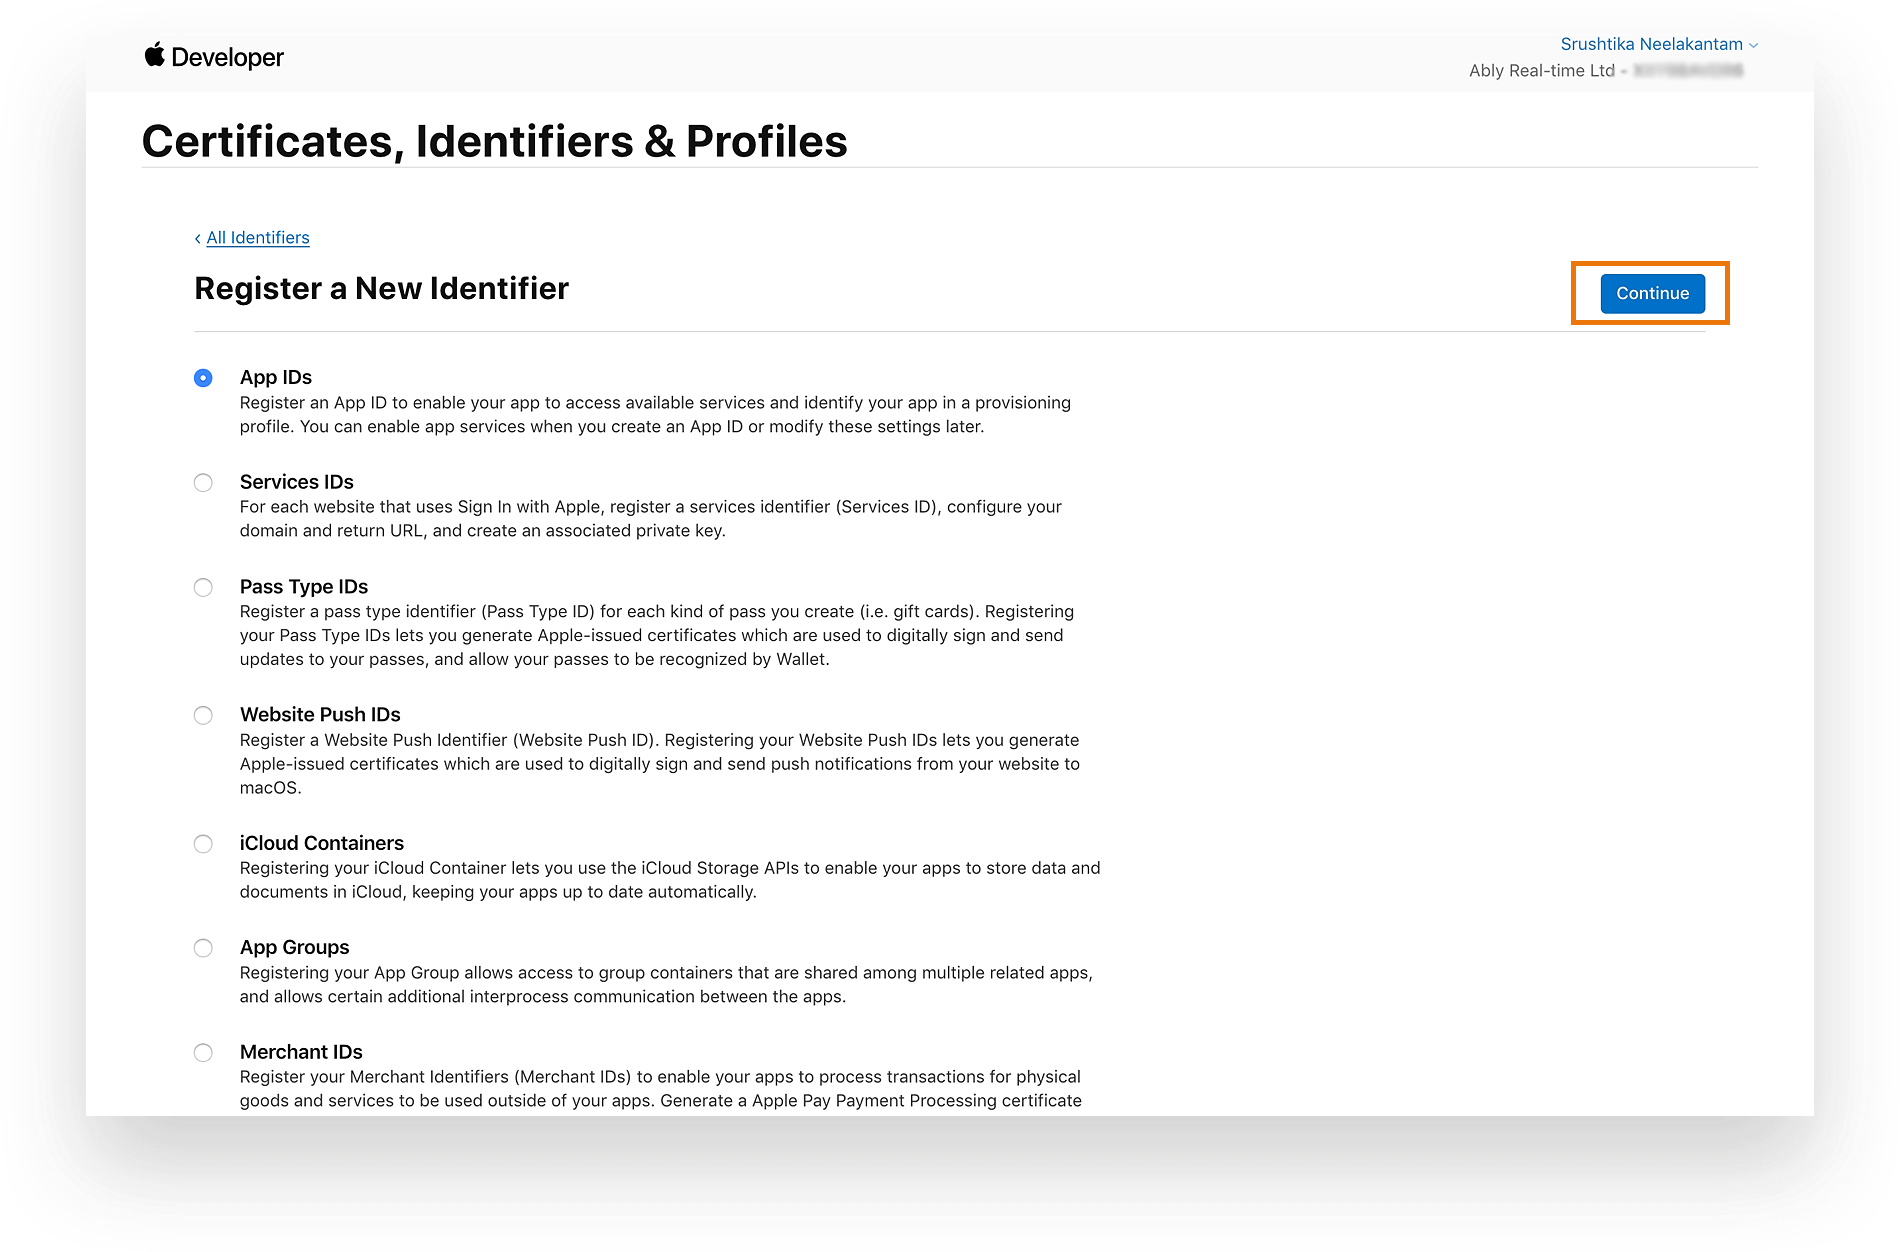
Next, select “App IDs” – as that is the identifier we want to create. Click on “Continue”, as shown below:
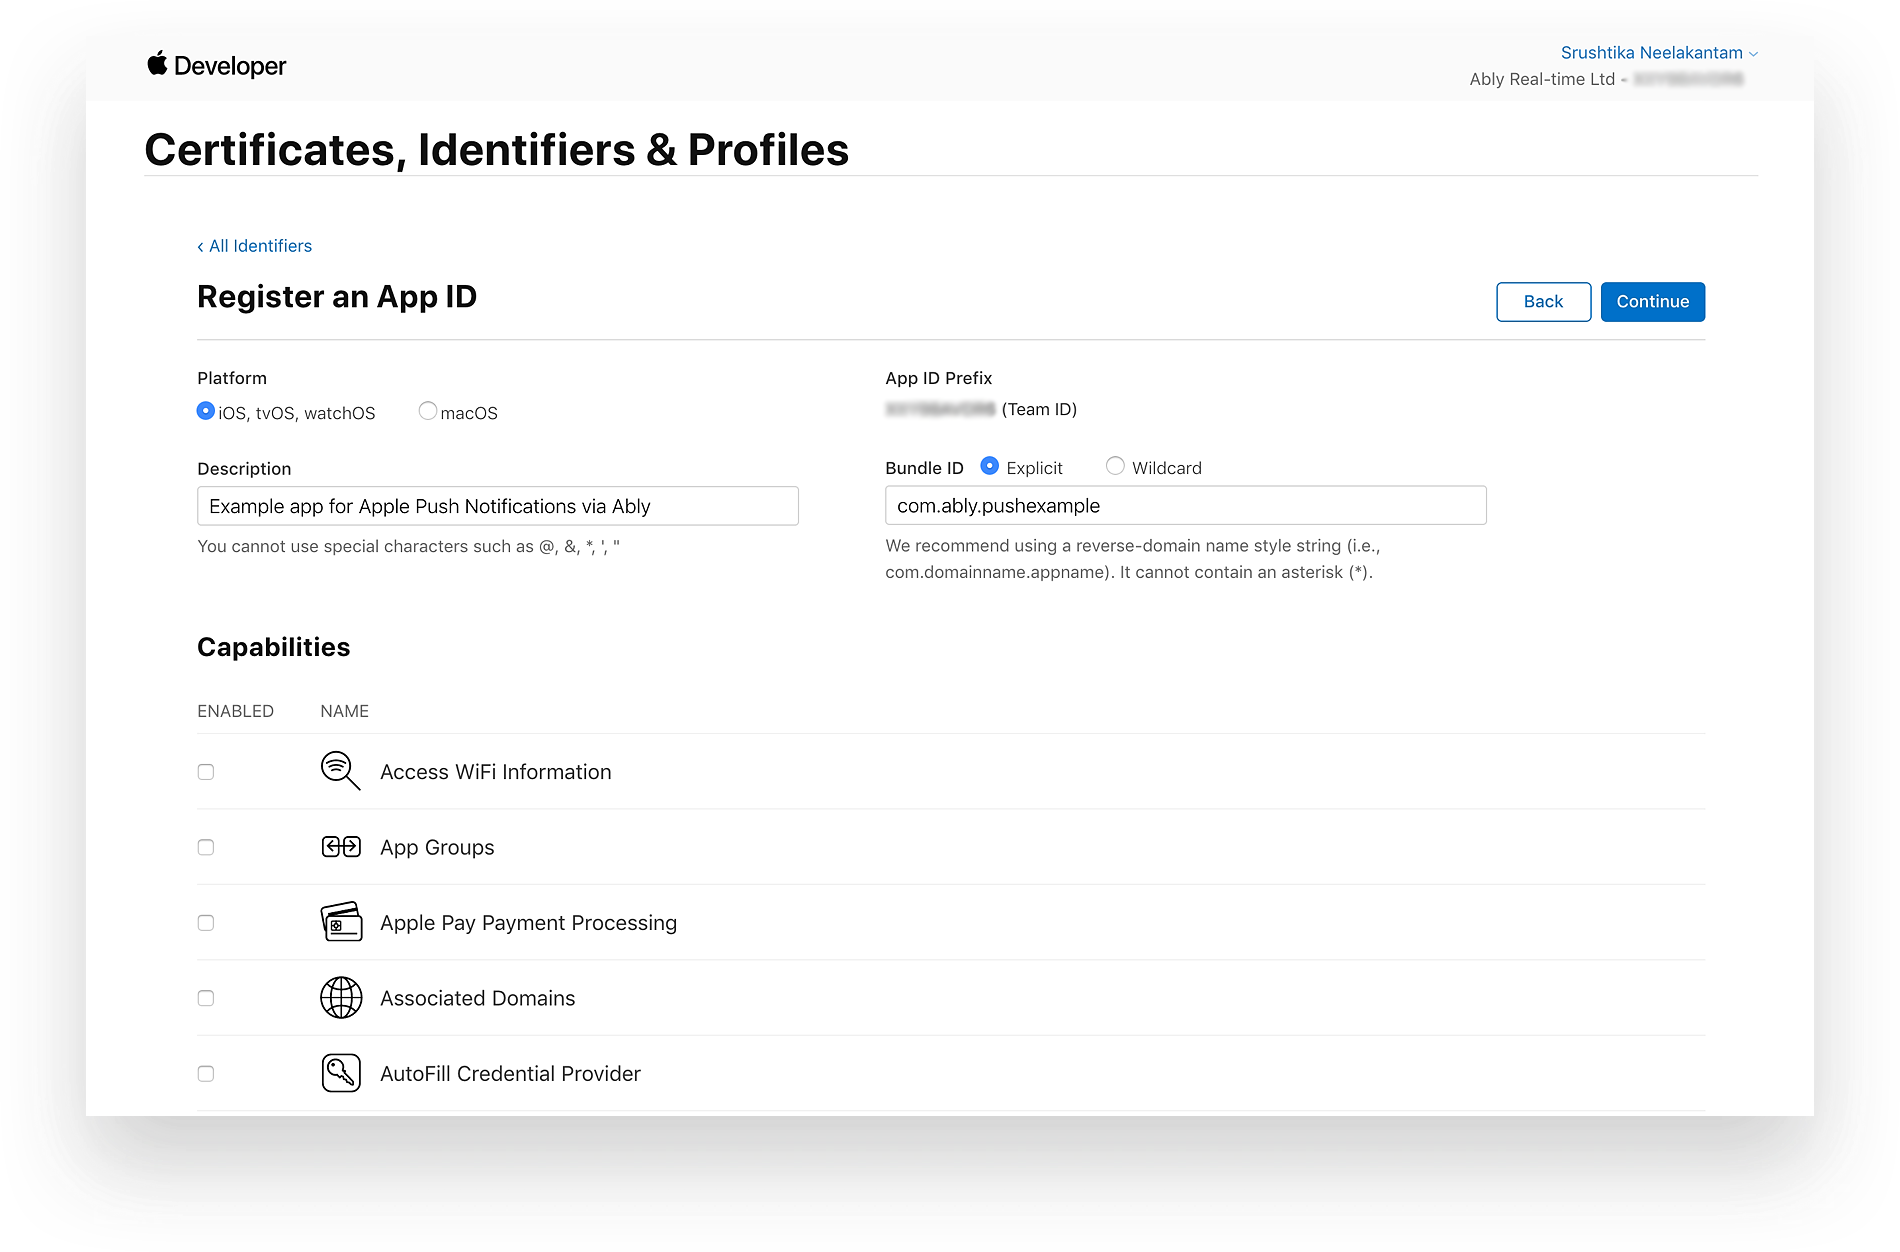
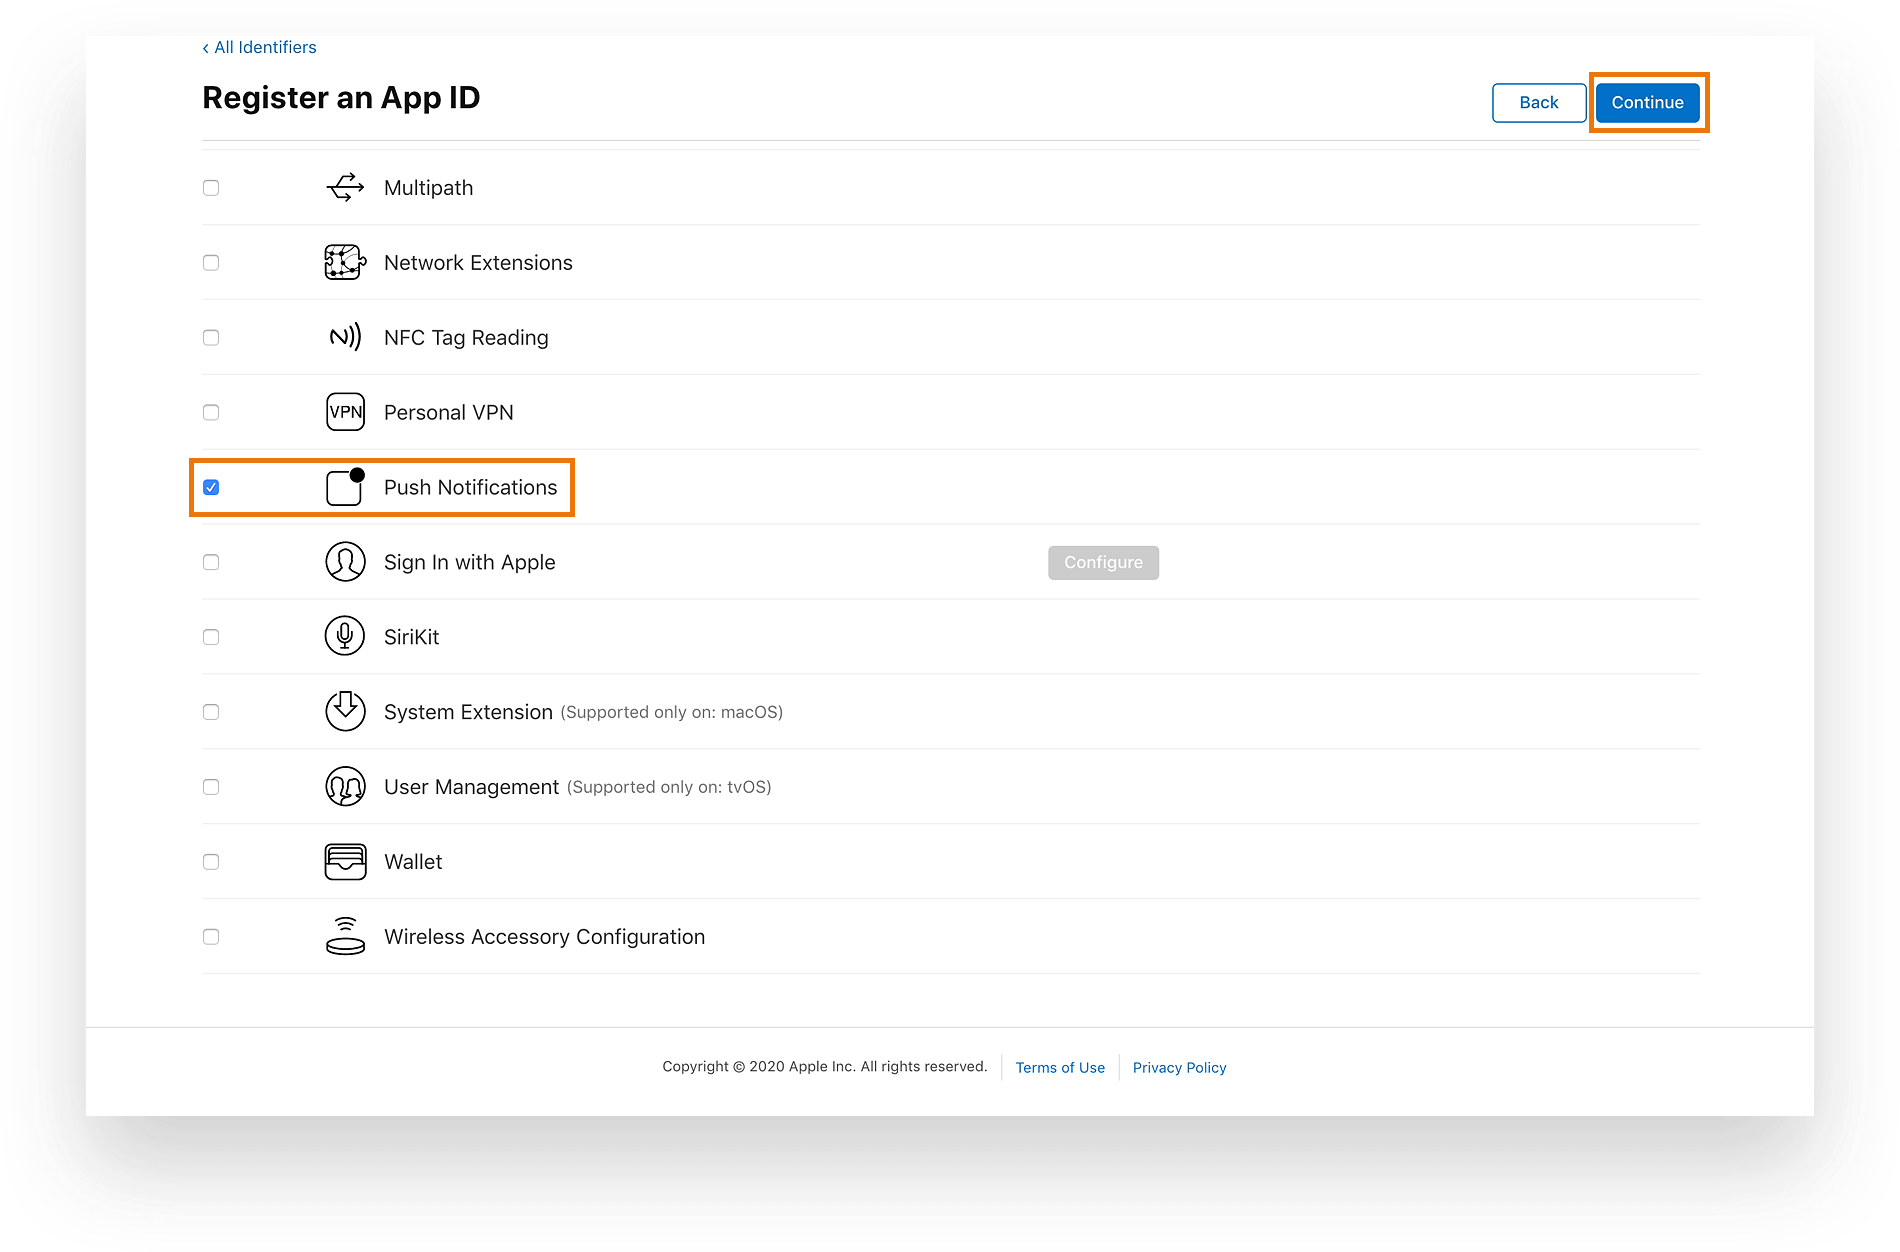
Now, add a description for the app – this can be anything you’d like – as well as a BundleID. On the same page, you’ll also see a list of capabilities that this app is supposed to have. Since we need Push Notifications, scroll down to that option, enable it and click on “Continue” on the top right, then “Register”. Please note that even if you are using an existing AppID, you will need to make sure that the Push Notifications capability is enabled.
Your AppID should now show up in the list of identifiers. If you click on that AppID now, you’ll see a ‘Configure’ option next to the Push Notifications capability that was previously enabled. This is because enabling Push Notifications requires you to set up a certificate so that APNs can establish your legitimacy. All MacOS computers come with a default application called ‘Keychain Access’ that allows you to generate signed certificates for such development purposes. We’ll do that next.
Step 1b – Generating a certificate using Keychain access
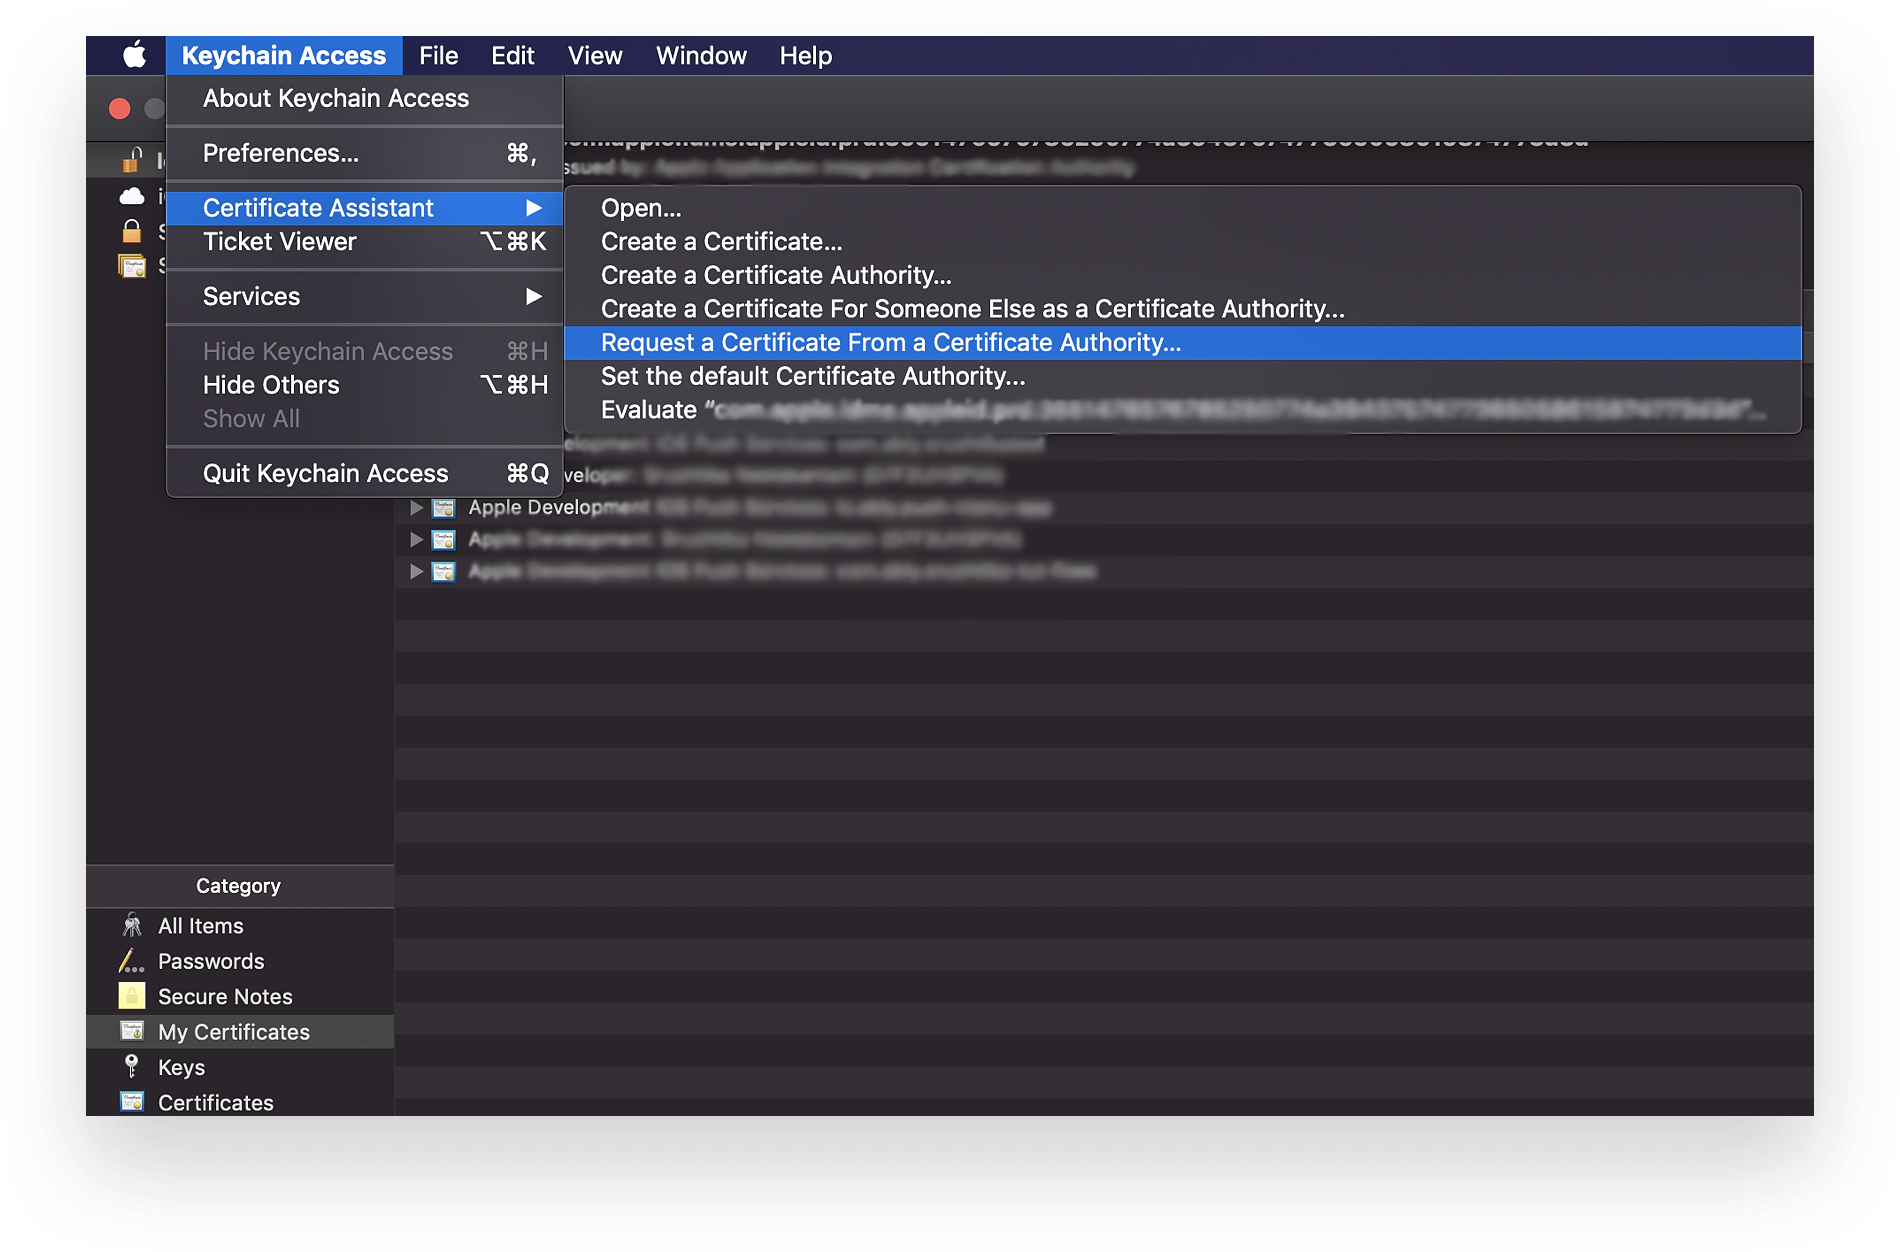
On your iOS computer, look for an app called ‘Keychain access’. Once it’s launched, from its menu bar select:
Keychain Access → Certificate Assistant → Request a Certificate From a Certificate Authority
This is also shown in the image below:
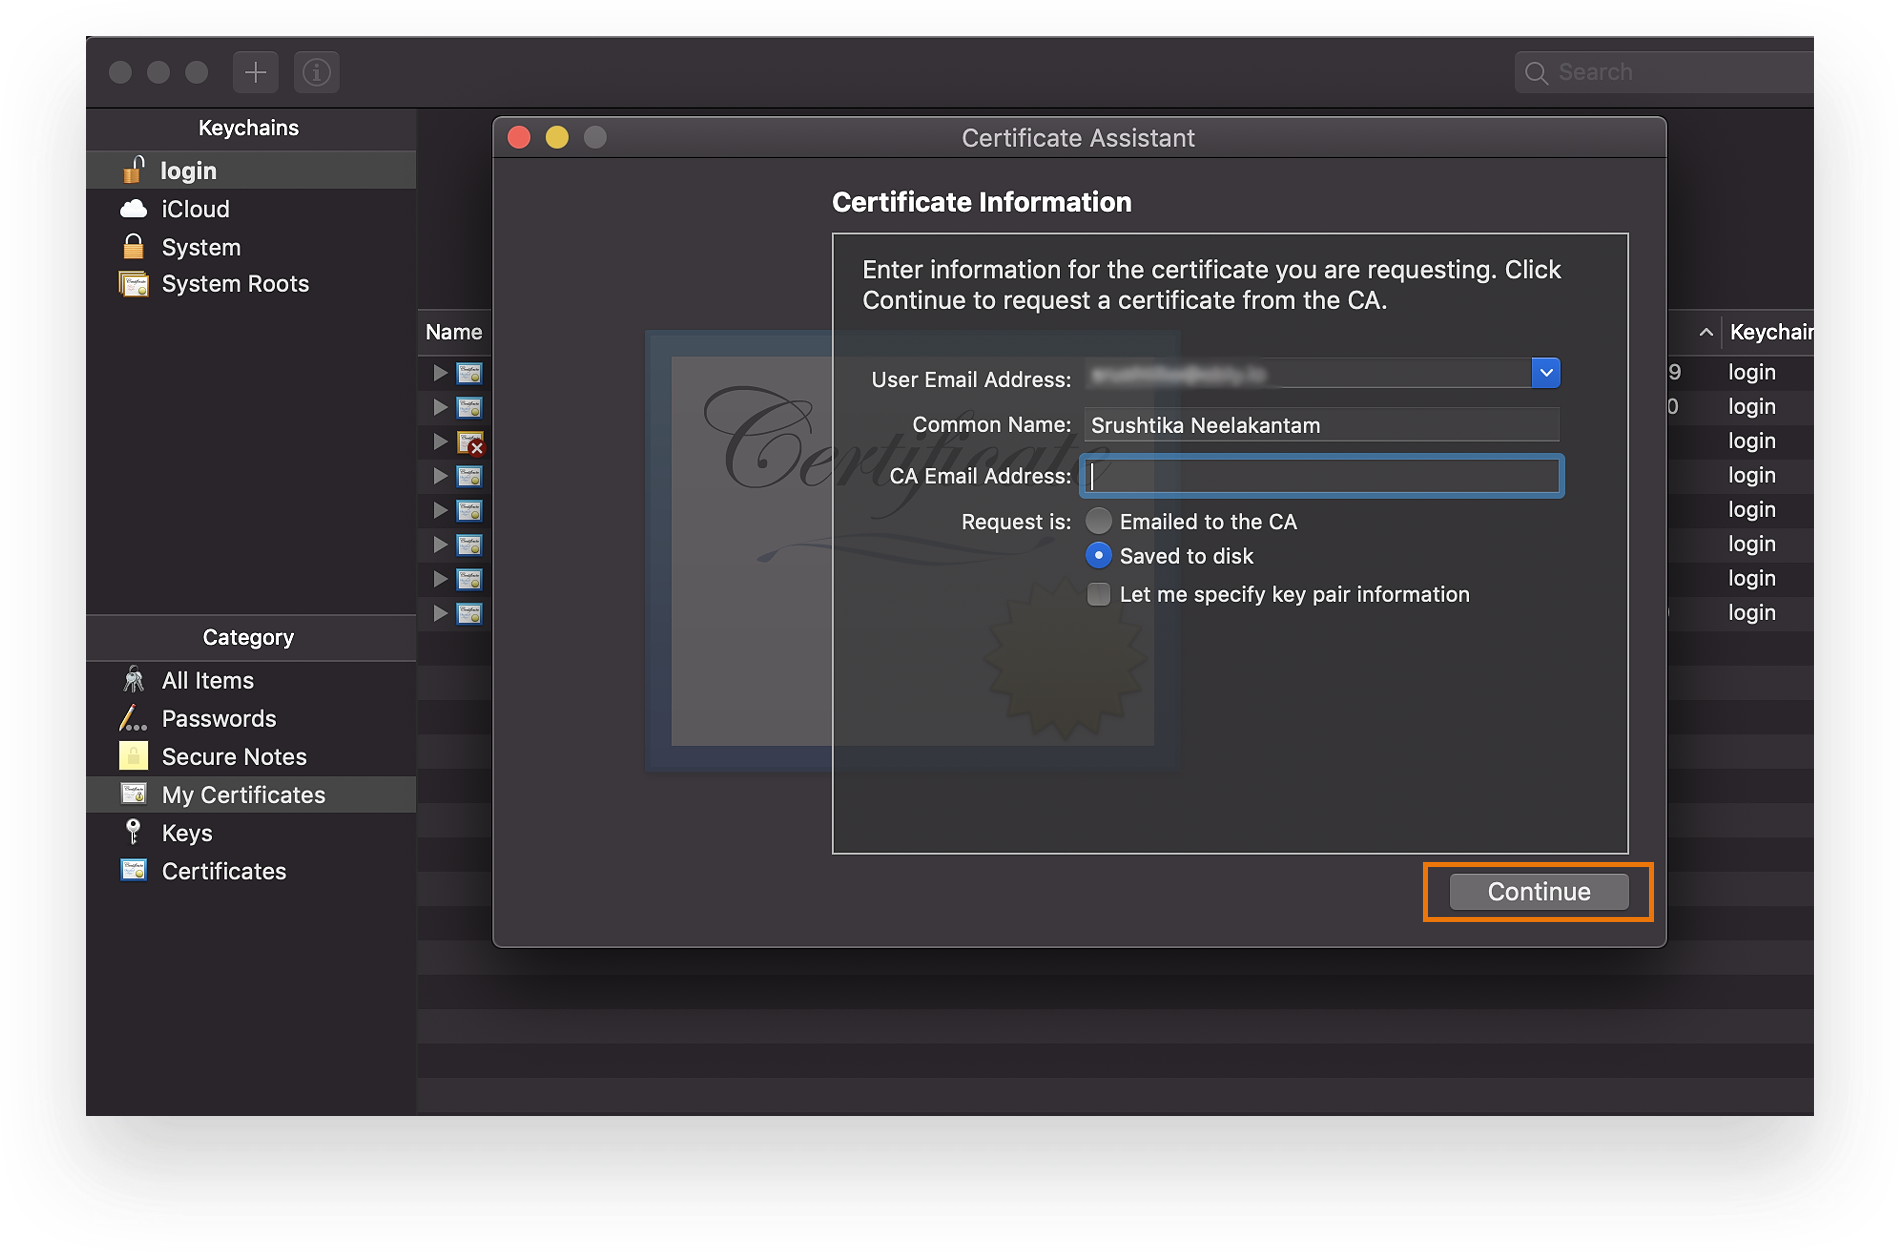
Next, add in the details, select “Saved to disk” and hit “Continue”.
This is the certificate we need in order to configure Push Notifications in the AppID that was previously set up in the Apple Developer account. So let’s go back there and finish the configuration.
Step 1c – Configuring Push Notifications for your Apple AppID
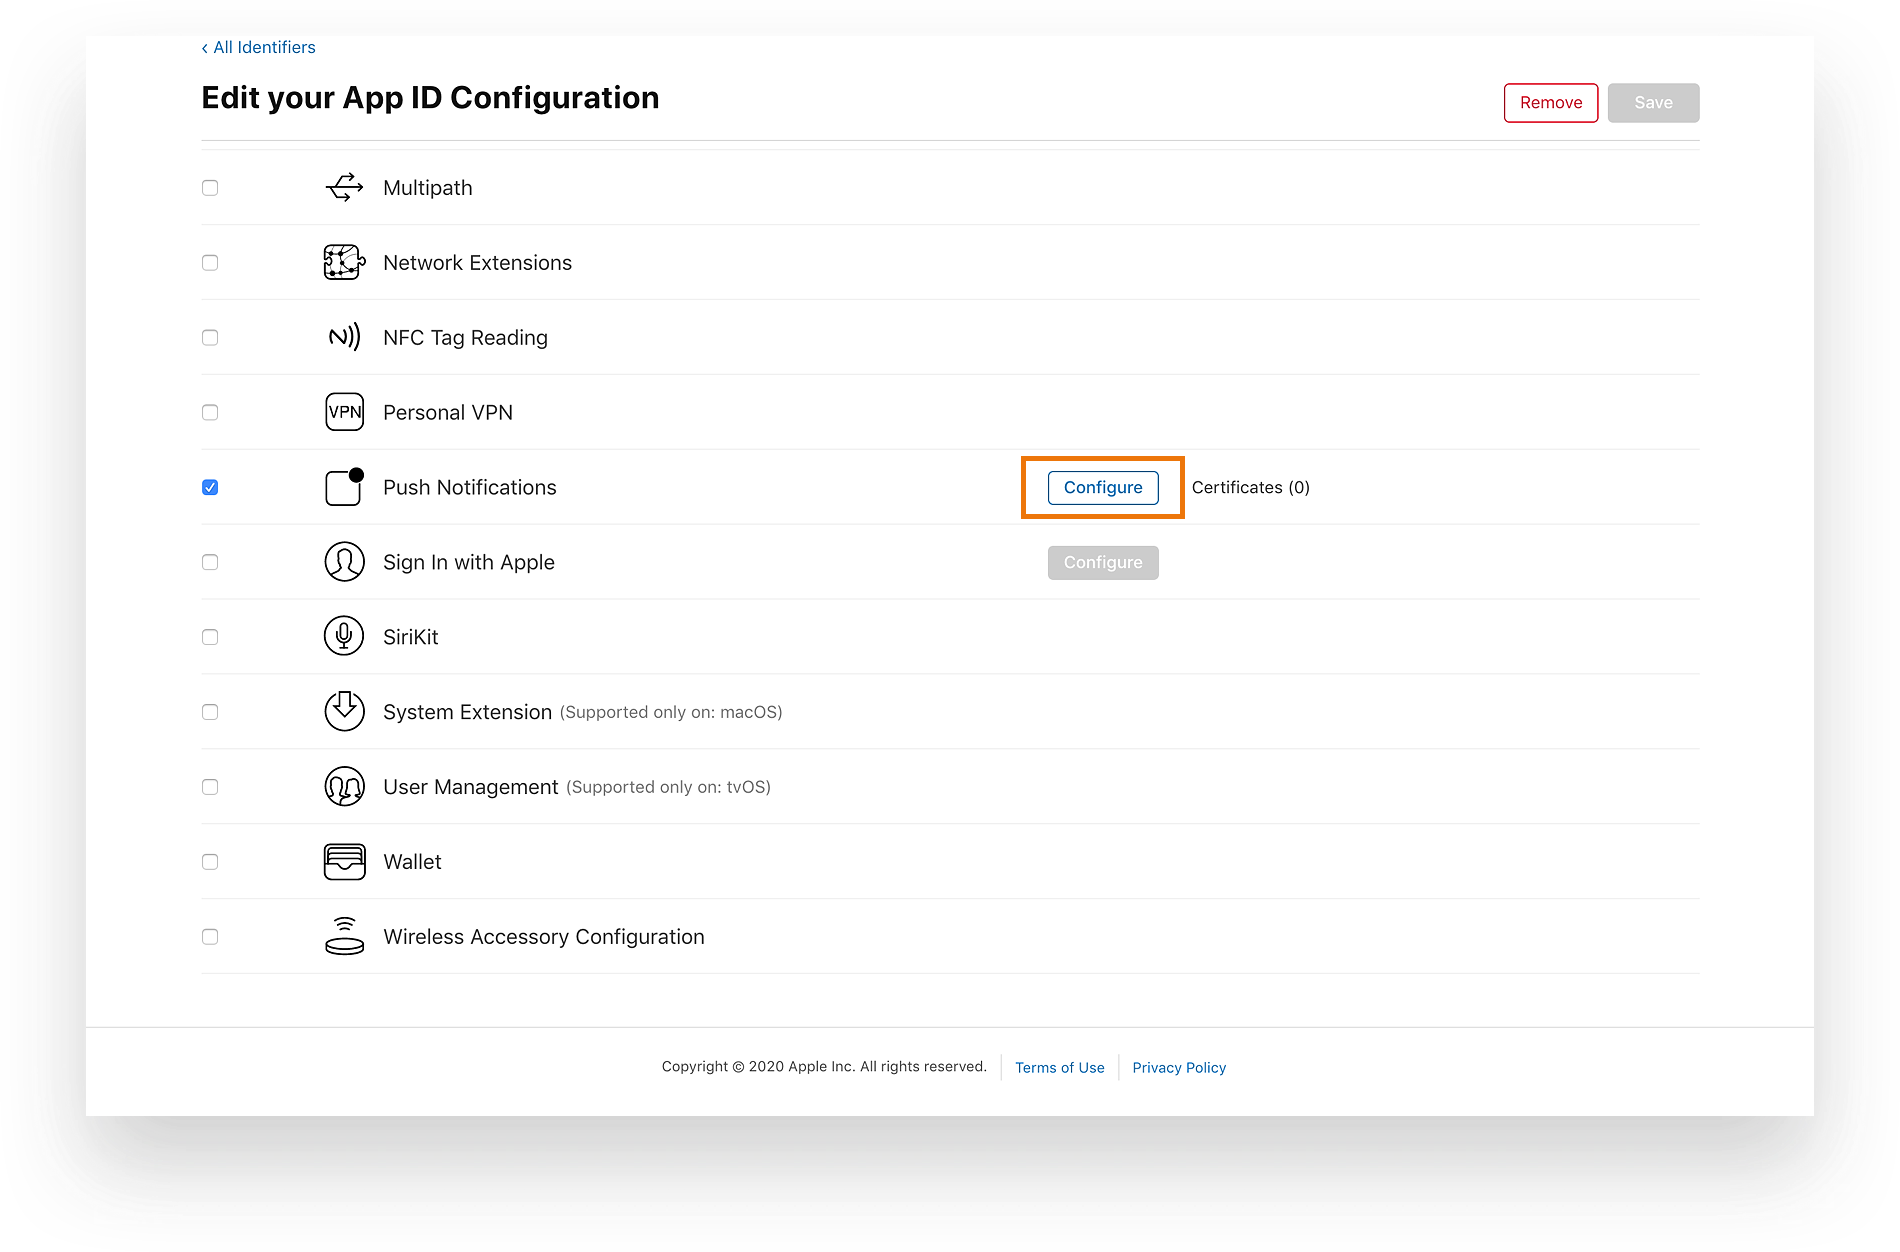
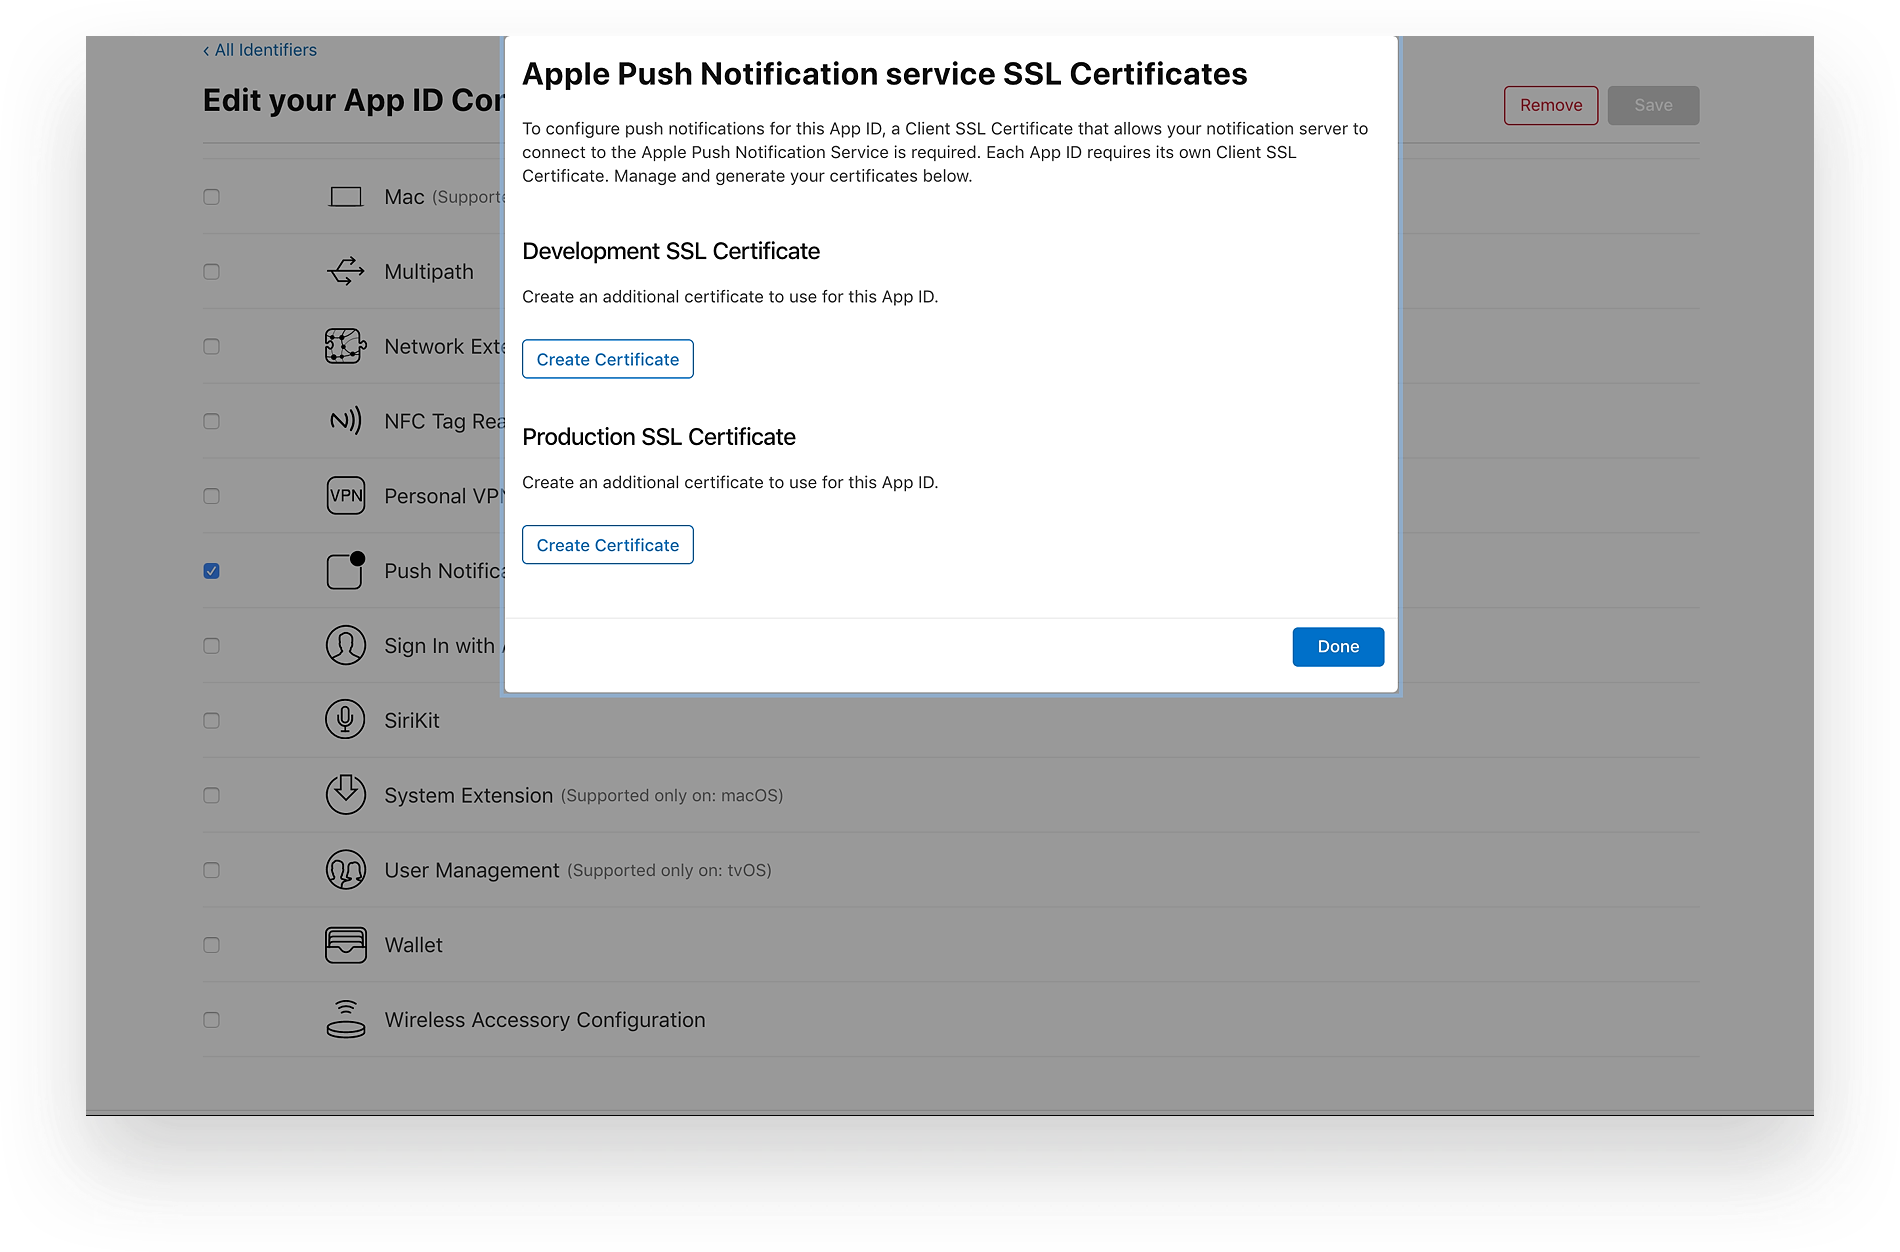
In your Apple developer account, within the AppID for this application, click on “Configure” next to the Push Notifications capability as shown below:
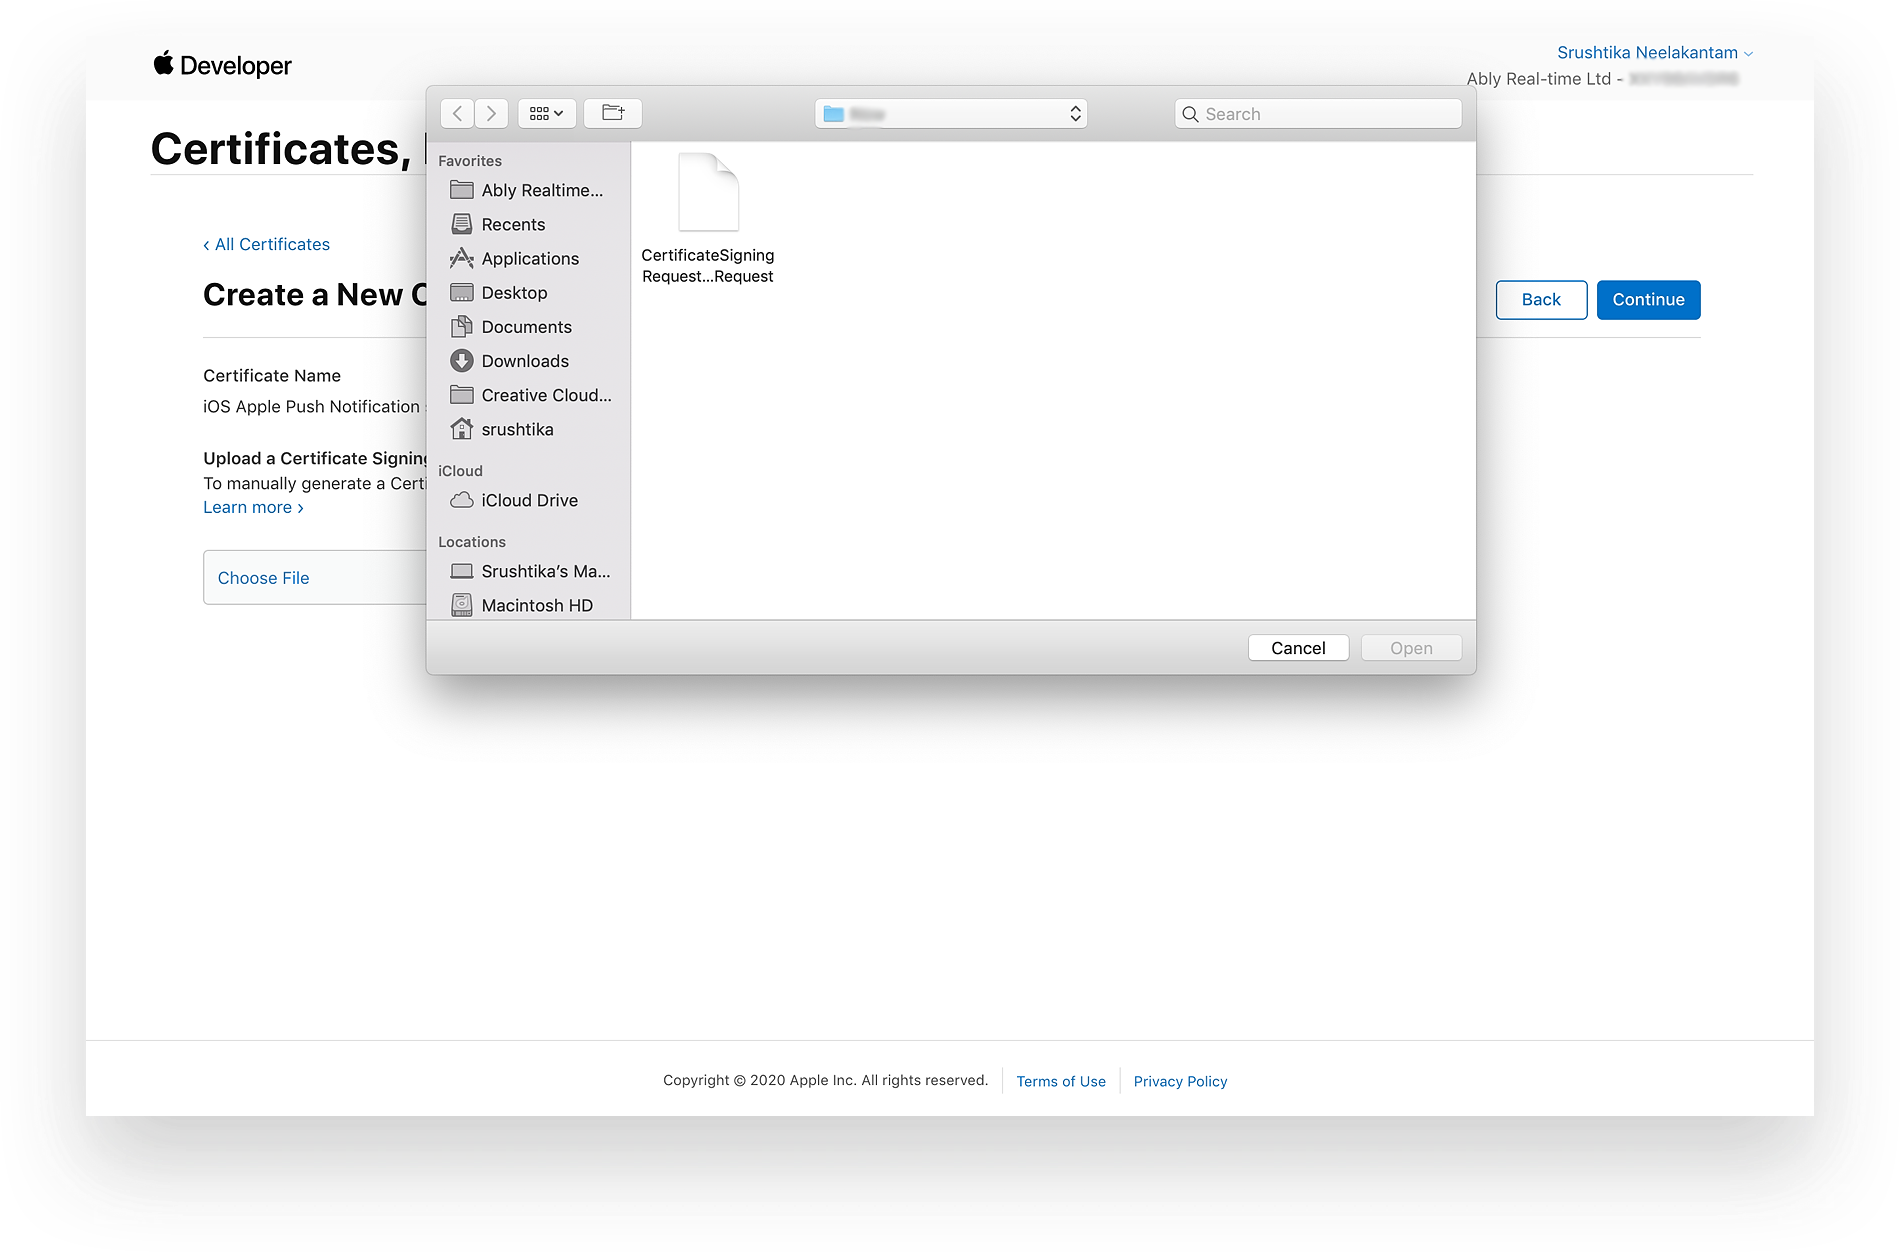
Next, choose the certificate option that suits your application. For this tutorial I’ll use the “Development SSL Certificate” option. Click on “Create Certificate” then choose the certificate file you saved to disk in the previous step.
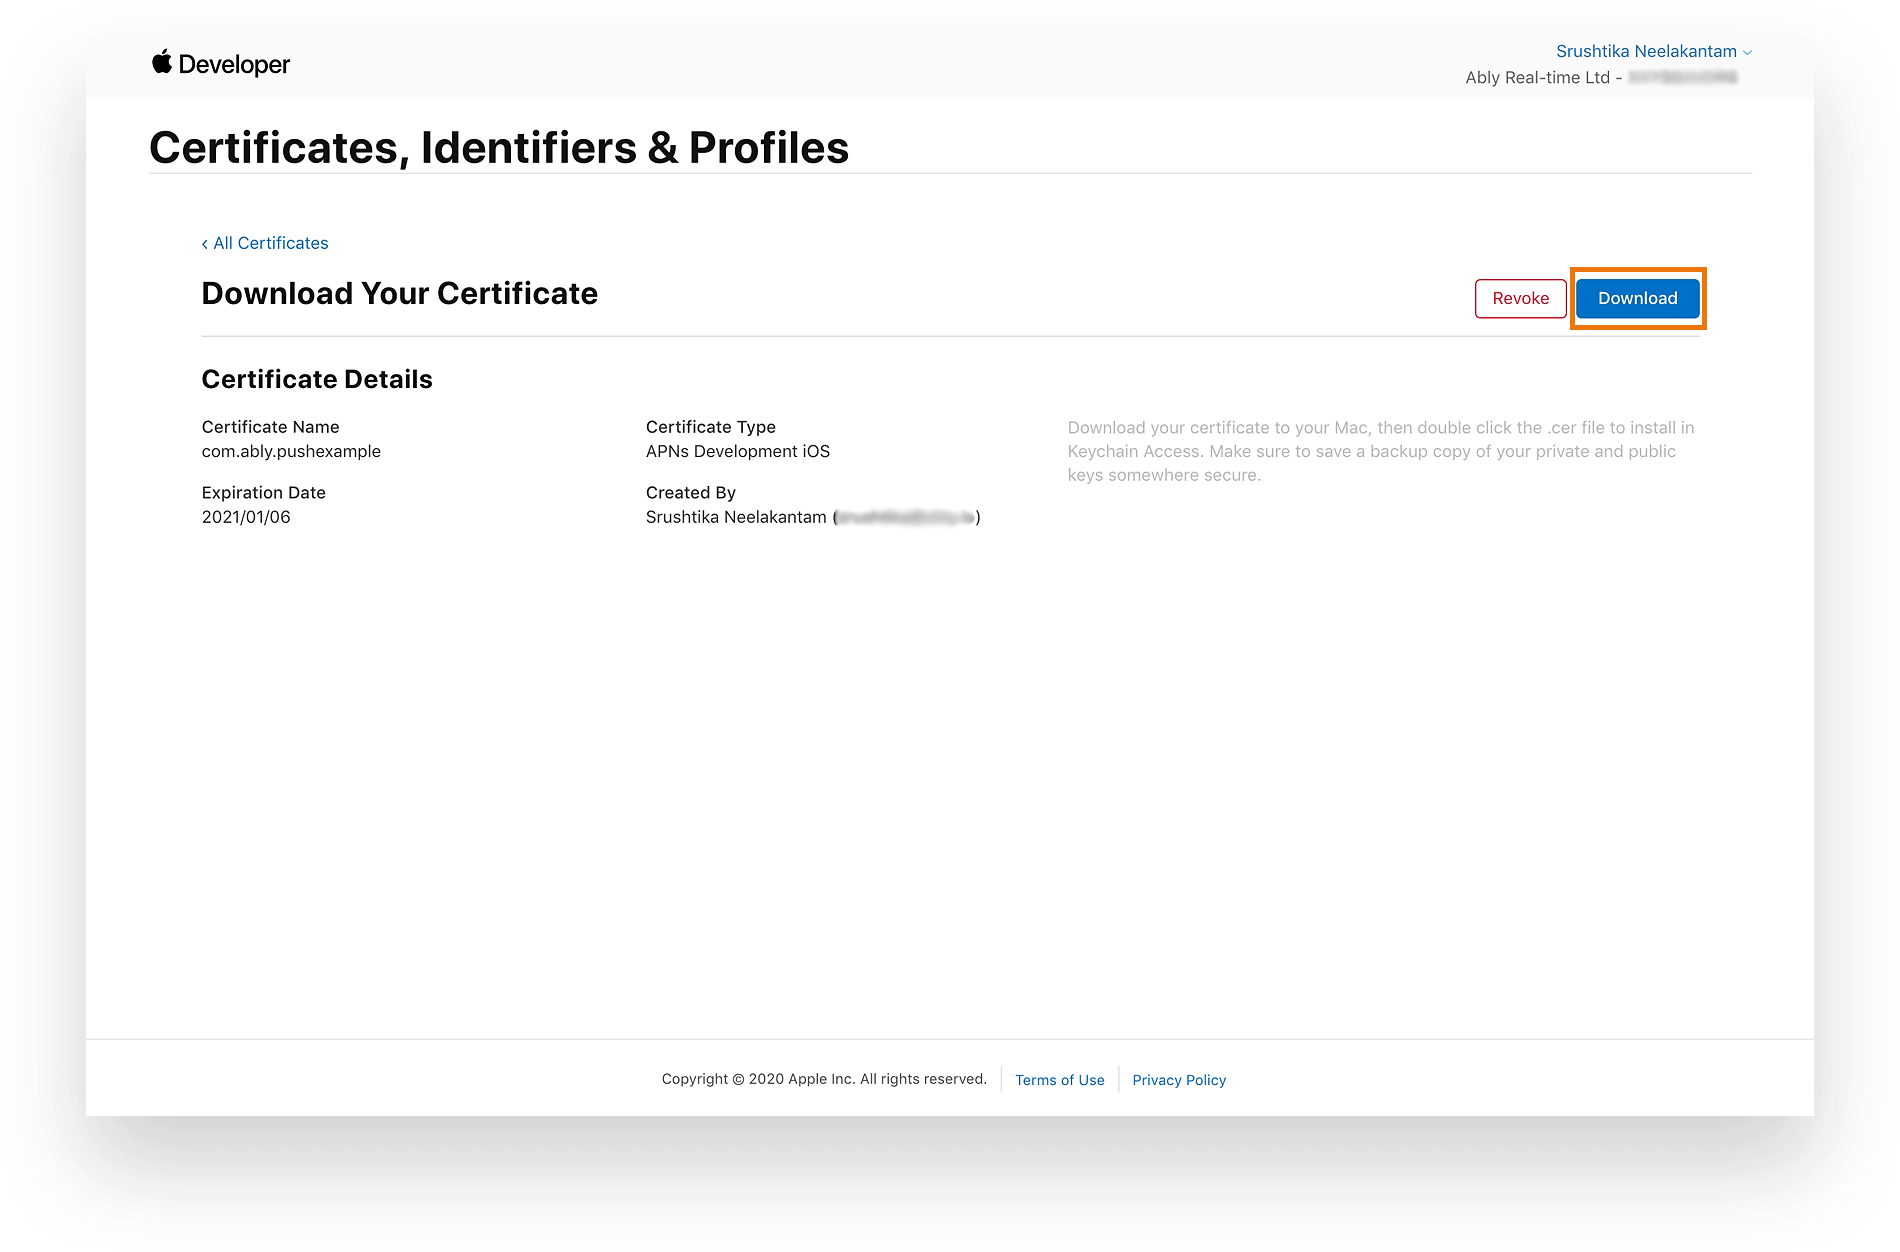
After you’ve uploaded the certificate file, click on “Continue” on the top right of the page. After that’s done, you should see the details of your certificate and an option to download it to your system. Click on the “Download” button and open this file with the Keychain Access application that you previously used.
Step 1d – Exporting your certificate in the P12 format
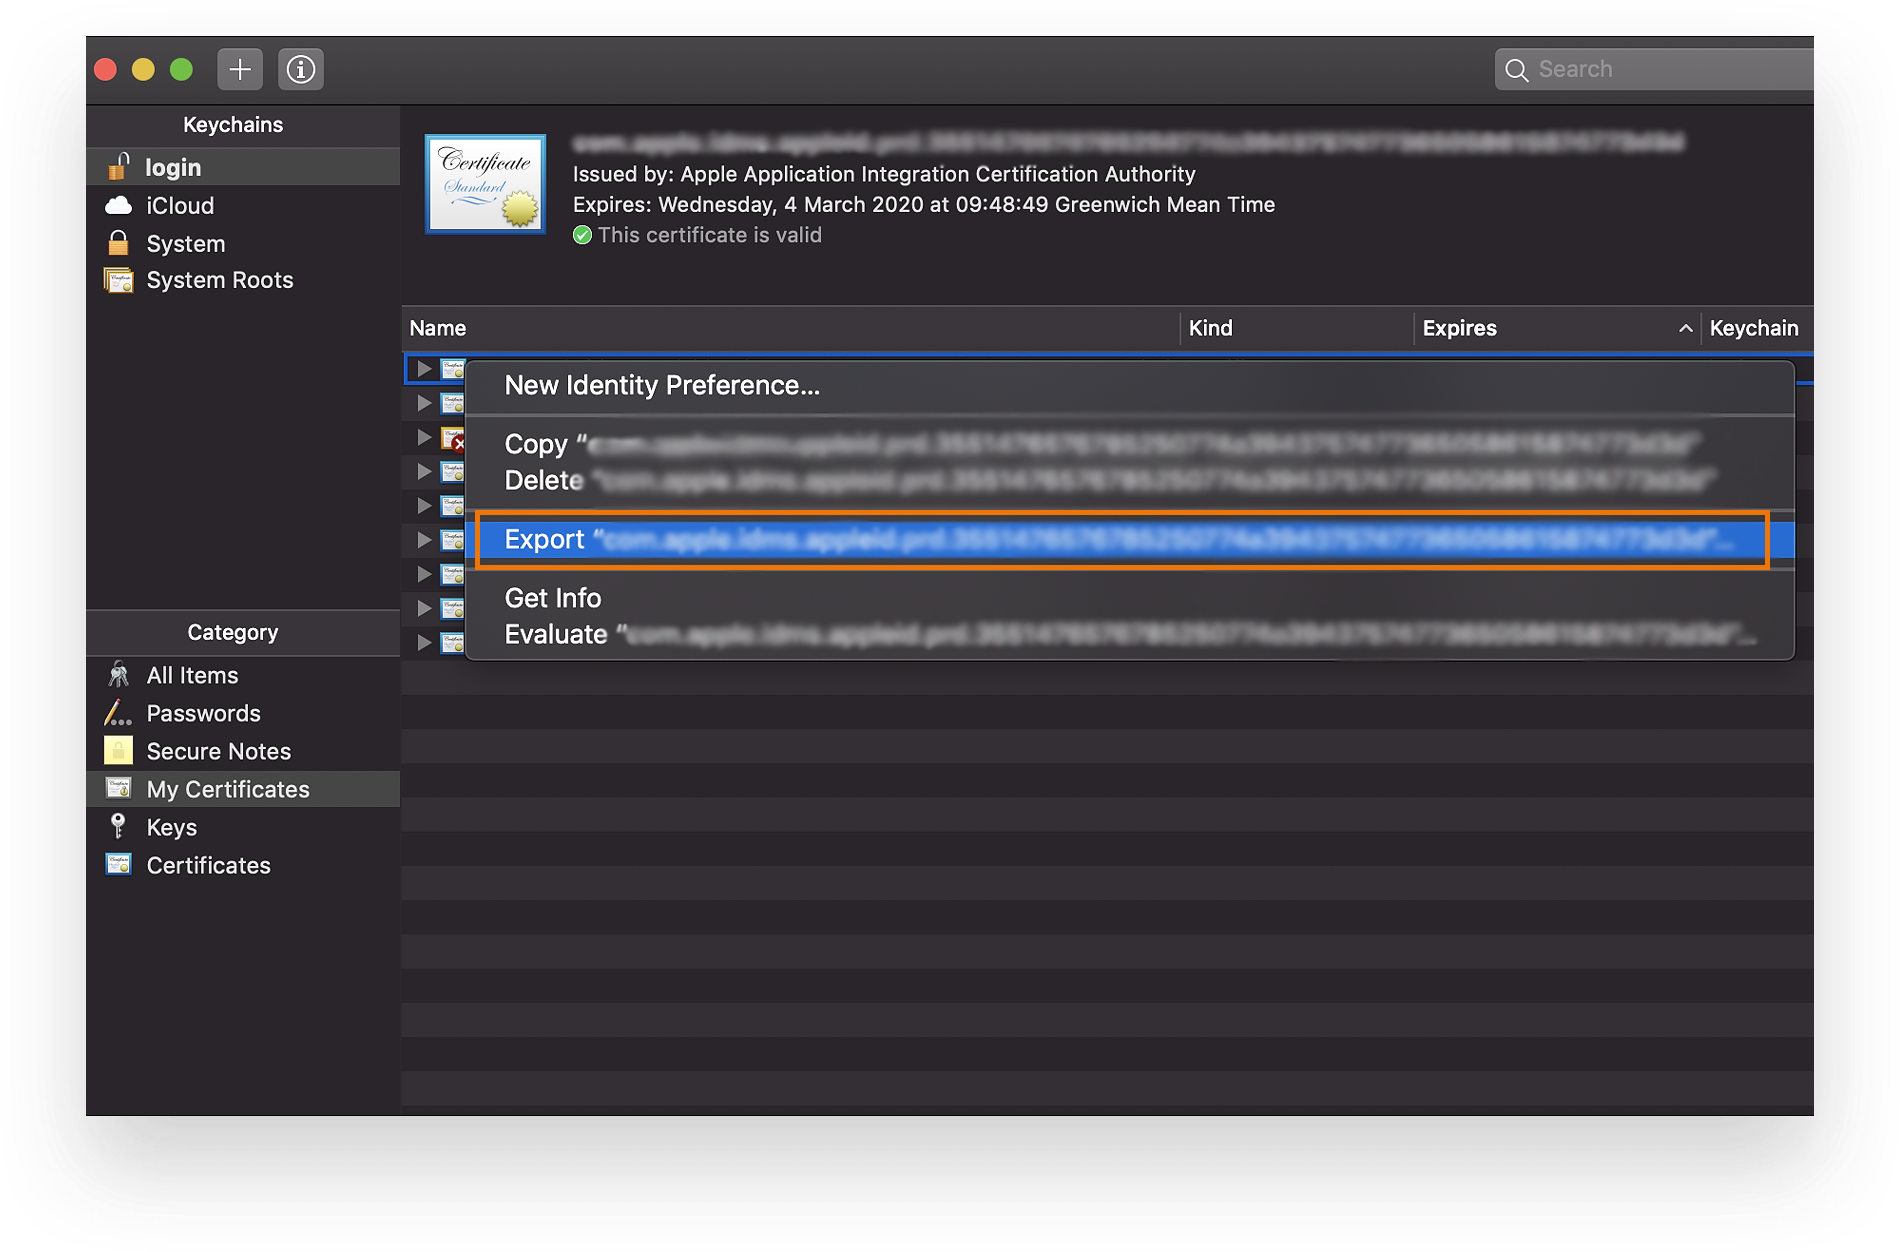
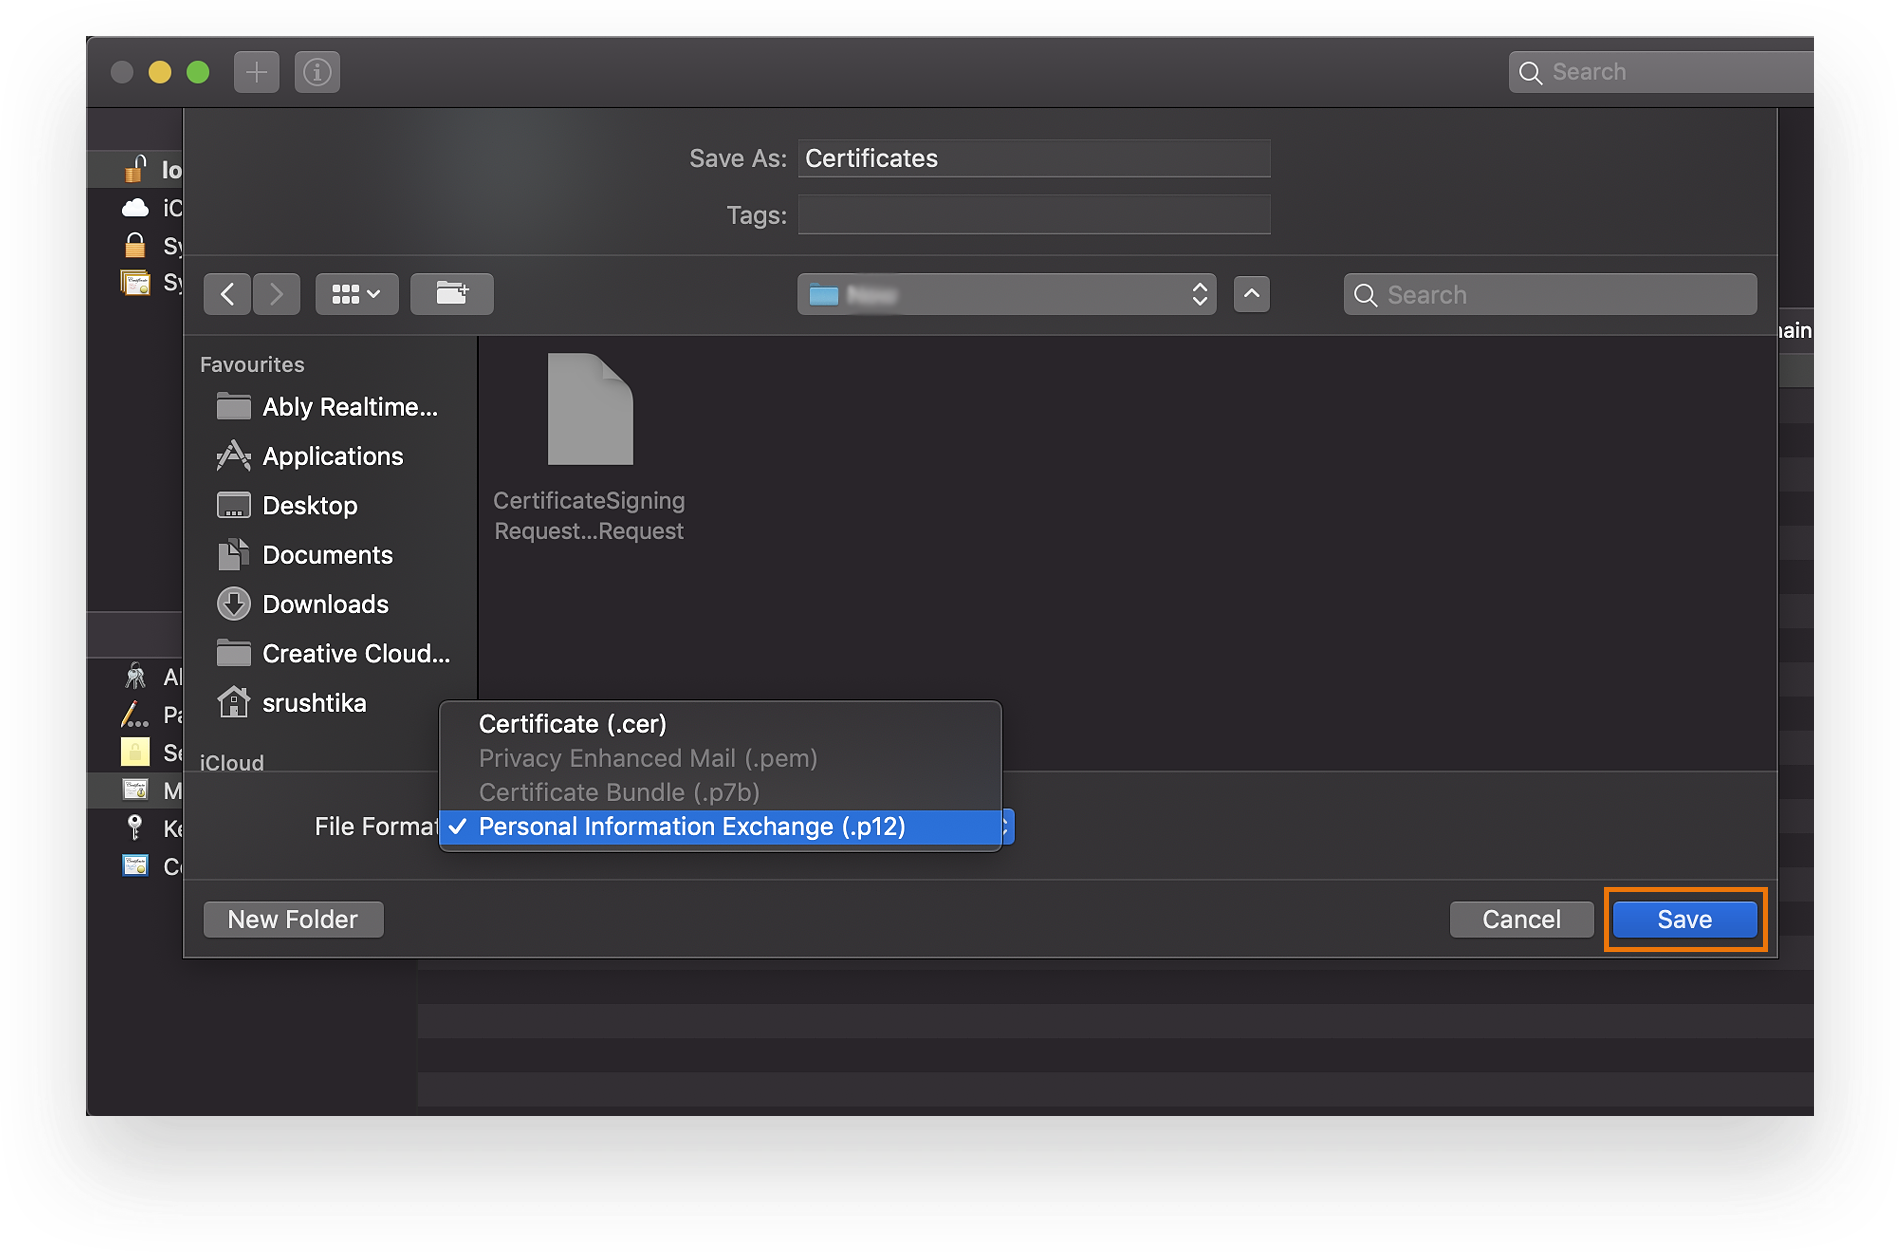
In this step, we’ll use the previously downloaded certificate and export it in the P12 format (because that is the format expected by Ably). After you’ve opened the certificate in the Keychain Access application, right-click on it and choose “Export …” as shown below:
Make sure to choose “Personal Information Exchange (.p12)” as the file format and save it. You’ll be prompted to create a password, this will be the password you’ll need to enter when adding this P12 certificate to your Ably app as well, so make sure to remember it. You may also be required to enter your system password.
Step 2 – Set up a free account with Ably
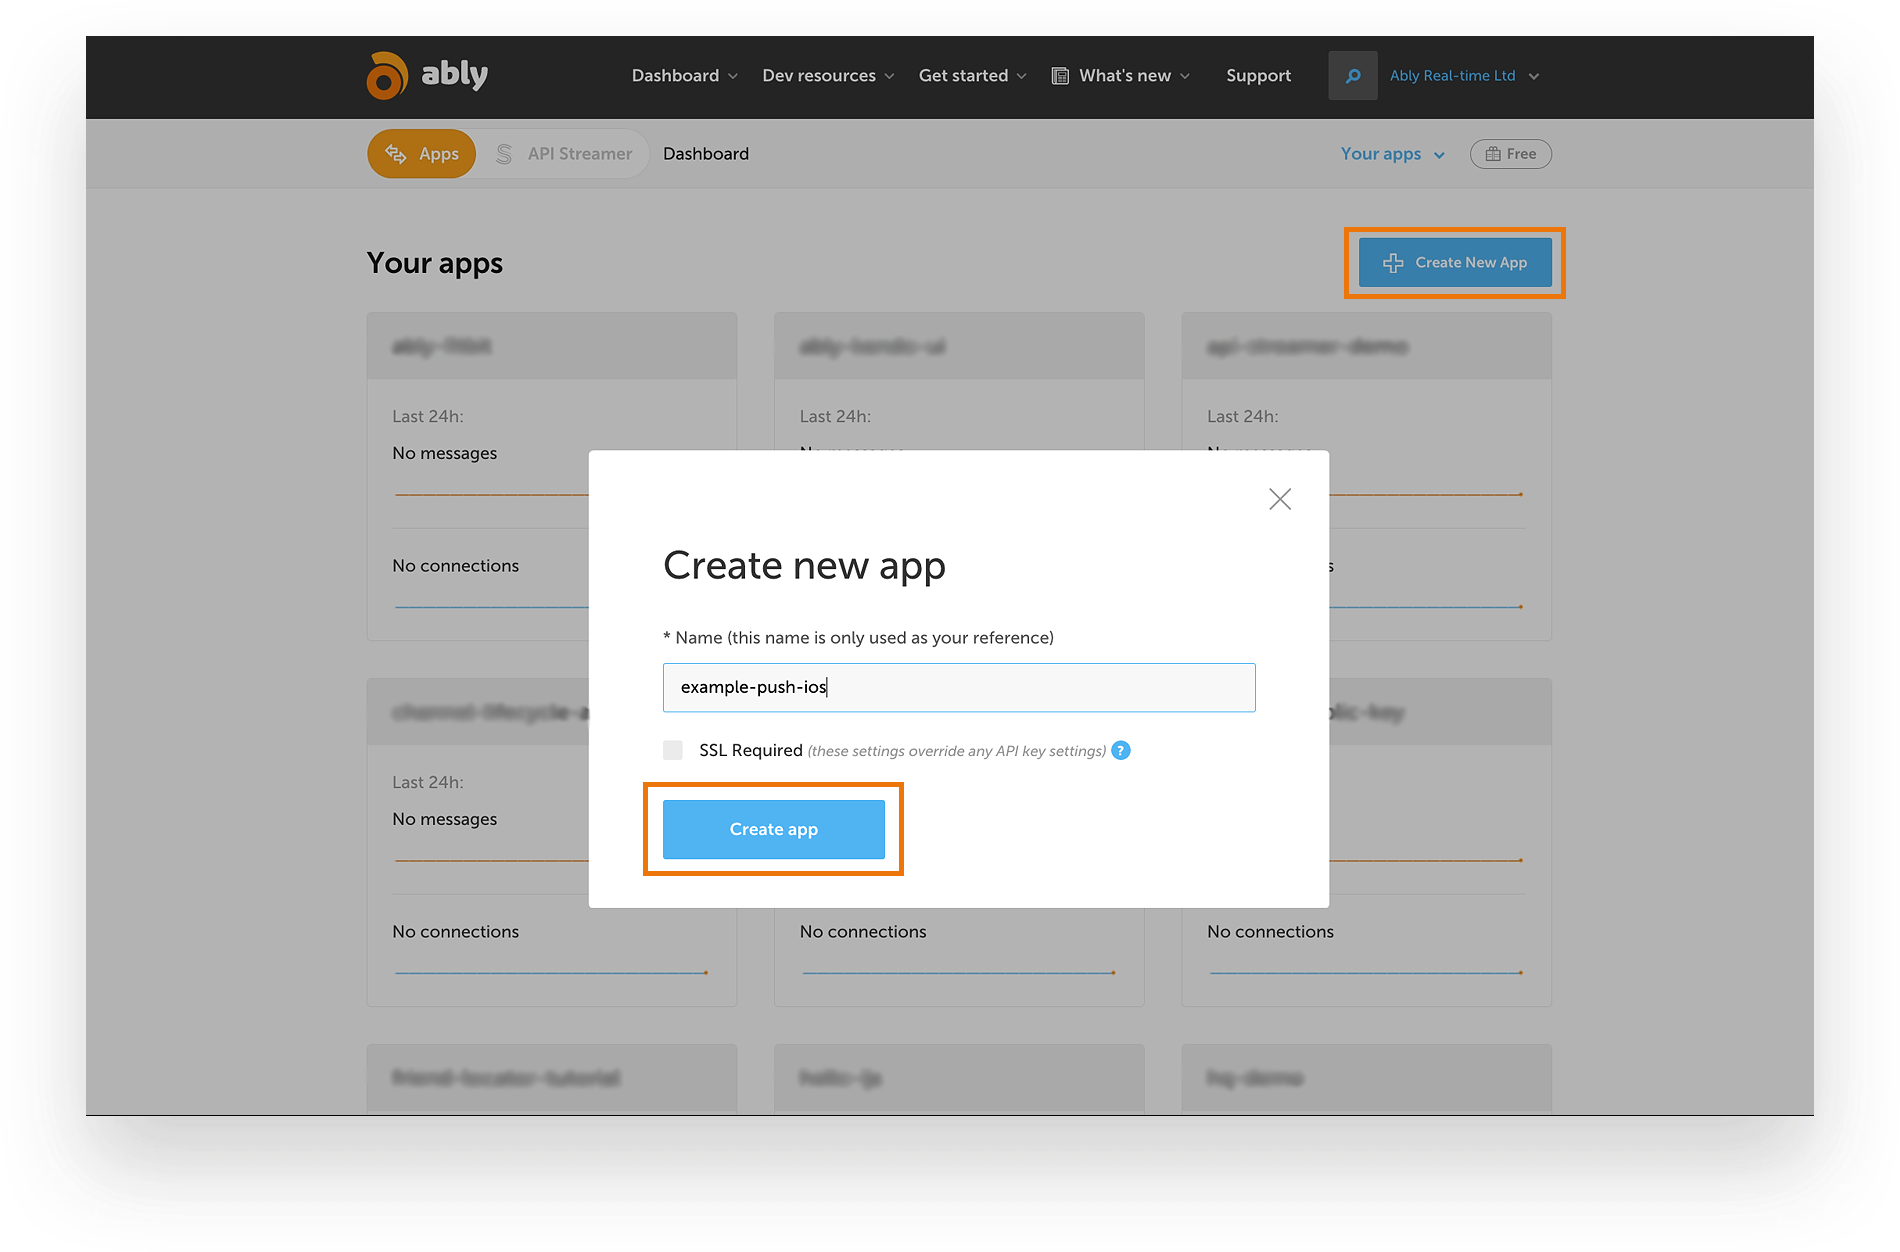
Now that we have the P12 certificate ready to be used, let’s get set up with an Ably account. If you are not already signed up, you should sign up now for a free Ably account. Once you have an Ably account, log into your Ably account, go to your Apps Dashboard and choose an existing app or create a new one as shown below:
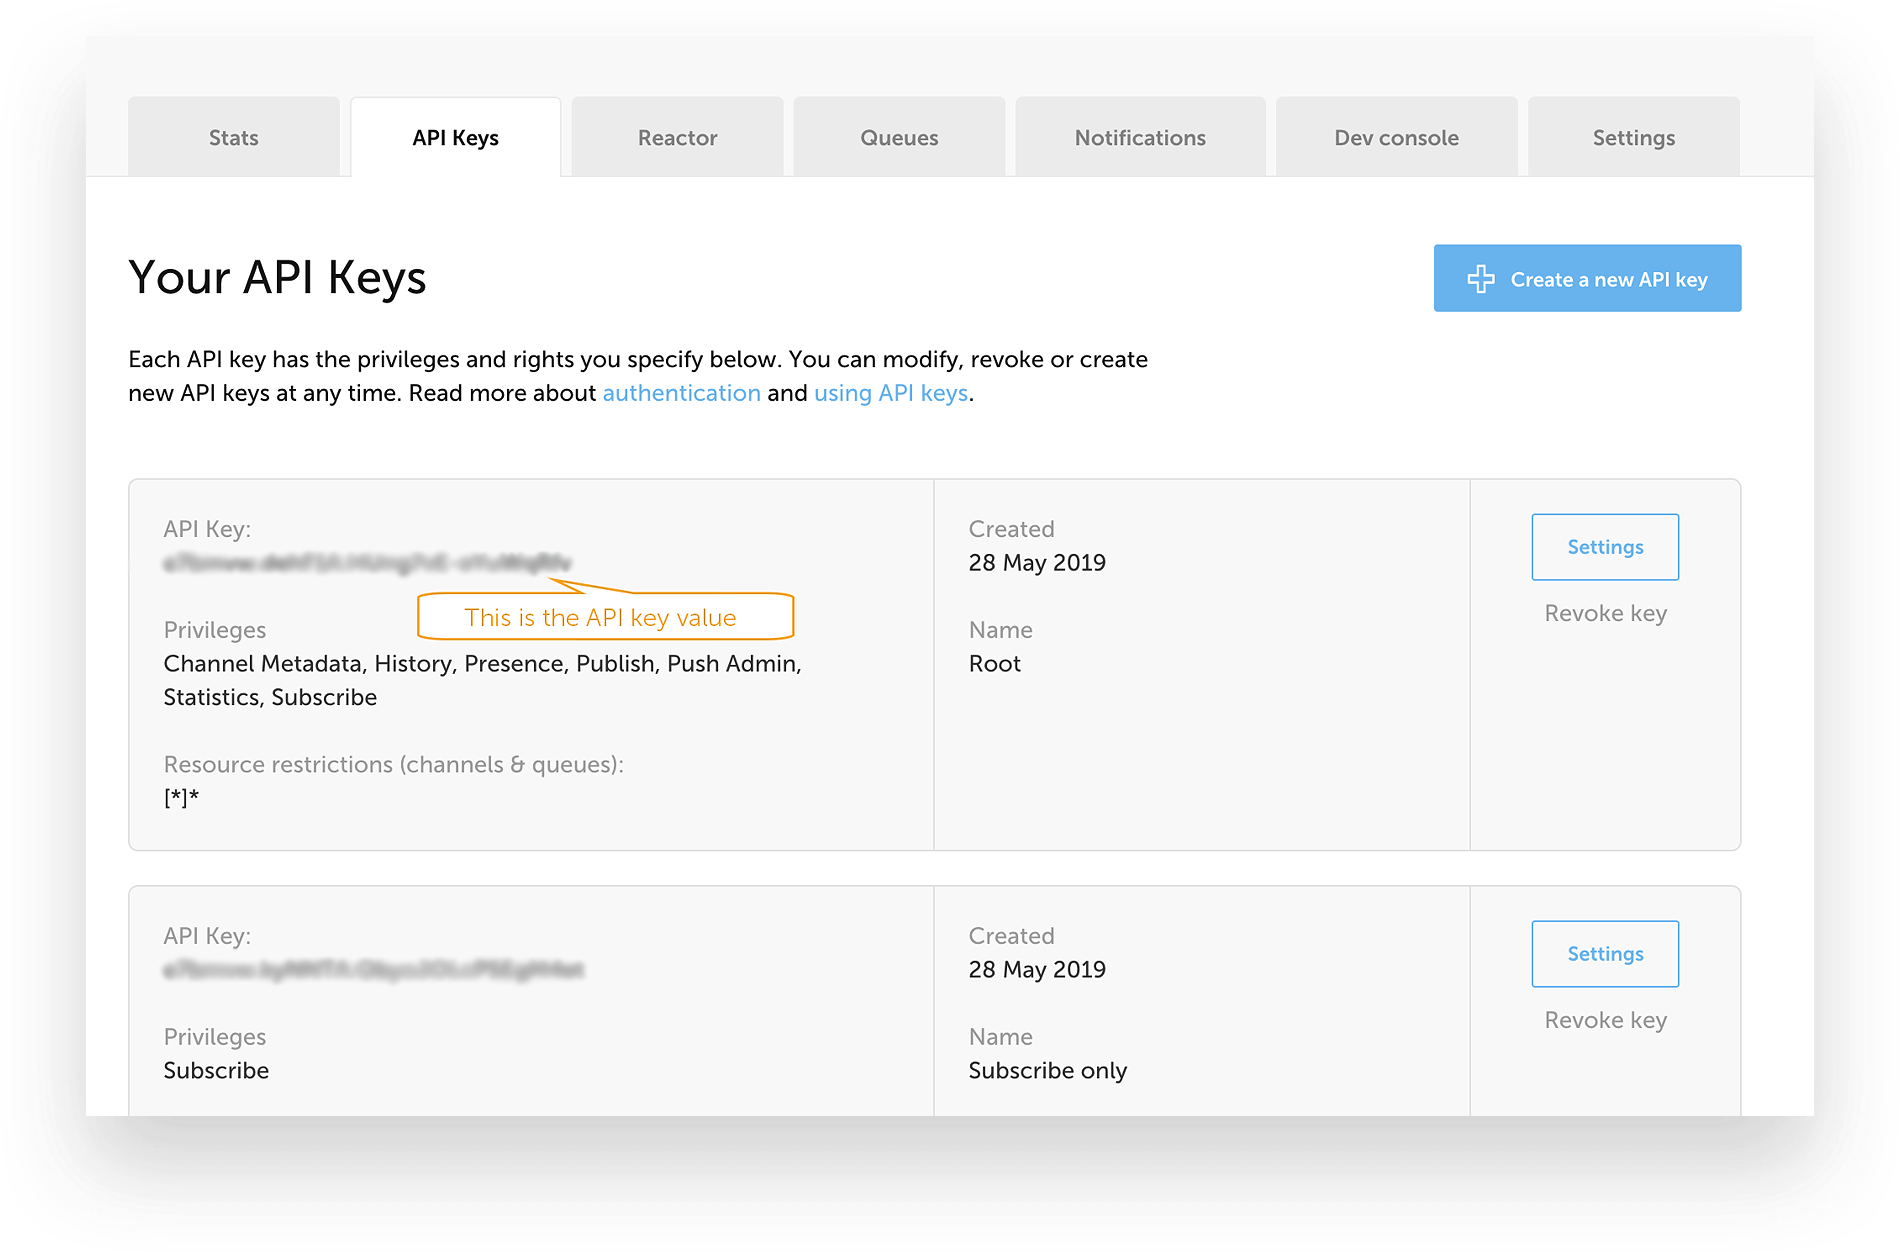
Click on the “API Keys” tab and copy the secret “API Key” value from your Root key and store it so that you can use it later in this tutorial
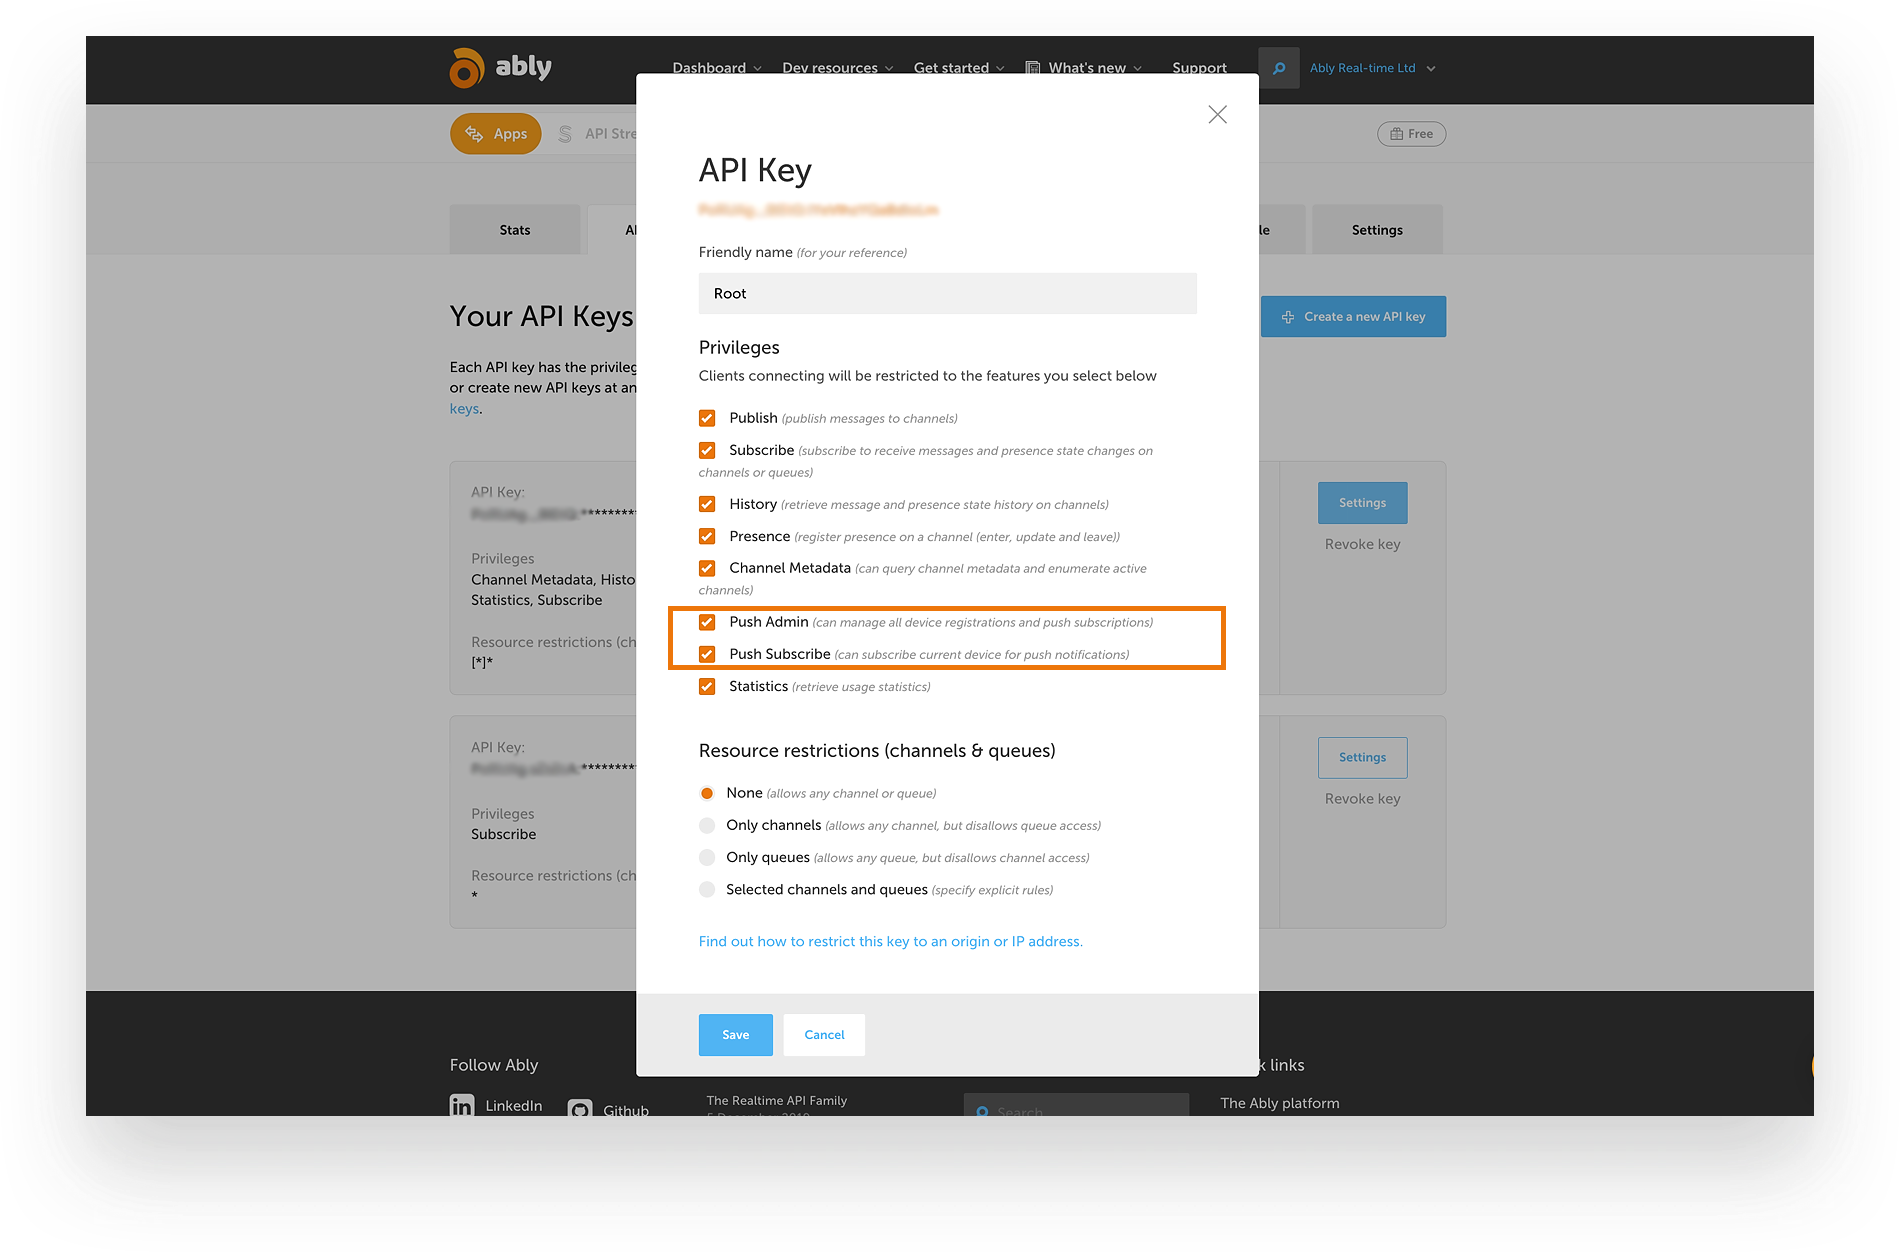
The Push Notifications feature in Ably comes with two different levels of client permissions or capabilities:
-
push-subscribe: A client with this permission is a push target device, and it can manage the registration and subscription for itself. However, it won’t be able to manage push registrations or channel subscriptions for any other device.
-
push-admin: A client with this permission has full admin capabilities and can manage registrations and subscriptions for all devices.
Under your API Key settings on your Ably app dashboard, you can enable or disable these permissions as needed.
Step 3 – Adding the P12 file to your Ably app
In this step, we’ll add the certificate we previously exported in the P12 format, to our Ably app.
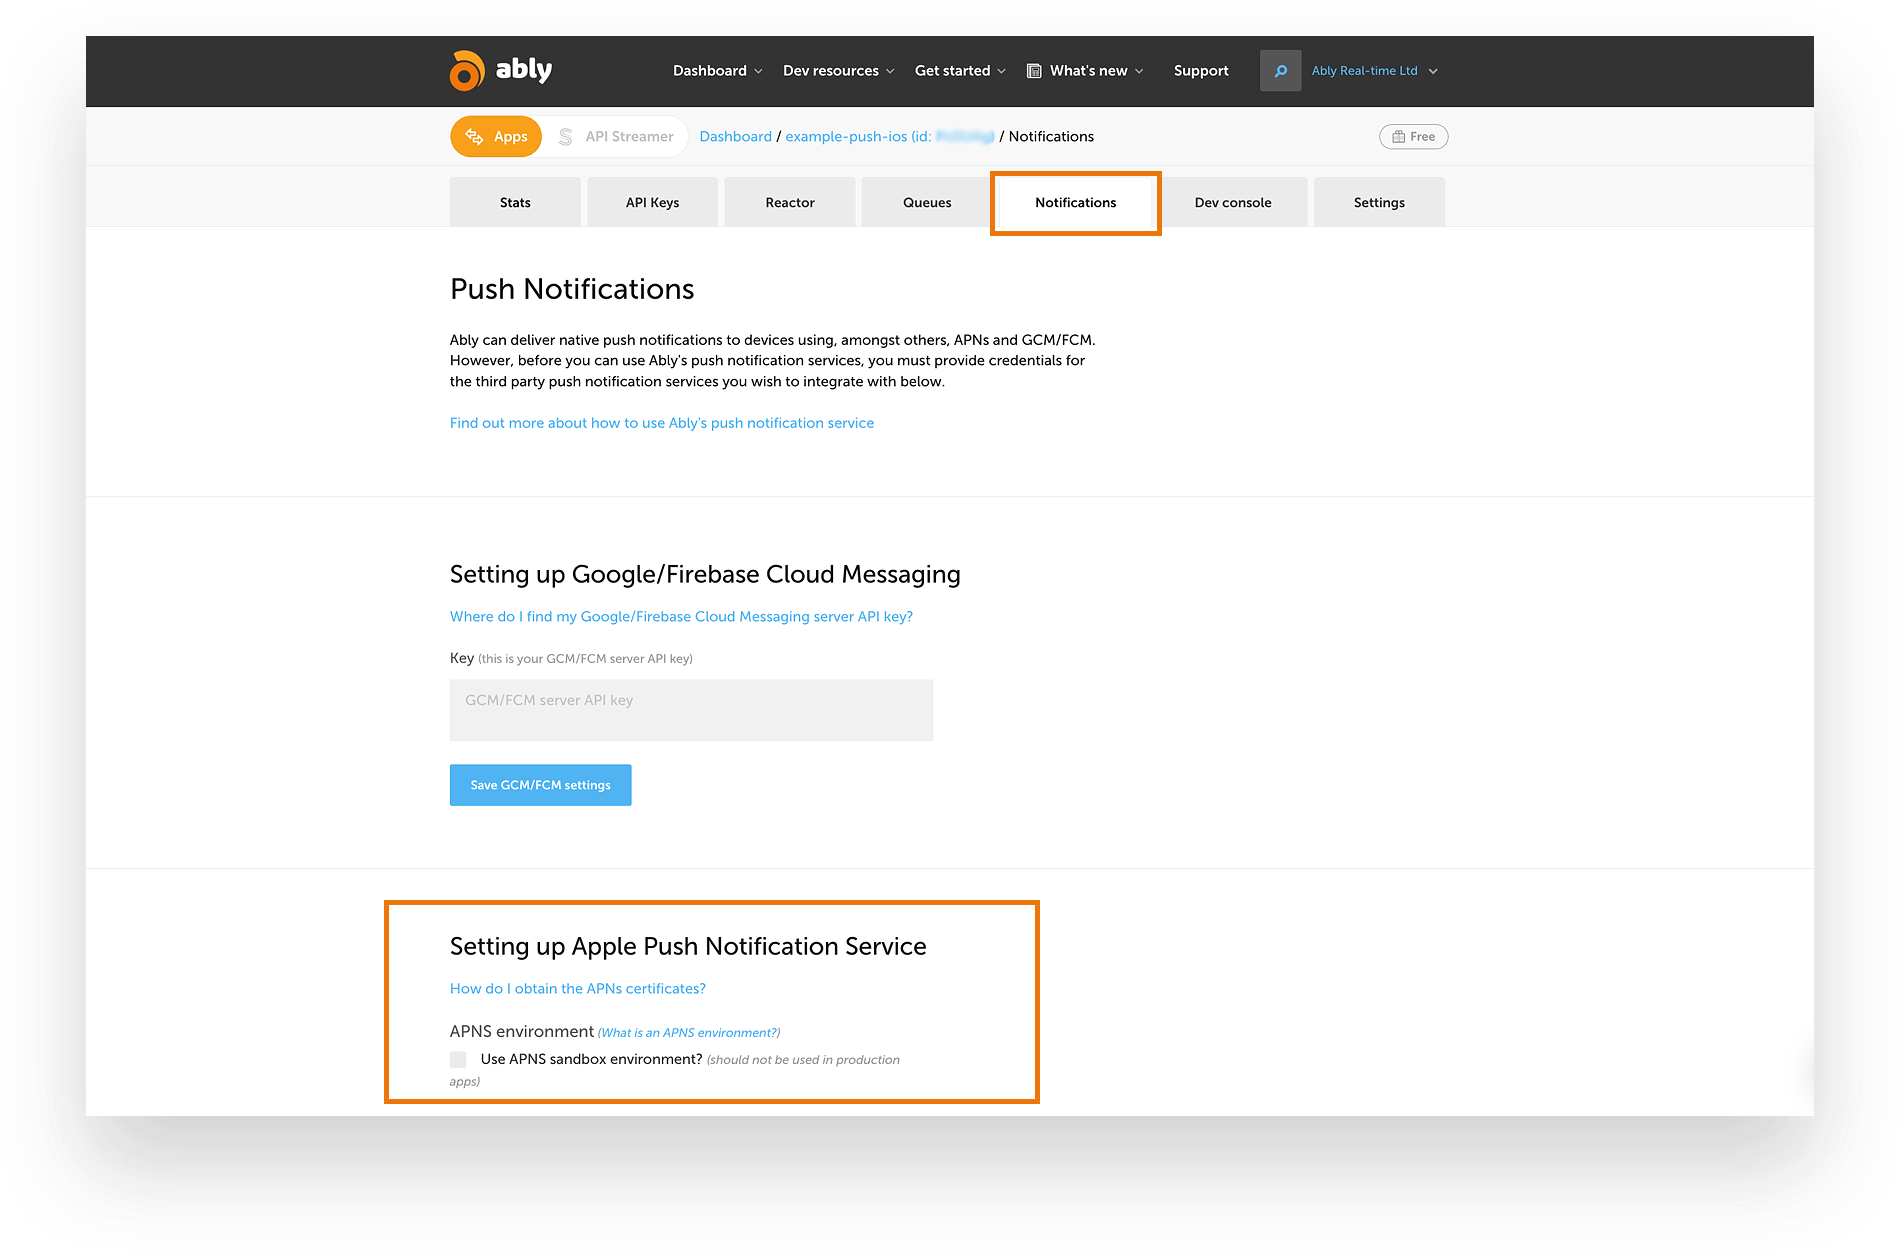
In the Apps dashboard of your Ably app, go to the “Notifications” tab and scroll down to “Setting Apple Push Notifications Service” section, as shown below:
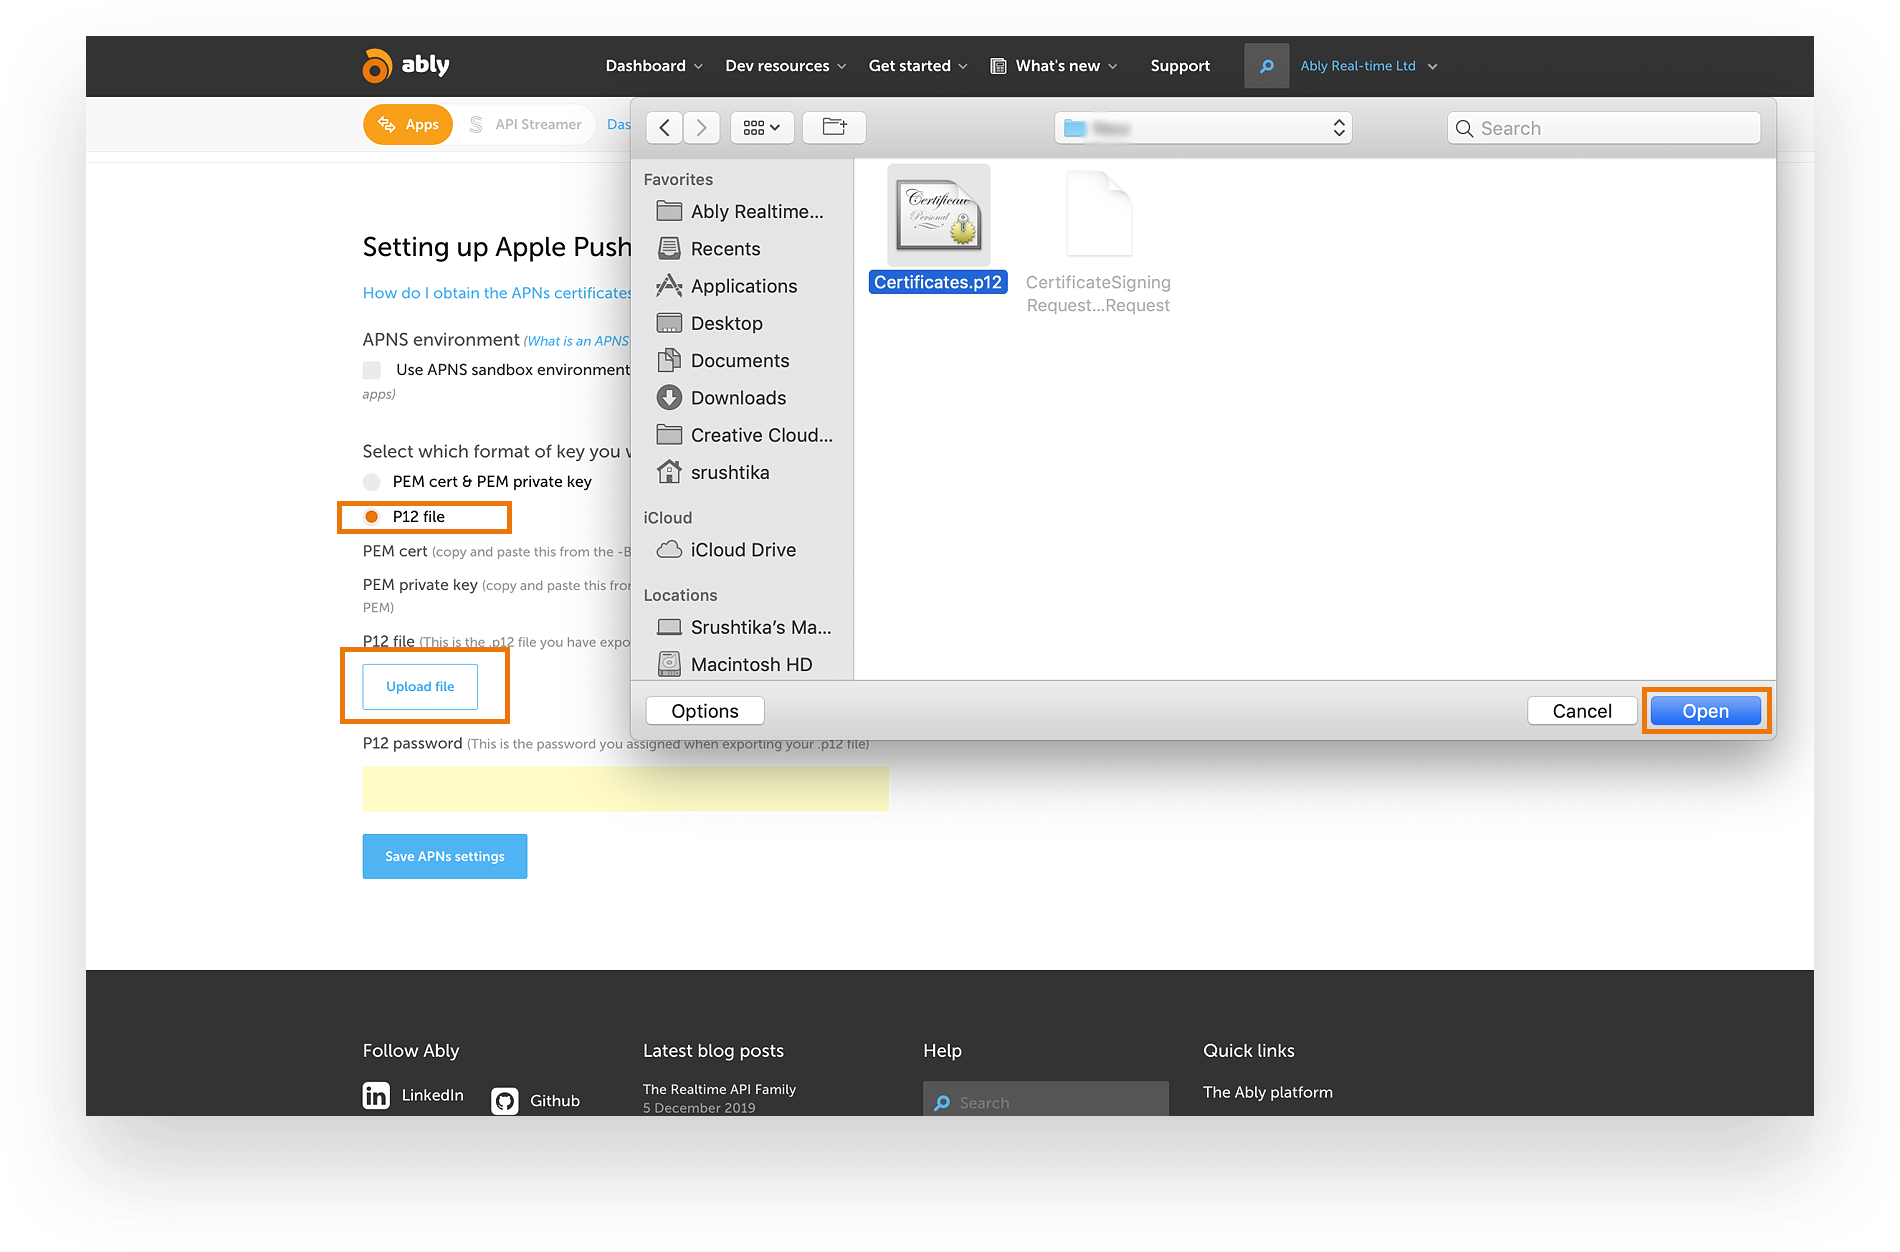
Next, choose the “P12 file” option and click on “Upload file”, choose the file from your local system and click “Open”. Also, add in the password that you created previously in the “P12 password” field and hit the “Save APNs settings” button.
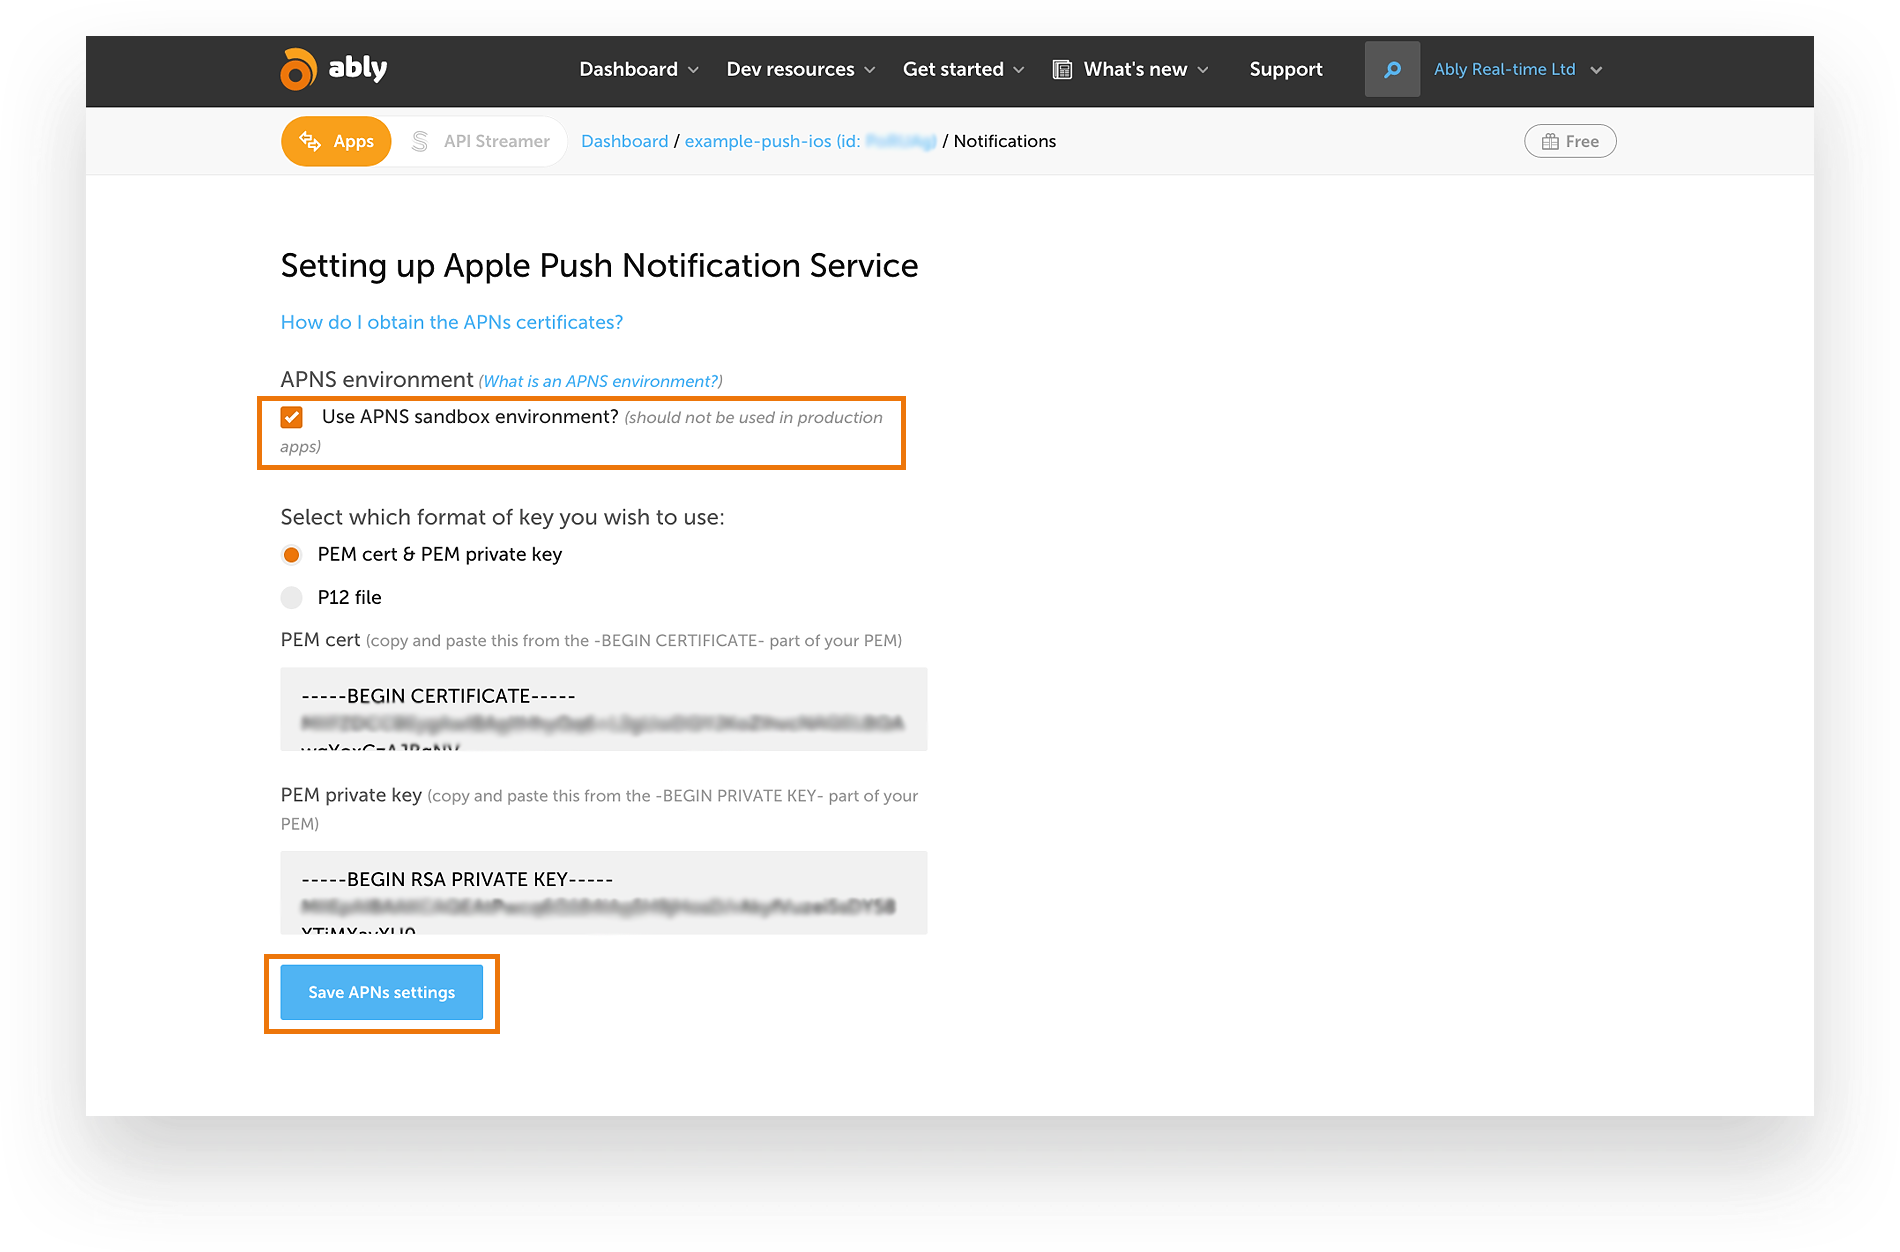
You should now see that your credentials are automatically added into the fields in that section, as shown below. If you can’t see them, try refreshing the page.
Please note that if you are using the certificates in a Sandbox environment on your APNS account, make sure to check the “Use APNS sandbox environment” option.
Step 4 – Enabling the Push Notifications rule for your channels
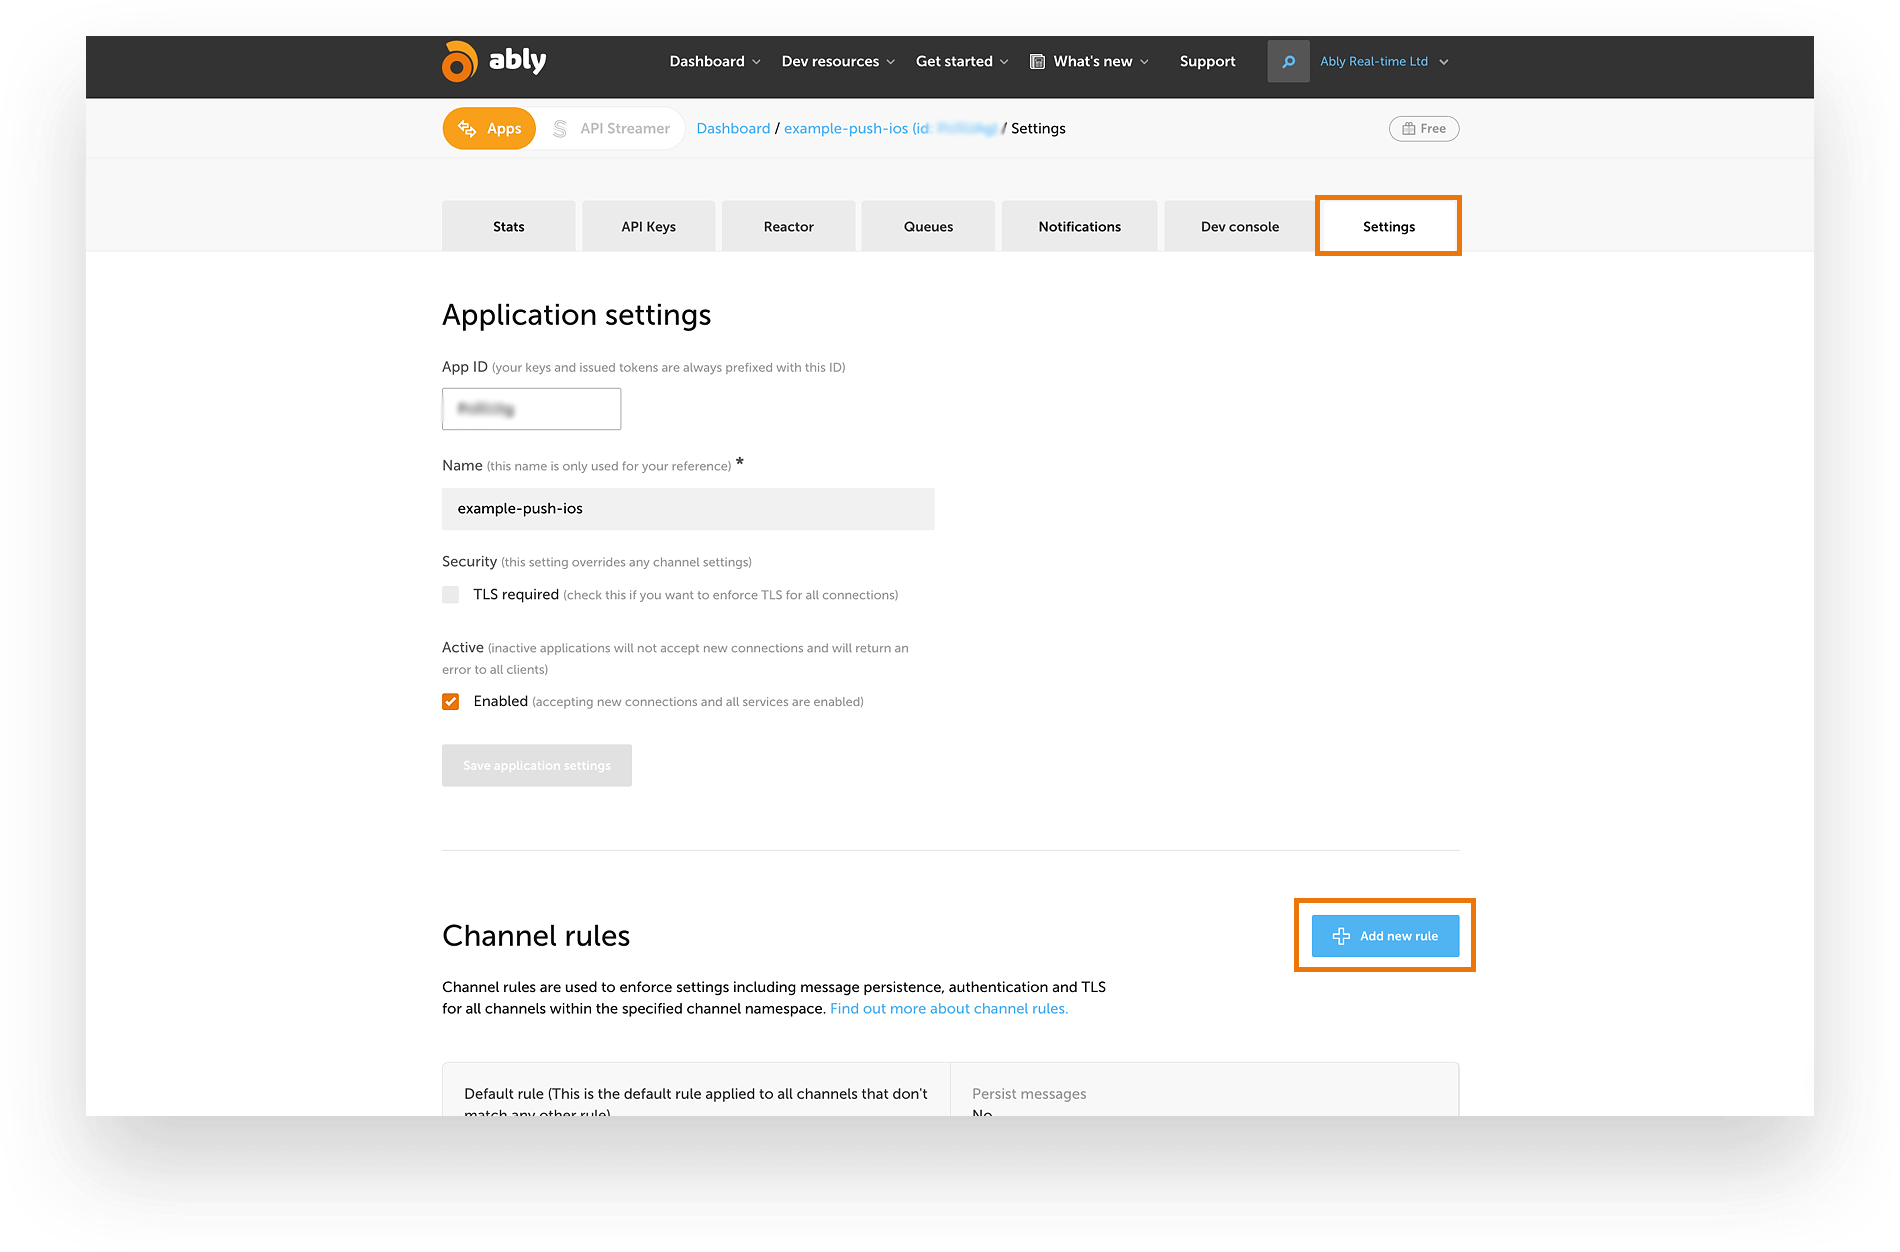
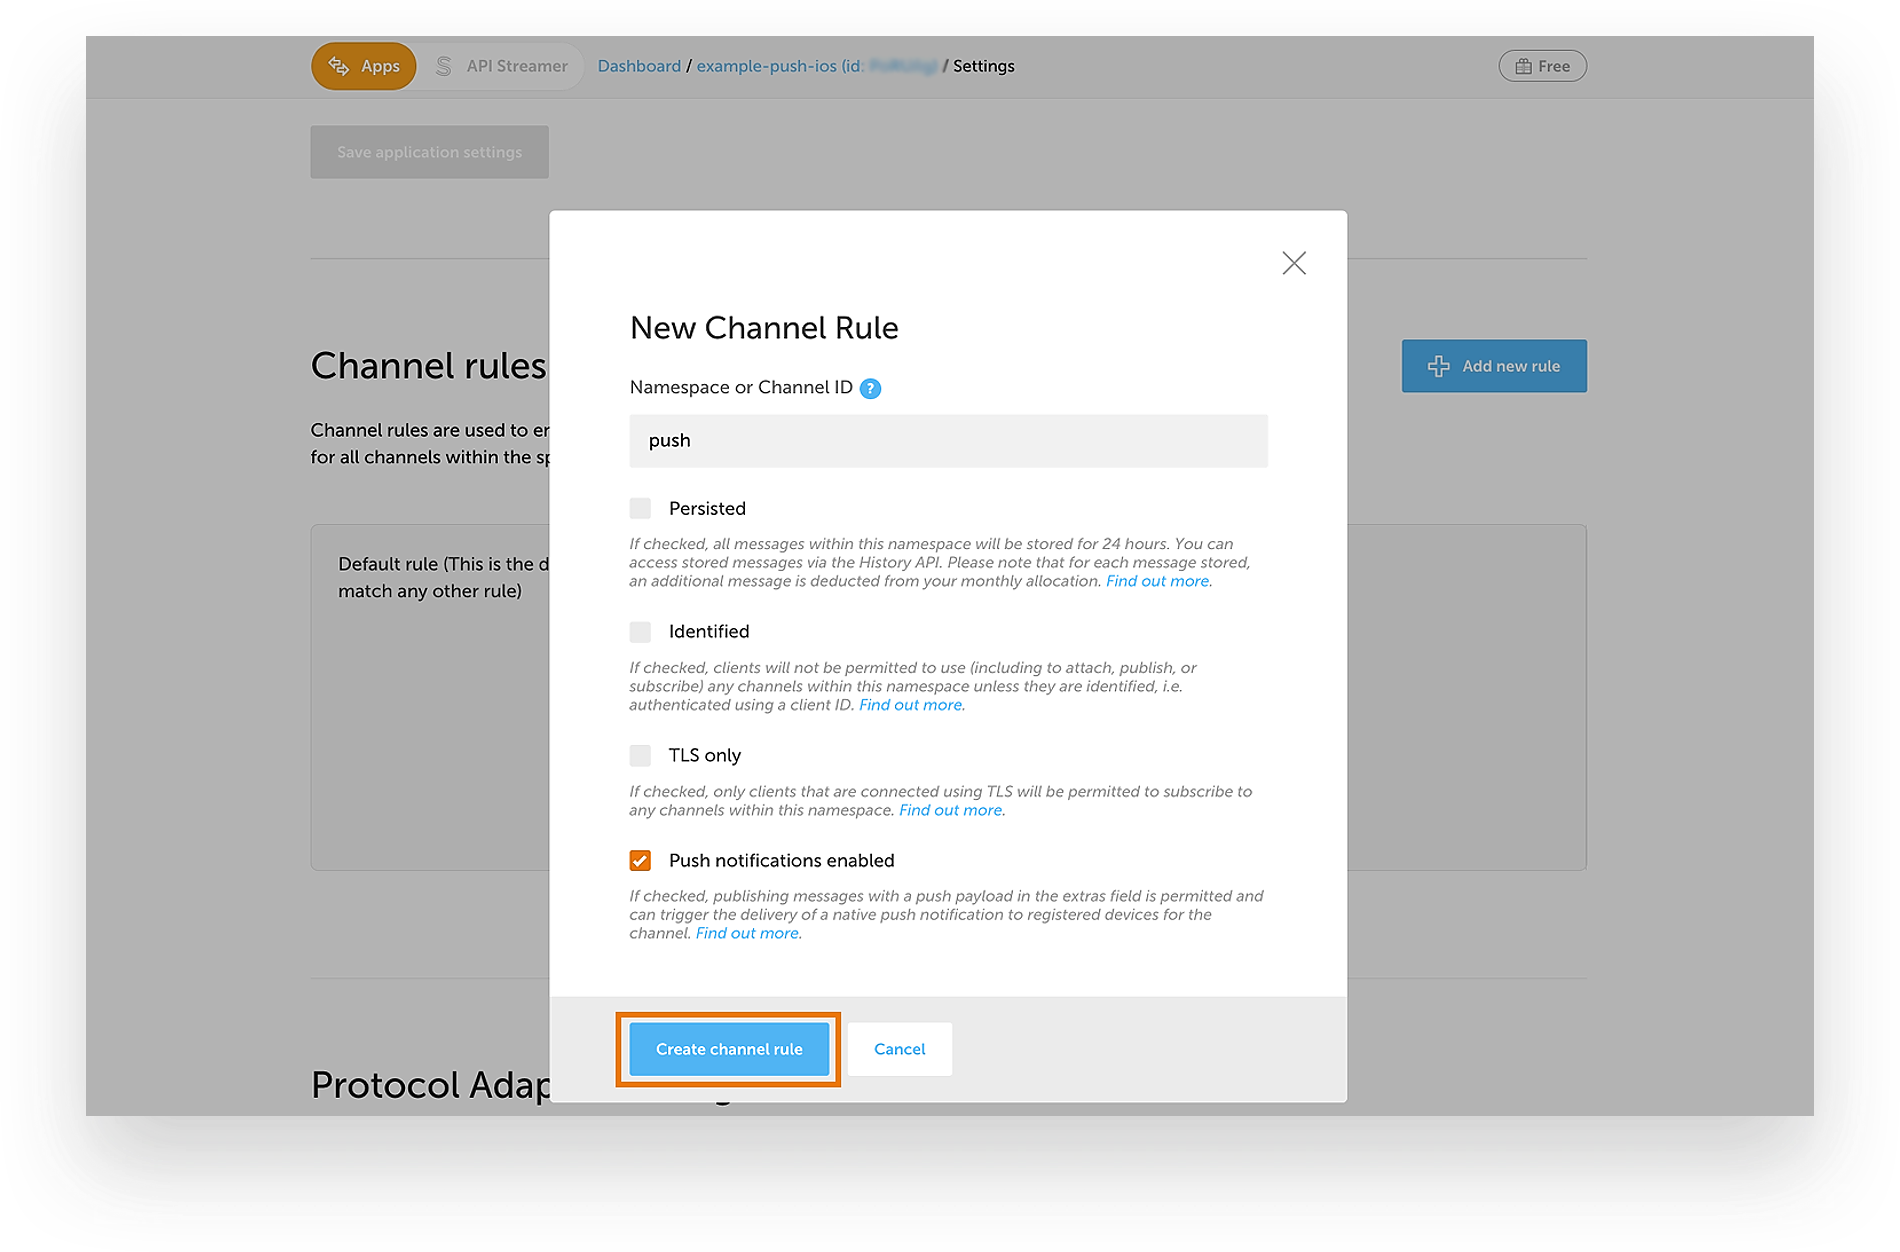
The last thing to do in the setup stage is to enable the Push Notifications option for an Ably channel or namespace that you’ll use in your app. In you app’s dashboard, head to the “Settings” tab and add a new channel rule or edit an existing one as shown below. You can learn more about channel namespaces from our support articles.
Add the channel or namespace that you want this rule to apply to, check the “Push notifications enabled” option and click on “Create channel rule” as shown below:
We are finally set up with the pre-requisites for implementing Push Notifications for your iOS devices. Let’s now get to the fun part – writing some code!
Step 5 – Installing Cocoapods and adding Push Notifications capability to your Swift project
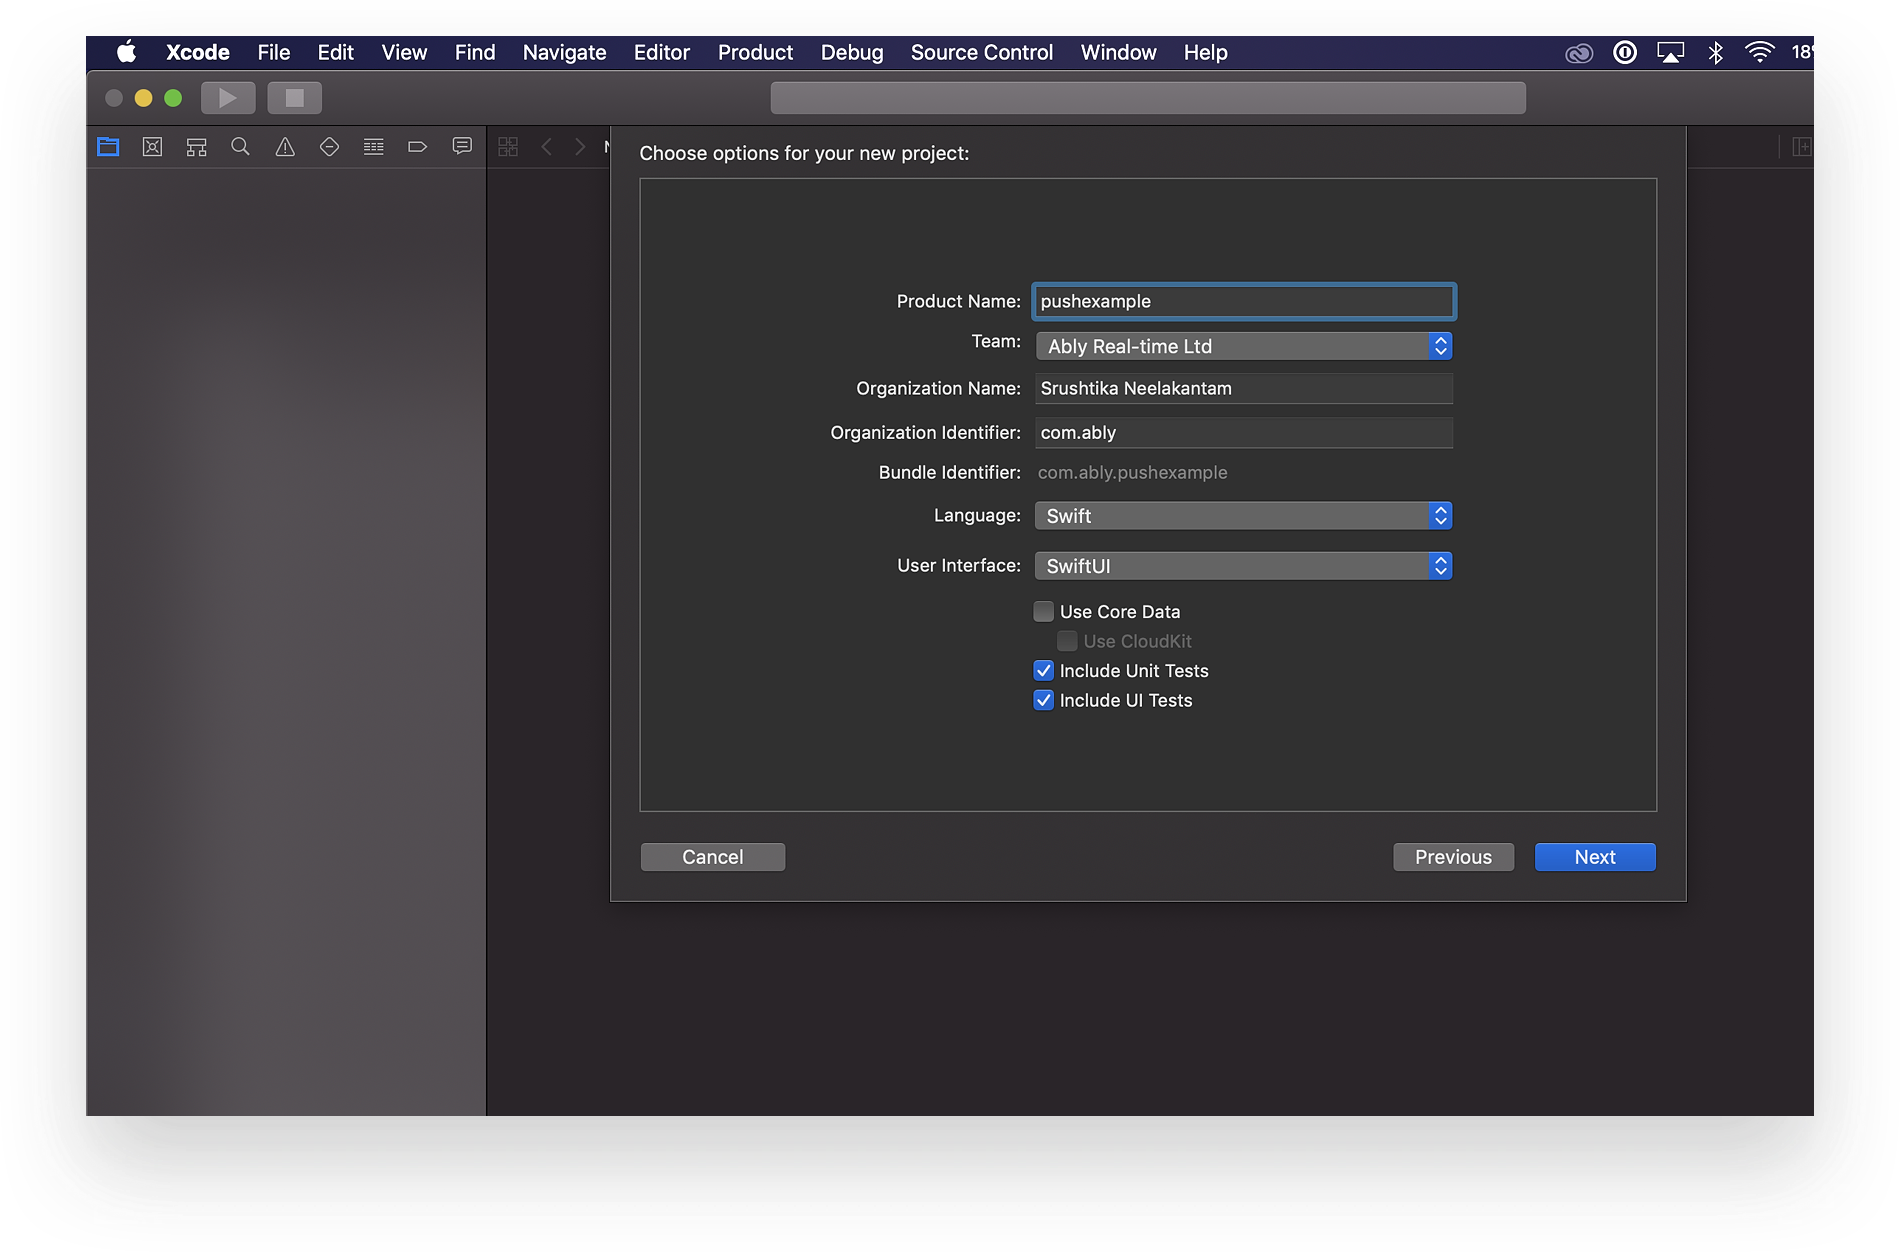
Fire up the Xcode application and create a new project or open an existing one. Make sure that the product name matches the BundleID that you added while setting up the AppID in your Apple Developer account.
For this application, we’ll add the Ably Realtime SDK via Cocoapods, which is a dependency manager for Swift and Obj-C projects. You can learn more about it from its official website or simply run the following command from the project folder in your terminal to install it:
Shell scriptsudo gem install cocoapodsNext, create a new Podfile using the following command:
Shell scriptpod initOpen up this Podfile in a code editor and add in the reference to the Ably SDK just below the use_frameworks! statement, as shown below:
# Comment the next line if you don't want to use dynamic frameworks
use_frameworks!

# Pods for pushexample
pod 'Ably', '~> 1.1.15'
Come back to your terminal and type the following command to install the Ably pod we just added:
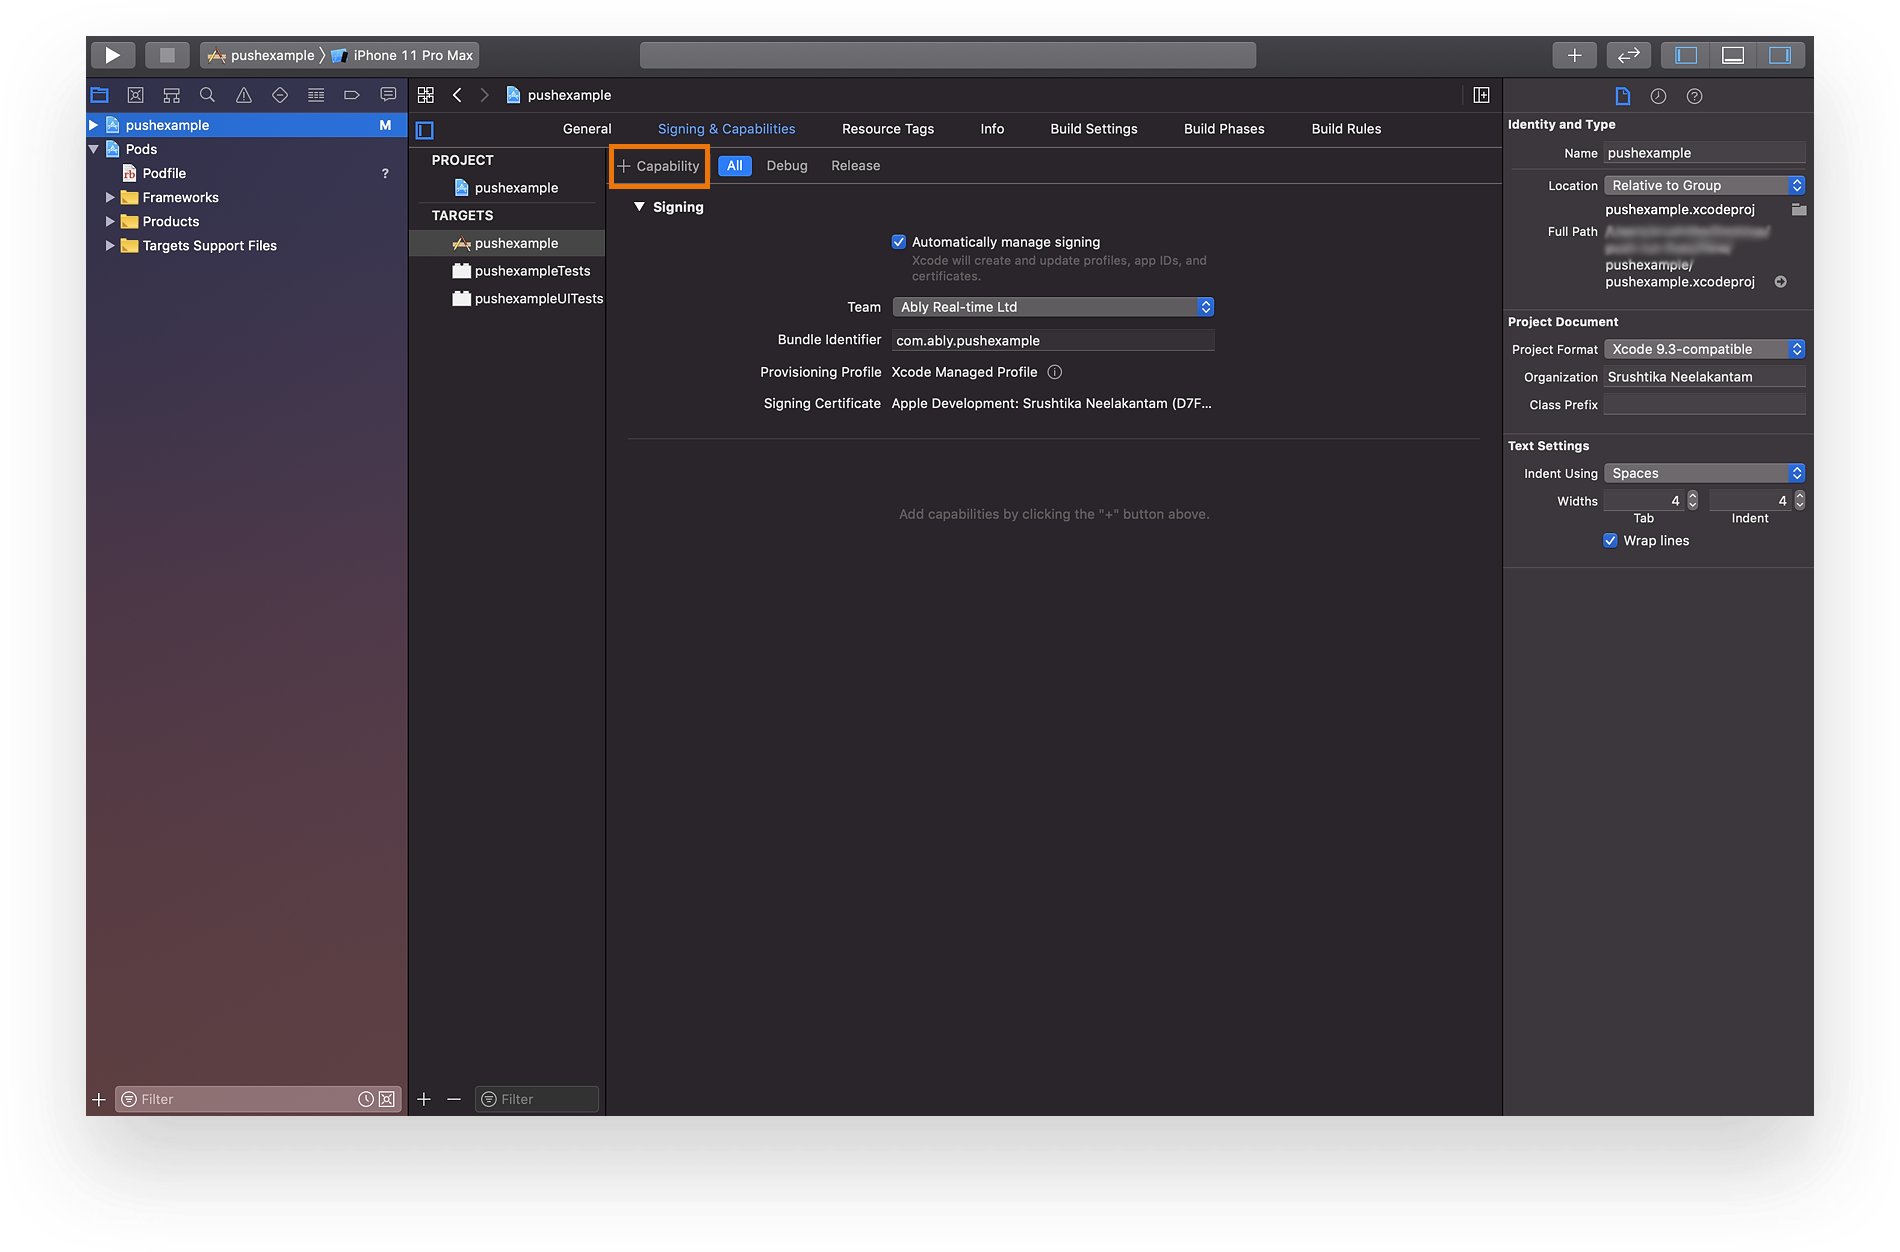
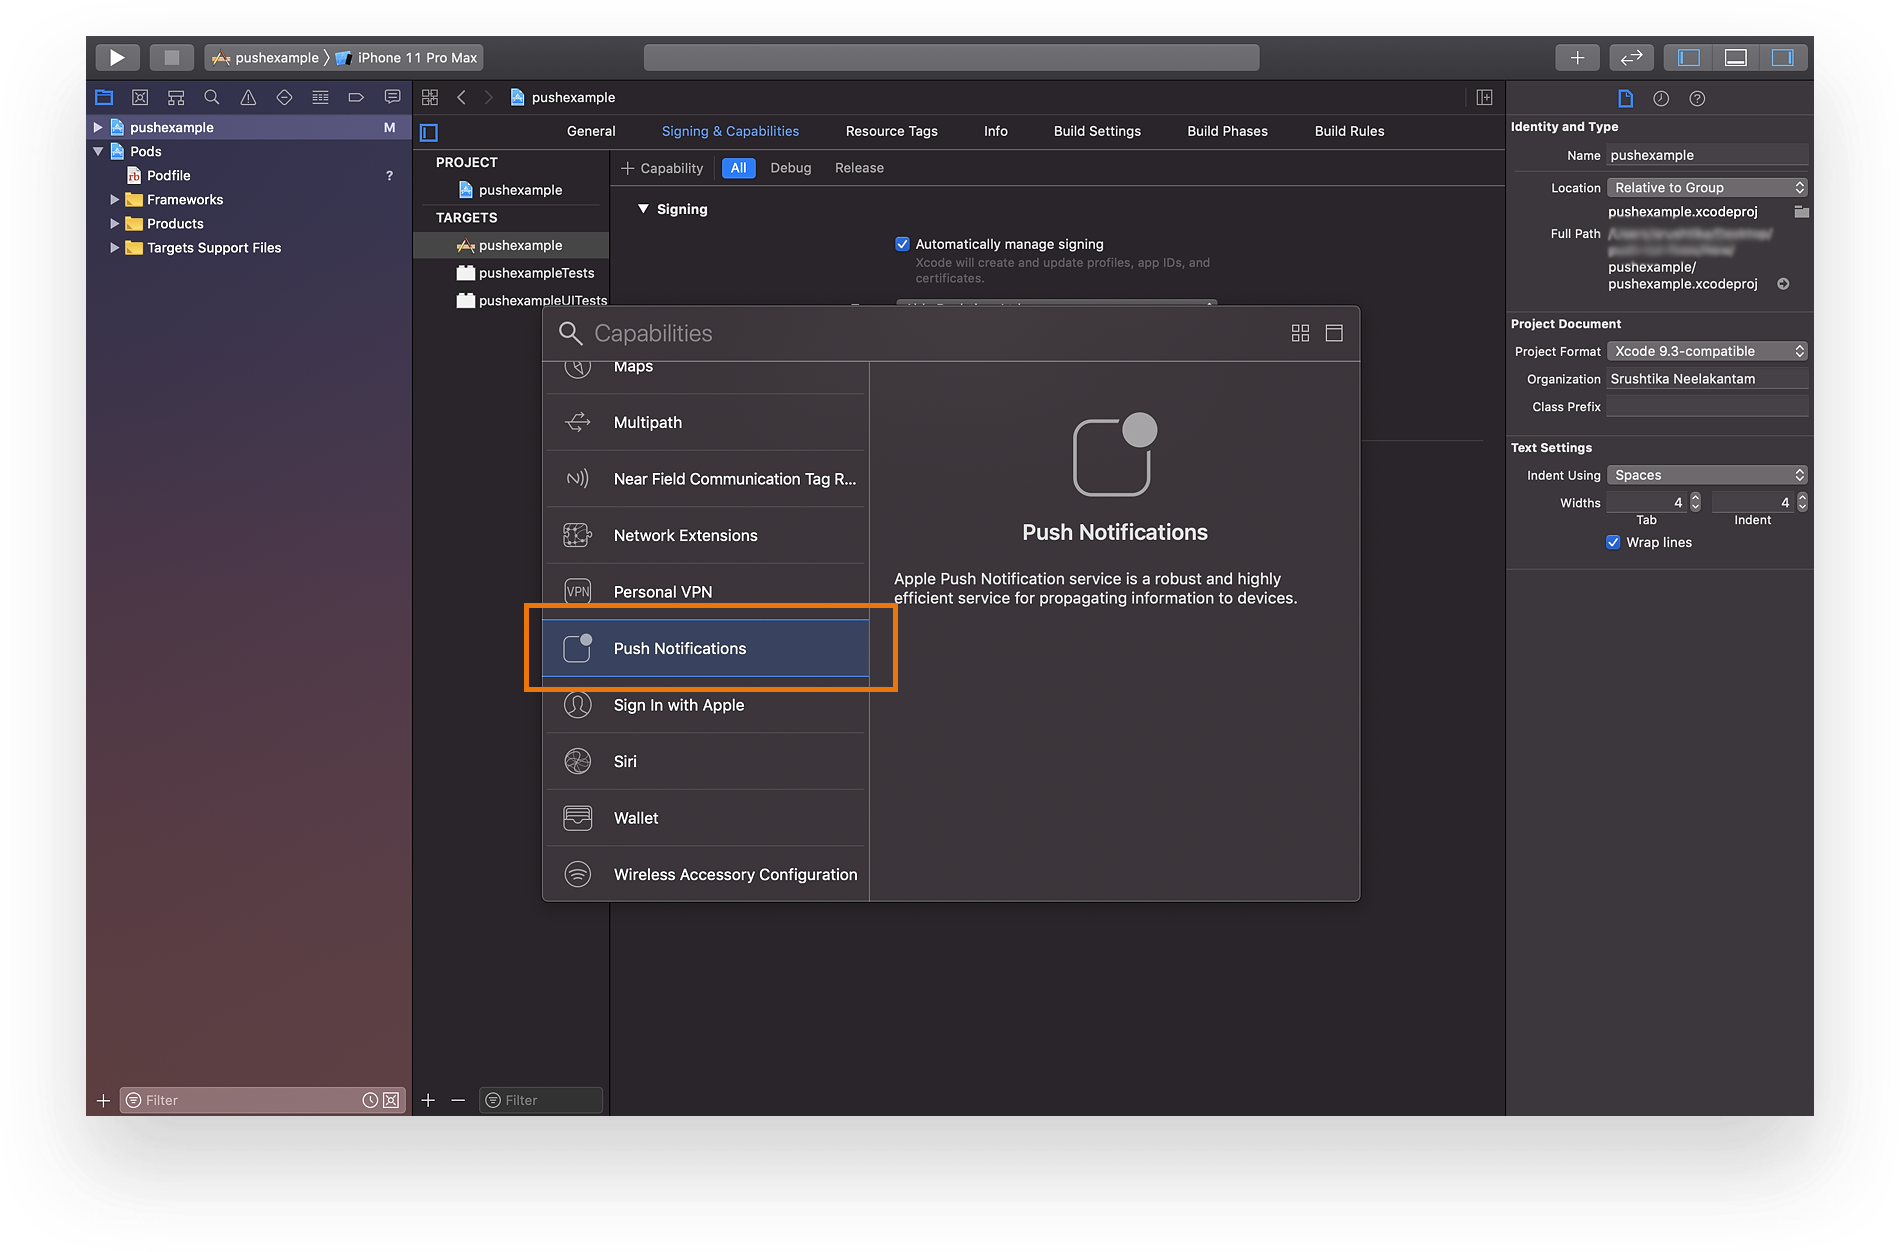
Shell scriptpod installFrom this point on, we’ll be using the Xcode workspace. Go back to Xcode and open up your target settings. In the “Signing & Capabilities” tab, add a new Capability using the ‘+’ symbol, scroll down to find “Push Notifications” and double click on it to enable it as shown below:
It’s time to write some code!
Step 6 – Initializing the Ably Realtime library
Now that we are all set up with the local workspace, let’s jump into coding. In your Xcode project, open up the AppDelegate.swift file which is the starting point of all Swift applications. We’ll begin by declaring a few imports that we’ll use in our application. So at the top of this file, add the following statements:
Swiftimport UIKit
import Ably
import UserNotifications

let apiKey = "<YOUR-ABLY-API-KEY>"
let myClientId = "<YOUR-CLIENT-ID>"
let ablyClientOptions = ARTClientOptions()
let myPushChannel = "<YOUR-PUSH-CHANNEL>"
As you might have guessed, you’ll need to replace the placeholders above for API Key, client ID and the push channel name with your own credentials. The API Key is from the apps dashboard and client ID can be anything of your choosing. We are using basic authentication for this example to keep things simple but it is never recommended to be used in production level applications. Generally, you can ensure better security by implementing the token auth strategy and in fact have the server assign a clientID and other credentials to the clients rather than doing it on the client-side like in this tutorial. But as mentioned before, we are doing this to keep things simple and get the Push Notifications feature working in as few steps as possible.
Next, we’ll need to add a reference to ARTPushRegistererDelegate from the default AppDelegate class in the same file. Your class declaration should look like the following:
Swift@UIApplicationMain
class AppDelegate: UIResponder, UIApplicationDelegate, ARTPushRegistererDelegate {
 // some pre-existing function declarations
}
Now inside the AppDelegate class, declare a few other variables (as shown below) which we’ll use later:
Swift@UIApplicationMain
class AppDelegate: UIResponder, UIApplicationDelegate, ARTPushRegistererDelegate {
    var window: UIWindow?
    var realtime: ARTRealtime! = nil
    var channel: ARTRealtimeChannel!
    var myDeviceToken = ""
    var myDeviceId = ""
    // some pre-existing function declarations
}
Next, we’ll add a function to initialize Ably’s Realtime library via Basic auth strategy below the variables we just declared inside the AppDelegate class. Add the following function to initialize the Ably Realtime library or get an existing instance if it was already initialized:
Swift// function to init ably with client options - key and clientId
private func getAblyRealtime() -> ARTRealtime {
    if(realtime == nil){
        ablyClientOptions.clientId = myClientId
        ablyClientOptions.key = apiKey
        realtime = ARTRealtime(options: ablyClientOptions)
    }
    return realtime
}
In the above function we added the clientID and API Key as client options and initialized the Ably Realtime library with those. You can learn more about client options from the documentation.
You should see a pre-declared function called didFinishLaunchingWithOptions inside your AppDelegate file. Add the following inside this function to ask the user permission to show notifications from your app when launched, call the getAblyRealtime() method we defined before, then call the activate method to activate push with Ably for this device.
By default, iOS devices will show notifications only when the underlying application is in the background. For testing purposes, we’ll add a method to show notifications even when our app is in the foreground using the UNUserNotificationCenter object.
Swift//on launch, init ably and call activate
func application(_ application: UIApplication, didFinishLaunchingWithOptions launchOptions: [UIApplication.LaunchOptionsKey: Any]?) -> Bool {
    // Override point for customization after application launch.
    UNUserNotificationCenter.current().delegate = self
    print("[LOCALLOG] App launched on the device")

    UNUserNotificationCenter.current().requestAuthorization(options:[.badge, .alert, .sound]) { (granted, err) in
        DispatchQueue.main.async() {
            UIApplication.shared.registerForRemoteNotifications()
            print("[LOCALLOG] Request to show notifications successful")
        }
    }

    self.realtime = self.getAblyRealtime()
    self.realtime.push.activate()

    return true
}
Next, add two functions to extend the UNUserNotificationCenterDelagate class as shown below. This needs to be added outside the AppDelegate class:
Swiftextension AppDelegate: UNUserNotificationCenterDelegate {

    func userNotificationCenter(_ center: UNUserNotificationCenter, didReceive response: UNNotificationResponse, withCompletionHandler completionHandler: @escaping () -> Void) {
        // Tell the app that we have finished processing the user's action (eg: tap on notification banner) / response
        // Handle received remoteNotification: 'response.notification.request.content.userInfo'
        // response.notification.request.content.userInfo
        print(response.notification.request.content.userInfo)
        completionHandler()
    }

    func userNotificationCenter(_ center: UNUserNotificationCenter, willPresent notification: UNNotification, withCompletionHandler completionHandler: @escaping (UNNotificationPresentationOptions) -> Void) {
        print("[LOCALLOG] Your device just received a notification!")
        // Show the notification alert in foreground
        completionHandler([.alert, .sound])
    }
}
Step 7 – Registering your device with APNs for Push Notifications
In this step, we’ll add some methods to register our client devices with APNs.
Please note that you can either do the registration step directly from your client-side code that’ll run on your device, or have your server handle the registration on your client’s behalf. Please read the documentation to decide which option works best for you. In this tutorial we’ll go with the option of directly registering with APNs for Push Notifications from the device itself.
Add the following two functions below the didFinishLaunchingWithOptions() method that we defined in the previous step:
Swift// Direct device registration with APNs to enable Push Notifications
func application(_ application: UIApplication, didRegisterForRemoteNotificationsWithDeviceToken deviceToken: Data) {
    print("[LOCALLOG] Registration for remote notifications successful")
    self.myDeviceToken = deviceToken.reduce("", {$0 + String(format: "%02X", $1)})
    ARTPush.didRegisterForRemoteNotifications(withDeviceToken: deviceToken, realtime: self.getAblyRealtime())
}

func application(_ application: UIApplication, didFailToRegisterForRemoteNotificationsWithError error: Error) {
    print("[LOCALLOG] Error registering for remote notifications")
    ARTPush.didFailToRegisterForRemoteNotificationsWithError(error, realtime: self.getAblyRealtime())
}
If this registration is successful, APNs will return a unique deviceToken for each device. We’ll use the received deviceToken to share with Ably.
Next, we’ll add a delegate method that tells us if push (with Ably) is activated or not following the registration in the previous step, thus giving us an opportunity to subscribe to the channels. We will also handle the subscription here. Note that the channel name used for subscribing needs to match the namespace you entered in the channel rules section in Step 4.
Swift// delegate method to handle push activation with Ably. Also includes subscribing the device to push on channel
func didActivateAblyPush(_ error: ARTErrorInfo?) {
    if let error = error {
        // Handle error
        print("[LOCALLOG] Push activation failed, err=\(String(describing: error))")
        return
    }
    print("[LOCALLOG] Push activation successful")

    self.channel = self.realtime.channels.get(myPushChannel)
    self.channel.push.subscribeDevice { (err) in
        if(err != nil){
            print("[LOCALLOG] Device Subscription on push channel failed with err=\(String(describing: err))")
            return
        }
        self.myDeviceId = self.realtime.device.id
        print("[LOCALLOG] Client ID: " + myClientId)
        print("[LOCALLOG] Device Token: " + self.myDeviceToken)
        print("[LOCALLOG] Device ID: " + self.myDeviceId)
        print("[LOCALLOG] Push channel: " + myPushChannel)
    }
}
We’ll also add a delegate method to check if push was deactivated for some reason. Add the following function below the didActivateAblyPush() method we defined above:
Swift// method to check if push with Ably was deactivated
func didDeactivateAblyPush(_ error: ARTErrorInfo?) {
    print("[LOCALLOG] push deactivated")
}
In terms of handling the appearance of a visual notification on a real iOS device, we don’t need to do anything as the operating system handles the messages we see on the lock screen.
We’ve now fully set up push notifications in our iOS app. The final step is to deploy this app to a real iOS device and try and publish some push notifications to the device to see if it’s working.
Connect your iOS device to your system and run the app. It’ll ask permission to show push notifications, after which it’ll simply be a white screen as we didn’t add anything to the app itself. Note the local logs that come up in your Xcode console as these identifiers are needed later to test out push notifications.
Step 8 – Testing Push Notifications
You can publish Push Notifications in two ways – via channels or directly using the device’s credentials. We’ll look at all of the alternatives in this step. We’ll use basic cURL commands to publish notifications to test our app. In general, you’d publish notifications via your server. Our Push Notifications documentation has examples of that.
Option 1 – Publish notifications via channel
Publishing push notifications via channels is very simple, just run the cURL command below using the Terminal or Command Line. Make sure to replace the placeholders for channel name and API key with your own credentials, the ones that you used in your iOS app before.
Shell scriptcurl -X POST https://rest.ably.io/channels/<YOUR-PUSH-CHANNEL-NAME>/messages \
 -u "<YOUR-ABLY-API-KEY>" \
 -H "Content-Type: application/json" \
 --data \
 '
{
  "name": "some event name for realtime receivers",
  "data": "example non-push data for realtime receivers",
  "extras": {
    "push": {
      "notification": {
        "title": "Hello from Ably!",
        "body": "Example push notification via channel."
      },
      "data": {
        "foo": "bar",
        "baz": "qux"
      },
      "apns": {
        "aps": {
          "content-available": 1,
          "sound": "ably-ios.wav"
        }
      }
    }
  }
}
'
Option 2a – Publish notifications directly using deviceId
Publishing push notifications directly using the deviceId as the identifier can be done as follows:
Shell scriptcurl -X POST https://rest.ably.io/push/publish \
 -u "<YOUR-ABLY-API-KEY>" \
 -H "Content-Type: application/json" \
 --data \
 '
{
  "recipient": {
    "deviceId": "<YOUR-DEVICE-ID>"
  },
  "notification": {
    "title": "Hello from Ably!",
    "body": "Example push notification using deviceId."
  },
  "data": {
    "foo": "bar",
    "baz": "qux"
  }
}'
Make sure to replace the placeholders for channel name and API key with your own credentials, the ones that you used in your iOS app before.
Option 2b – Publish notifications directly using clientID
Publishing push notifications directly using the clientId as the identifier can be done as follows:
Shell scriptcurl -X POST https://rest.ably.io/push/publish \
 -u "<YOUR-ABLY-API-KEY>" \
 -H "Content-Type: application/json" \
 --data \
 '
{
  "recipient": {
    "clientId": "<YOUR-CLIENT-ID>"
  },
  "notification": {
    "title": "Hello from Ably!",
    "body": "Example push notification using clientId."
  },
  "data": {
    "foo": "bar",
    "baz": "qux"
  }
}'
As always, make sure to replace the placeholders for channel name and API key with your own credentials, the ones that you used in your iOS app before.
Option 2c – Publish notifications directly using deviceToken
Publishing push notifications directly using the deviceToken as the identifier can be done as follows:
Shell scriptcurl -X POST https://rest.ably.io/push/publish \
 -u "<YOUR-ABLY-API-KEY>" \
 -H "Content-Type: application/json" \
 --data \
 '
{
  "recipient": {
    "transportType": "apns",
    "deviceToken": "<YOUR-DEVICE-TOKEN>"
  },
  "notification": {
    "title": "Hello from Ably!",
    "body": "Example push notification using device token."
  },
  "data": {
    "foo": "bar",
    "baz": "qux"
  }
}'
And as always, make sure to replace the placeholders for channel name and API key with your own credentials, the ones that you used in your iOS app before.
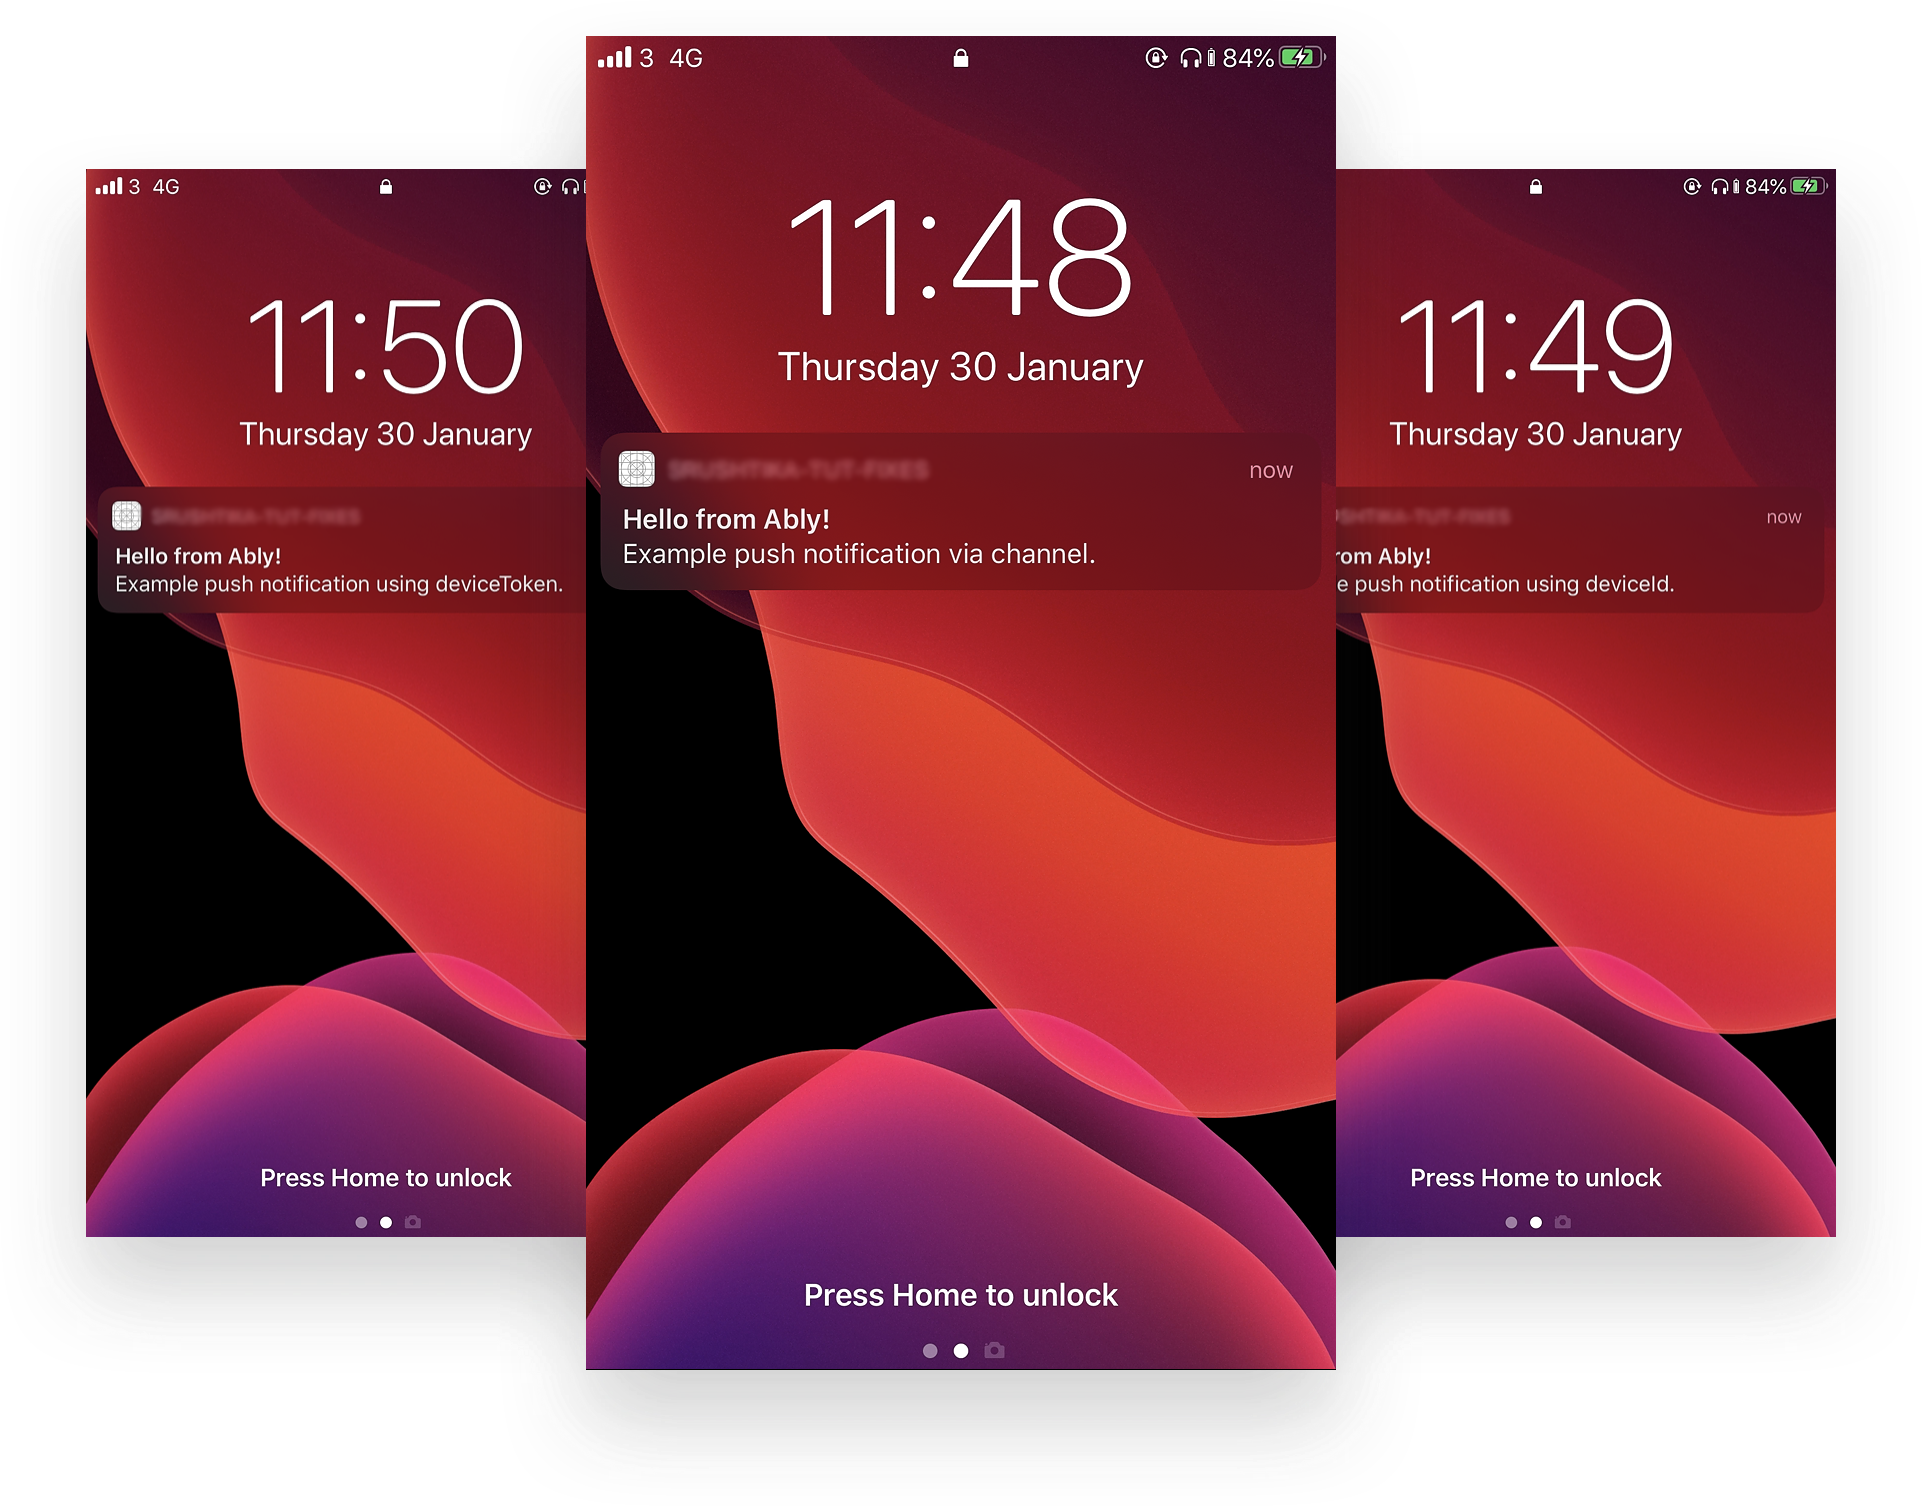
How do the notifications look?
It doesn’t matter which option you used to publish notifications, the visual presentation would look the same as shown below:
That’s it, you’ve successfully implemented Ably Push Notifications for your iOS devices! You can check out the original source code for this project in the next step.
Related resources and next steps
1. Check out the original source code for this project on GitHub
2. Learn more out Ably’s Push Notifications feature from the documentation
3. Check out the Push Notifications tutorial for Android devices
3. Learn about other Ably features
4. Check out other tutorials
5. Get in touch if you need help
