Publish/Subscribe messaging app
The Ably Realtime service organizes the message traffic within applications into named channels. Channels are the “unit” of message distribution; clients attach to any number of channels to subscribe to messages, and every message published to a channel is broadcasted to all subscribers. This scalable and resilient messaging pattern is commonly called pub/sub.
As you can publish a message to any channel, channels provide a means for you to filter data by topic or enforce access control for your subscribers. Only subscribers for those channels will receive those messages.
Messages published can contain string, JSON object, JSON array or binary data payloads.
Publishing and subscribing for messages on channels with our channel API is trivial. Let’s get started.
Step 1 – Create your Ably app and API key
To follow this tutorial, you will need an Ably account. Sign up for a free account if you don’t already have one.
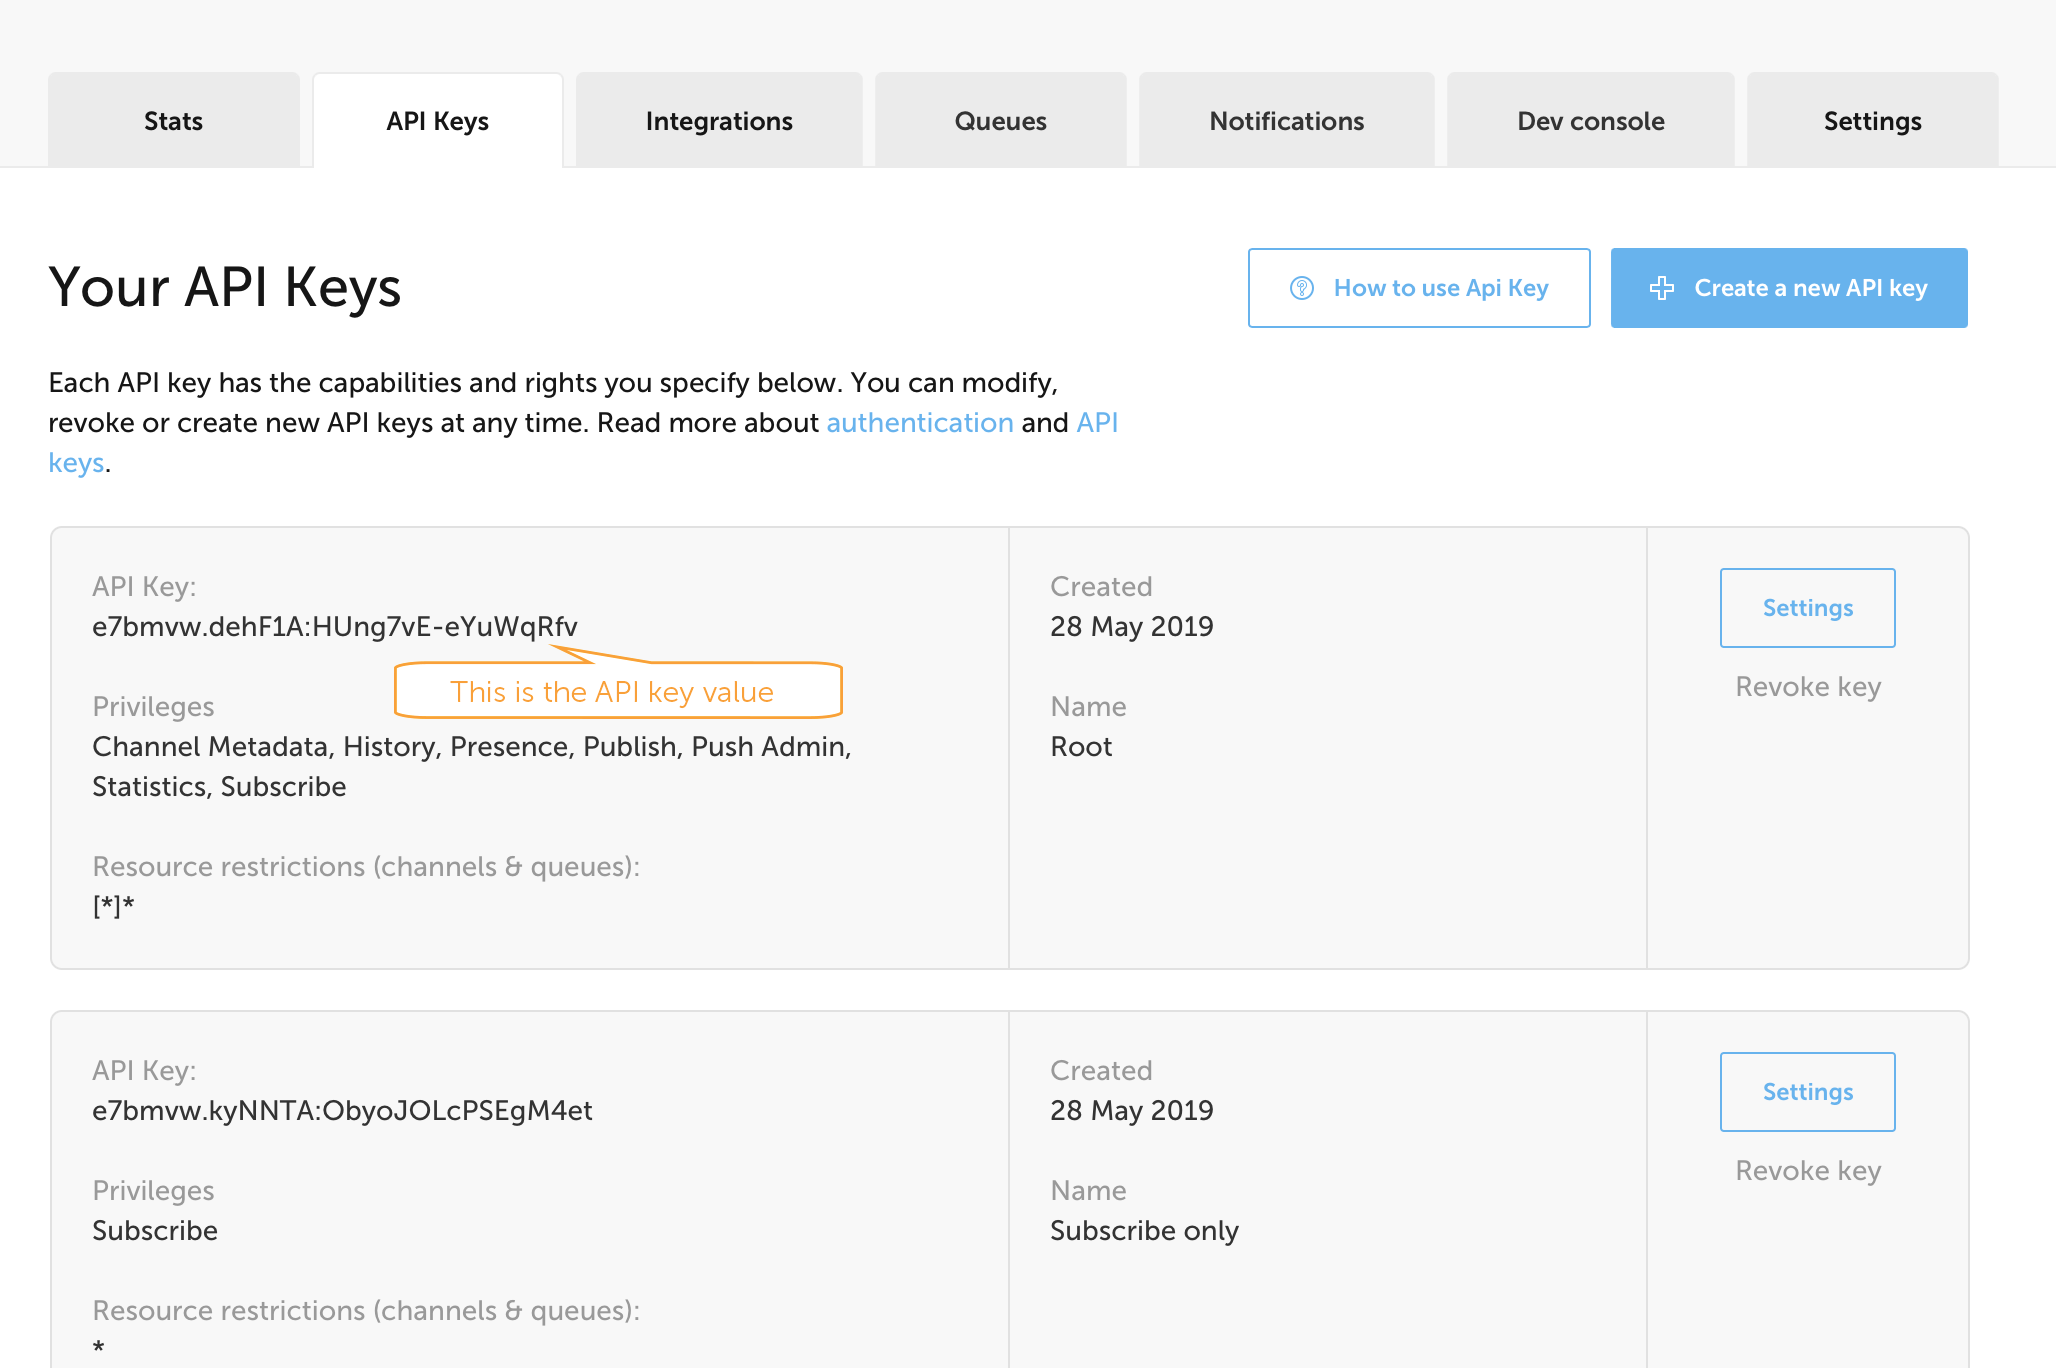
Access to the Ably global messaging platform requires an API key for authentication. API keys exist within the context of an Ably application and each application can have multiple API keys so that you can assign different capabilities and manage access to channels and queues.
You can either create a new application for this tutorial, or use an existing one.
To create a new application and generate an API key:
- Log in to your Ably account dashboard
- Click the “Create New App” button
- Give it a name and click “Create app”
- Copy your private API key and store it somewhere. You will need it for this tutorial.
To use an existing application and API key:
- Select an application from “Your apps” in the dashboard
- In the API keys tab, choose an API key to use for this tutorial. The default “Root” API key has full access to capabilities and channels.
- Copy the Root API key and store it somewhere. You will need it for this tutorial.
Step 2 – Install AblyStep 2 – Setup an Xcode project and install AblyStep 2 – Set up environment and install Ably
To start using Ably in your JRE application, you need to include the Ably Client library. We recommend that you include the latest client library via Gradle in your project’s gradle.build file.
Plain Textapply plugin: 'application'
mainClassName = 'io.ably.tutorial.Example'

repositories {
  jcenter()
}

dependencies {
    compile 'io.ably:ably-java:1.2.0'
}
In the above example a specific version of the library is referenced, however we recommend you check which is the latest stable version and always use that. Follow link to get the latest stable release for Java.
After you add necessary dependencies, you can import AblyRealtime class into your code and initialize it.
Javaimport io.ably.lib.realtime.AblyRealtime;

public class Example {
  private final static String API_KEY = "INSERT-YOUR-API-KEY-HERE";

  public static void main(String[] args) {
      try {
          initAbly();
      } catch (AblyException e) {
          e.printStackTrace();
      }
  }

  private static void initAbly() throws AblyException {
      AblyRealtime ablyRealtime = new AblyRealtime(API_KEY);
  }
}To build your own Android Project, please visit Android Developers website and get familiar with steps necessary to set up your own application.
To start using Ably in your Android app, you need to include the Ably Client library. We recommend that you include the latest client library via Gradle in your module-level gradle.build file.
Plain Textapply plugin: 'com.android.application'
dependencies {
compile 'io.ably:ably-android:1.2.0'
}In the above example a specific version of the library is referenced, however we recommend you check which is the latest stable version and always use that. Follow link to get the latest stable release for Android.
After you add necessary dependencies, you can import AblyRest class into your code and initialize it.
Javaimport io.ably.lib.realtime.AblyRealtime;
public class ExampleActivity extends AppCompatActivity {
private final static String API_KEY = "INSERT-YOUR-API-KEY-HERE";
protected void onCreate(Bundle savedInstanceState) {
super.onCreate(savedInstanceState);
setContentView(R.layout.activity_example);
try {
initAbly();
} catch (AblyException e) {
e.printStackTrace();
}
}
private void initAbly() throws AblyException {
AblyRealtime realtime = new AblyRealtime(API_KEY);
}
}Create a blank HTML page called example.html, to host your web app:
HTML
<html lang="en">
<head>
<meta charset="UTF-8" />
<meta http-equiv="X-UA-Compatible" content="IE=edge" />
<meta name="viewport" content="width=device-width, initial-scale=1.0" />
<title>Ably Pub Sub</title>
</head>
<body>
</body>
</html>To start using Ably in your web app, you first need to include the Ably client library. In this example, we recommend that you include the latest client library from our CDN using a simple <script> tag. You should then instantiate the client library with the API key you copied in Step 1.
Note: in production we recommend you always use the token authentication scheme for browser clients, however in this example you will use an API key for simplicity.
Include the code below just before your closing </html> tag. This code uses the Promise-based version of the Ably client library (Ably.Realtime.Promise) that enables you to use the much tidier await/async syntax, instead of relying on callbacks:
JavaScript<script src="https://cdn.ably.com/lib/ably.min-1.js"></script>
<script>
  const apiKey = "YOUR_API_KEY";
  const realtime = new Ably.Realtime.Promise(apiKey);
</script>
To start using Ably you first need to install the NPM module. The NPM module can be installed as follows:
Shell scriptnpm install ablyThe client library must be instantiated with the API key you copied in Step 1. API keys used with basic authentication for your own servers is generally preferred, however clients running on insecure devices should always use the token authentication scheme instead. In this example, we use an API key for simplicity.
Add the following to a file named example.js to instantiate the Ably library inside your Node.js server:
Node.jsvar Ably = require("ably");
var realtime = new Ably.Realtime({ key: apiKey });To start using Ably you first need to install the Ably RubyGem. The RubyGem can be installed as follows:
Shell scriptgem install ablyOr if using bundler, simply add the following to your Gemfile and run bundle install:
Rubygem 'ably'The client library must be instantiated with the API key you copied in Step 1. API keys used with basic authentication for your own servers is generally preferred, however clients running on insecure devices should always use the token authentication scheme instead. In this example, we use an API key for simplicity.
The Ruby realtime library uses EventMachine to run the client library within an asynchronous event loop. However, typically when using Ruby on servers, most developers use the synchronous REST client library API. As this tutorial needs realtime access to subscribe to messages, it uses the Ruby realtime library.
Add the following to a file named example.rb to instantiate the Ably library inside an EventMachine reactor:
Rubyrequire 'ably'
EventMachine.run do
  ably = Ably::Realtime.new(key: api_key)
endTo start using Ably you first need to install composer package on packagist into your composer.
Shell scriptcomposer require ably/ably-php --update-no-devThe client library must be instantiated with the API key you copied in Step 1. API keys used with basic authentication for your own servers is generally preferred, however clients running on insecure devices should always use the token authentication scheme instead. In this example, we use an API key for simplicity.
PHP Client library doesn’t provide Realtime API support, so we’ll create a web app that uses JavaScript on the client-side (browser) to demonstrate a server publishing messages to realtime JavaScript clients.
JavaScript will handle subscribing to messages, while PHP will be responsible for publishing messages.
First let’s create ably.php where we will store Ably library and Api key
PHP<?php
require_once 'vendor/autoload.php';
$apikey = '{{ApiKey}}';
$ably   = new \Ably\AblyRest($apikey);
Next step is to create frontend of our app, and set up JavaScript library. create index.php file with code:
PHP<?php
require_once 'ably.php';
?>
<html>
<head>
<script src="https://cdn.ably.com/lib/ably.min-1.js" type="text/javascript"></script>
</head>
<body>
<h1>Publish & Subscribe sample</h1>
</body>
<script type="text/javascript">
/* Set up a Realtime client which will subscribe to the 'sport' channel*/
var realtime = new Ably.Realtime('<?= $apikey?>');
</script>
</html>If you would like to try running the server now, you can do so with php -S 0.0.0.0:8000. Once running, open your browser to http://localhost:8000/ and you should see “Publish & Subscribe sample”.
To start using Ably you first need to install The REST library for Python, it’s hosted on Github and is published on PyPI and can be installed as follows:
Shell scriptpip install ablyThe client library must be instantiated with the API key you copied in Step 1. API keys used with basic authentication for your own servers is generally preferred, however clients running on insecure devices should always use the token authentication scheme instead. In this example, we use an API key for simplicity.
Python Client library doesn’t provide Realtime API support, so we’ll create a web app that uses JavaScript on the client-side (browser) to demonstrate a server publishing messages to realtime JavaScript clients.
JavaScript will handle subscribing to messages, while Python will be responsible for publishing messages.
web.py is a simple web framework for Python. Django is arguably more popular as a web server framework, however for the purposes of this tutorial it is overkill.
Let’s get going with a simple web.py web server now. Install web.py using pip:
Shell scriptpip install web.pyNow set up a vanilla web.py server in server.py:
Pythonfrom __future__ import unicode_literals
from ably import AblyRest
import web

apiKey = '{{ApiKey}}'
client = AblyRest(apiKey)

render = web.template.render('templates/')

class index:
    def GET(self):
        return render.index(apiKey)

urls = (
    '/', index
)

app = web.application(urls, globals())

if __name__ == "__main__":
    app.run()
In web.py each resource is mapped to a class, which in turn takes action depending on HTTP method used. In this case it’s main domain '/', that will be handled by index class, and it will support HTTP GET.
We’ve used web.py template system to easily pass apiKey to JavaScript library, let’s create index.html in templates directory:
HTML$def with (apiKey)
<html>
<head>
<script src="https://cdn.ably.com/lib/ably.min-1.js" type="text/javascript"></script>
</head>
<body>
<h1>Publish & Subscribe sample</h1>
</body>
<script type="text/javascript">
/* Set up a Realtime client which will subscribe to the 'sport' channel*/
var realtime = new Ably.Realtime('$apiKey');
</script>
</html>Note on string encodings
Since Ably supports both string and binary payloads, to avoid ambiguity, we recommend that strings passed to the library for publishing to Ably (eg as an event name or payload data) should be unicode strings. In Python 3 this is the normal string type, but in Python 2 it is not, so we suggest you prefix string literals with u prefix (eg u'eventname' – or alternatively, use from __future__ import unicode_literals, which will make this automatic), and to explicitly decode any user input (eg raw_input().decode(sys.stdin.encoding).
If you would like to try running the server now, you can do so with python server.py. Once running, open your browser to http://localhost:8080/ and you should see the text “Publish & Subscribe sample”. If you would like to change port, on which your site will be available, simply add it after command ieg. python server.py 1234 for port 1234.
We will start by creating an Xcode project for this tutorial. To build your own Xcode Project in Swift visit Apple developer website and get familiar with steps necessary to setup your own application.
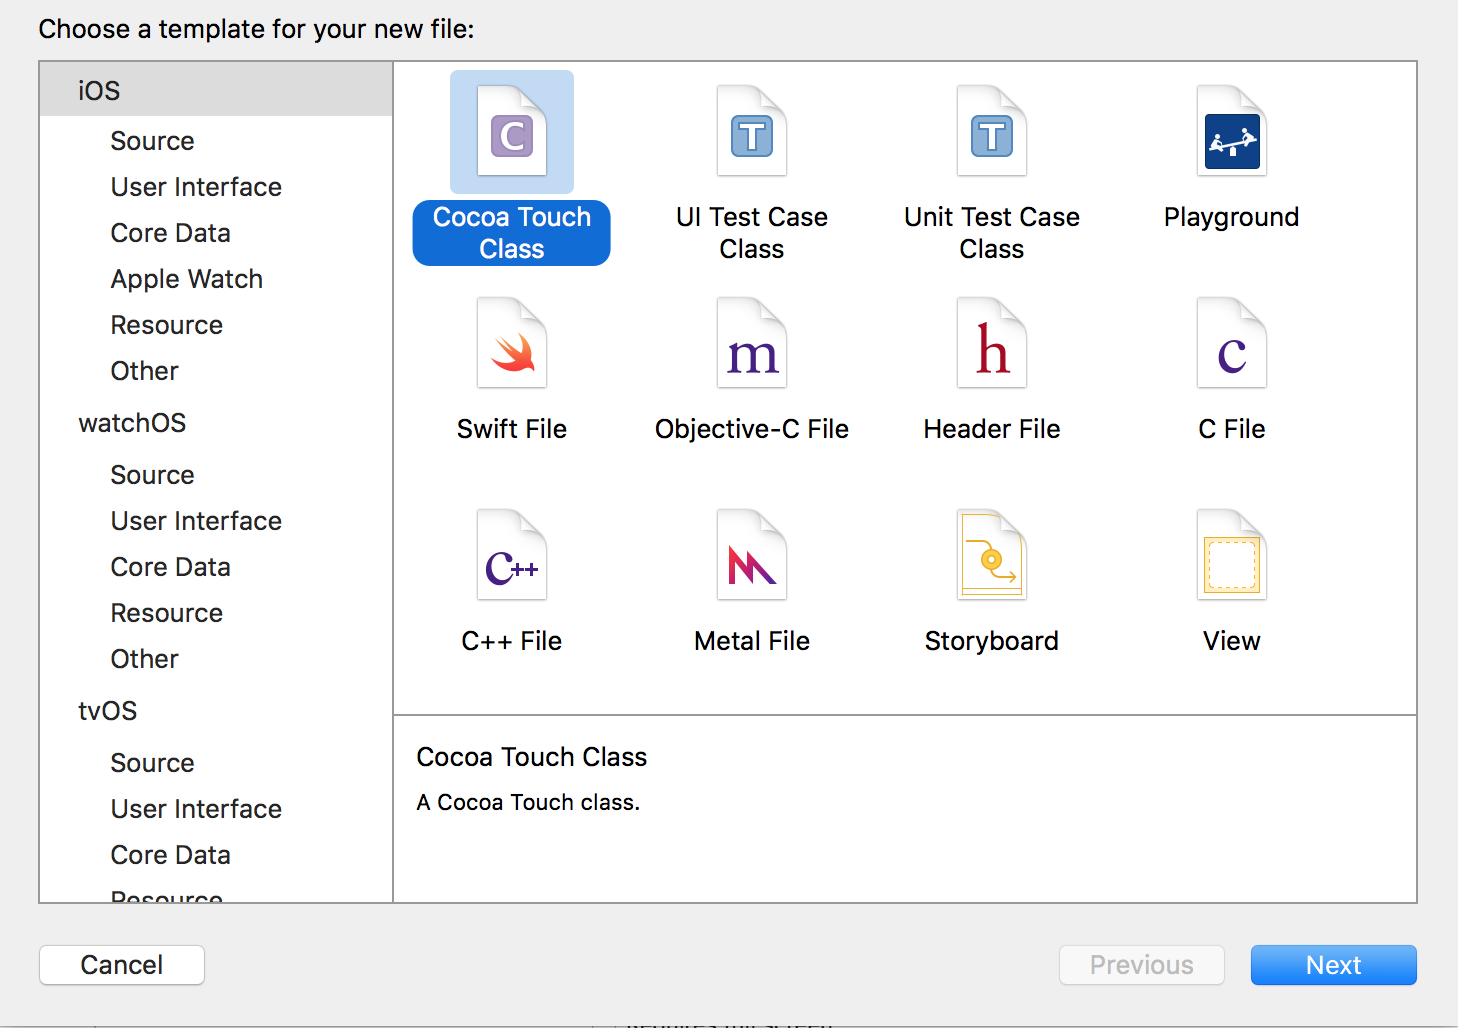
When you setup your application delete the default ViewController.swift add new File → New → File… and choose Cocoa Touch Class.
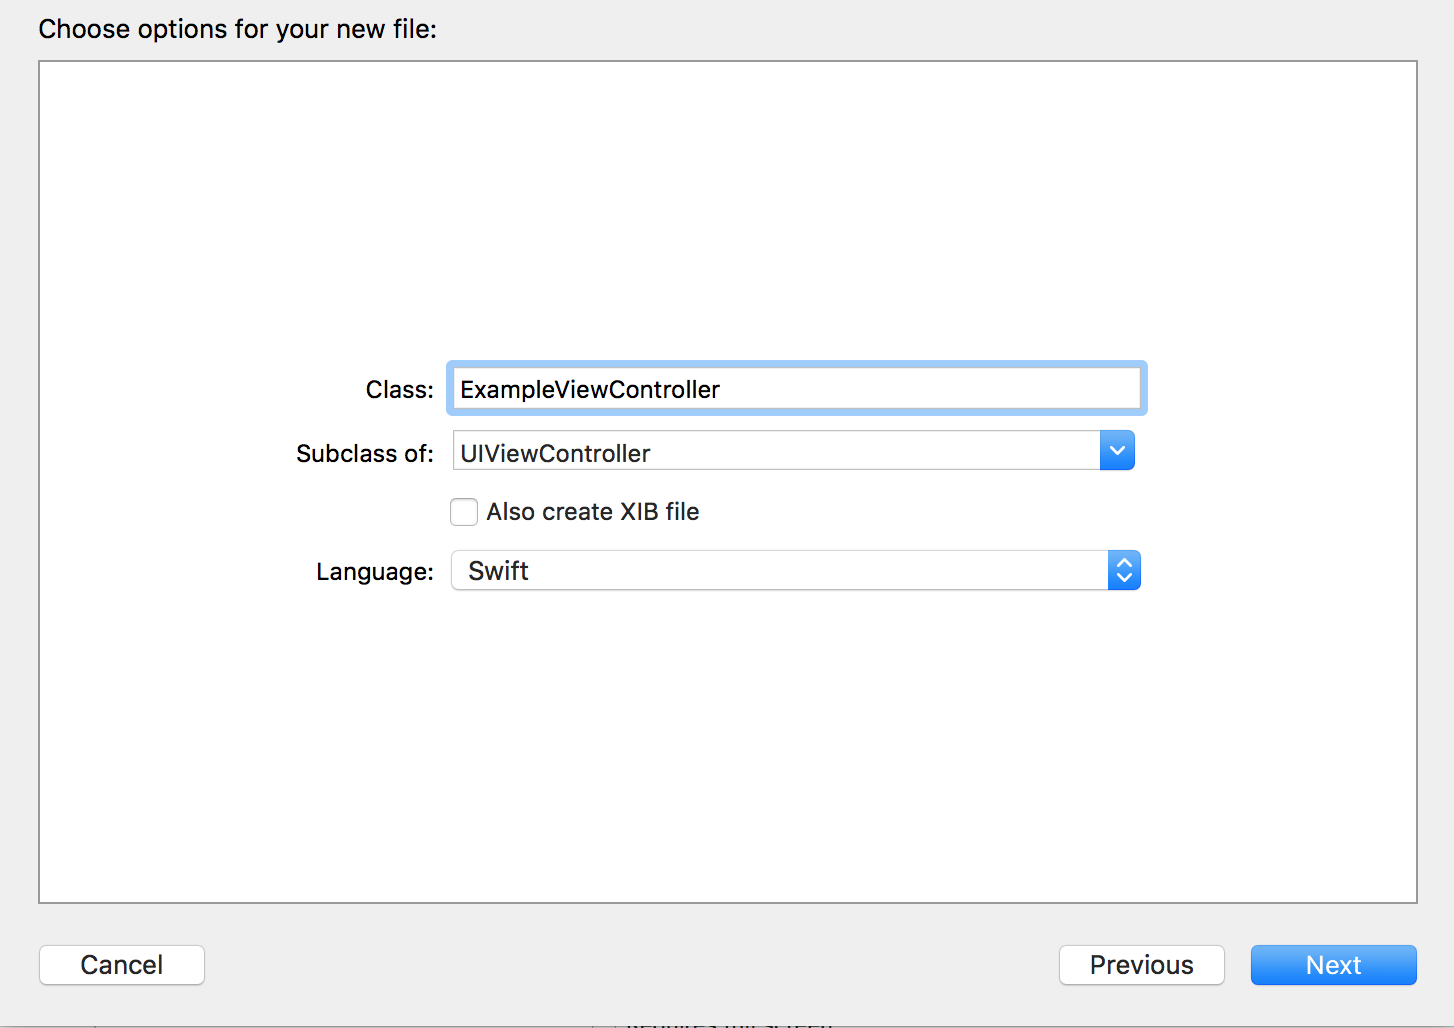
Name your new class “ExampleViewController” and choose Swift as language:
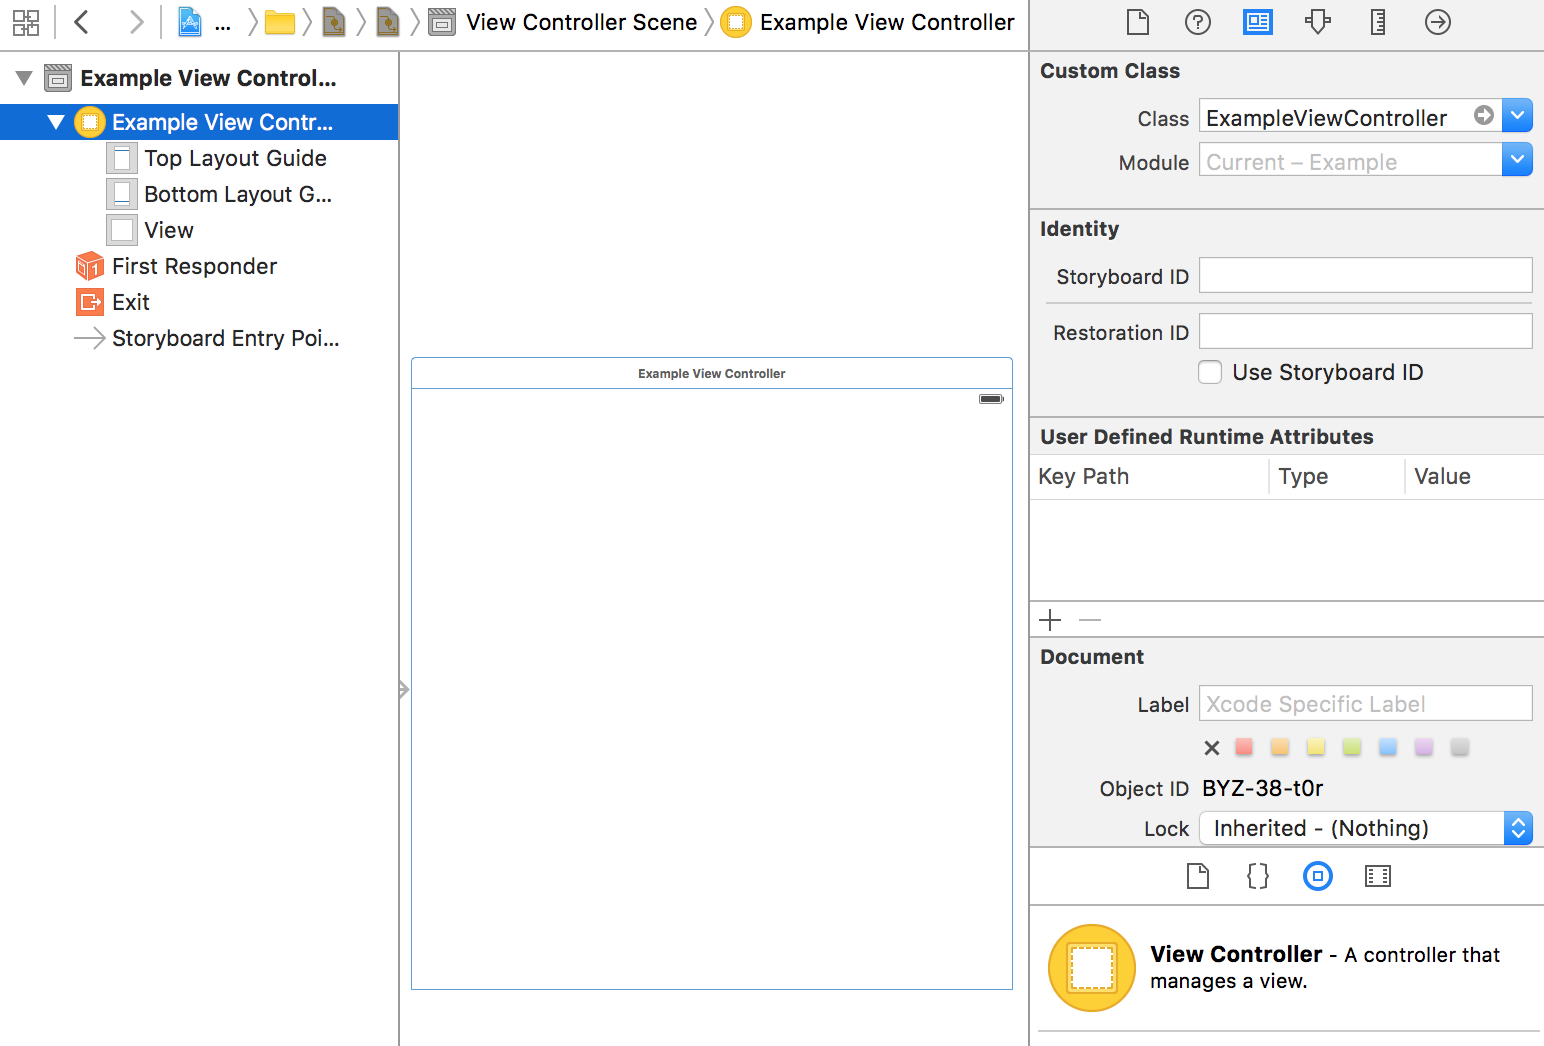
After that navigate to Main.storyboard in your project, click on the ViewController that has already been added by default during project creation and from the Utilities that are located on the right choose Identity Inspector. Find the field labeled “Class” and select “ExampleViewController”.
To start using Ably you first need to install the Ably pod via CocoaPods. You need to add a Podfile to your project directory:
Shell scripttouch PodfileThen add this line to your application’s Podfile:
Plain Textpod 'Ably'Install it with:
Shell scriptpod installTo learn more about using CocoaPods in your project visit official CocoaPods guide.
Then in your files in which you will be using Ably import:
Swiftimport AblyTo connect to Ably, you need to instantiate the client library with the API key you copied in Step 1. API keys used with basic authentication for your own servers is generally preferred, however clients running on insecure devices should always use the token authentication scheme instead. In this example, we use an API key for simplicity.
Add the following to the file in which you imported the Ably library:
Swiftlet API_KEY = "INSERT-YOUR-API-KEY-HERE"
let client = ARTRealtime(key: API_KEY)To start using Ably you first need to install the Ably Go library with the following command:
Shell scriptgo get -u github.com/ably/ably-go/ablyThe client library must be instantiated with the API key you copied in Step 1. API keys used with basic authentication for your own servers is generally preferred, however clients running on insecure devices should always use the token authentication scheme instead. In this example, we use an API key for simplicity.
Add the following to a file named example.go to instantiate the Ably library:
Gopackage main

import "fmt"
import "github.com/ably/ably-go/ably"

func main() {
    client, err := ably.NewRealtimeClient(ably.WithKey("INSERT-YOUR-API-KEY-HERE"))
    if err != nil {
      panic(err)
    }
}
All this is doing is instancing the Ably library, using an API key as your credentials.
Step 3 – Subscribe to messages
Now that the library is installed, you can subscribe to messages published on channels. Every app can have an arbitrary number of channels that should be used to filter the messages received by subscribing clients. For example, if building a news feed, you may want one channel for politics named “politics”, and another for sport named “sport”. A user interested in “sport” can subscribe to the “sport” channel to receive updates. If that user is not subscribed to the “politics” channel, then “politics” updates will not be delivered to that user.
JavaChannel channel = realtime.channels.get("sport");
channel.subscribe(new Channel.MessageListener() {
public void onMessage(Message messages) {
System.out.println("Message received: " + messages.data);
}
});JavaChannel channel = realtime.channels.get("sport");
channel.subscribe(new Channel.MessageListener() {
public void onMessage(Message messages) {
Toast.makeText(getBaseContext(), "Message received: "
+ messages.data, Toast.LENGTH_SHORT).show();
}
});Create an async function called doPubSub() and then call that function at the end of your <script> block:
JavaScriptasync function doPubSub() {
  // Write your Ably code here
}

doPubSub();
Ensure that you are connected to the Ably platform, by monitoring the connected event:
JavaScriptasync function doPubSub() {
  await realtime.connection.once("connected");
  console.log("Connected to Ably!");
}
Use realtime.channels.get to get a reference to the “sport” channel. Then, subscribe to the channel:
JavaScriptasync function doPubSub() {
  await realtime.connection.once("connected");
  console.log("Connected to Ably!");

  const channel = realtime.channels.get("sport");

  await channel.subscribe((msg) => {
    console.log("Received: " + JSON.stringify(msg.data));
  });
}
Test this by opening the example.html page in a browser tab. Any messages sent to the “sport” channel are logged to the browser console.
Node.jsvar channel = realtime.channels.get("sport");
channel.subscribe(function(msg) {
  console.log("Received: " + JSON.stringify(msg.data));
});Rubychannel = ably.channels.get('sport')
channel.subscribe do |msg|
puts "Received: #{msg.data}"
endUpdate index.php and add code below before </script> tag:
JavaScriptvar channel = realtime.channels.get("sport");
channel.subscribe(function(msg) {
  alert("Received: " + msg.data);
});Update index.html and add code below before </script> tag:
JavaScriptvar channel = realtime.channels.get("sport");
channel.subscribe(function(msg) {
  alert("Received: " + msg.data);
});If you have not previously had experience building a basic user interface in Xcode, please refer to Apple developer guide on how to build a simple UI and also learn more about adding IBOutlets and IBActions.
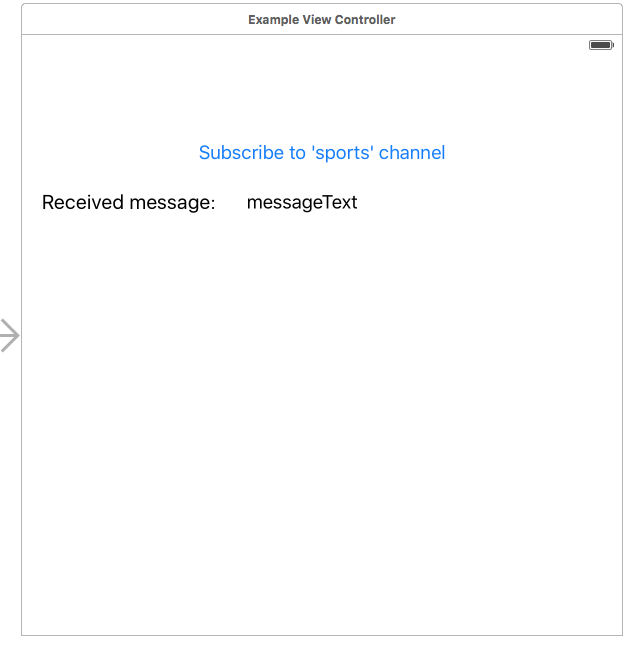
To be able to subscribe to a channel and send some initial messages, we will add a listener for new messages and add a button that publishes a message. Go to your ExampleViewController and add a UIButton from Object library. Name the action “subscribeAction”.
In a similar fashion add two UILabels and connect one of them so that it will show the last message received. Name it “receivedMessageText”.
Your ExampleViewController should look similar to this view:
Add this code to previously added IBAction:
Swiftlet channel = client.channels.get("sport")
self.receivedMessageText.text = ""

channel.subscribe { message in
    self.receivedMessageText.text = "\(message.timestamp) \(message.data)"
  }
}Update the main function in example.go to the following:
Gofunc main() {
    client, err := ably.NewRealtimeClient(ably.WithKey("INSERT-YOUR-API-KEY-HERE"))
    if err != nil {
      panic(err)
    }

    channel := client.Channels.Get("sport")

    _, err := channel.SubscribeAll(context.Background(), func(msg *ably.Message) {
      fmt.Printf("Received message with data '%v'\n", msg.Data)
    })
    if err != nil {
      err := fmt.Errorf("subscribing to channel: %w", err)
      fmt.Println(err)
    }
}
Now whenever a message is sent onto the sport Ably Channel, it’ll be received by our subscription.
Step 4 – Publish a message
Publishing a message on a channel ensures that any number of subscribers on that channel receive the message in real time. To publish a message on the “sport” channel, call the publish method on the channel, specify an optional message event name as the first argument, and provide the payload as the second argument.
JavaChannel channel = realtime.channels.get("sport");
channel.publish("update", "{ \"team\": \"Man United\" }", new CompletionListener() {
public void onSuccess() {
System.out.println("Message sent");
}
public void onError(ErrorInfo reason) {
System.out.println("Message not sent, error occurred: "
+ reason.message);
}
});JavaChannel channel = realtime.channels.get("sport");
channel.publish("update", "{ \"team\": \"Man United\" }", new CompletionListener() {
public void onSuccess() {
Toast.makeText(getBaseContext(), "Message sent",
Toast.LENGTH_SHORT).show();
}
public void onError(ErrorInfo reason) {
Toast.makeText(getBaseContext(), "Message not sent, error occurred: "
+ reason.message, Toast.LENGTH_SHORT).make();
}
});Add the call to channel.publish to the last line of code within the doPubSub() function:
JavaScriptasync function doPubSub() {
  await realtime.connection.once("connected");
  console.log("Connected to Ably!");

  const channel = realtime.channels.get("sport");

  await channel.subscribe((msg) => {
    console.log("Received: " + JSON.stringify(msg.data));
  });

  await channel.publish("update", { team: "Man United" });
}
Then, refresh the example.html page in your browser and watch the message payload being displayed in the browser console.
Node.jsvar channel = realtime.channels.get("sport");
channel.publish("update", { "team": "Man United" });Rubychannel = ably.channels.get('sport')
channel.publish 'update', 'team' => 'Man United'Create publish.php file which will be responsible for publishing messages:
PHP<?php
require_once 'ably.php';
if (isset($_POST['message']) && !empty($_POST['message'])) {
    $channel = $ably->channels->get('sport');
    $channel->publish('update', $_POST['message']);
}
?>
<html>
  <body>
    <h1>Input message</h1>
    <form method="post">
      <input type="text" name="message">
      <input type="submit" value="Publish!">
    </form>
  </body>
</html>
And to simplify it even further, let’s add an iframe so that we can publish messages from the same browser window. Add code below just after the <h1>Publish & Subscribe sample</h1>:
HTML<iframe src="publish.php"></iframe>If you would like to try running the server now, you can do so with php -S 0.0.0.0:8000. Once running, open your browser to http://localhost:8000/ and you should see “Publish & Subscribe sample” and box with “input message”, try it out.
Let’s create resource for /publish, it will serve as message publisher:
Pythonclass publish:
    def GET(self):
        return render.publish()

    def POST(self):
        message = web.input().get('message')
        if message is not None:
            channel = client.channels.get('sport')
            channel.publish('update', message)
        raise web.seeother('/publish')
And create publish.html in templates directory with message form:
HTML<html>
  <body>
    <h1>Input message</h1>
    <form method="post">
      <input type="text" name="message">
      <input type="submit" value="Publish!">
    </form>
  </body>
</html>
And to simplify it even further, let’s add an iframe so that we can publish messages from the same browser window. Add code below to index.html, just after the <h1>Publish & Subscribe sample</h1>:
HTML<iframe src="/publish"></iframe>Let’s update urls:
Pythonurls = (
    '/', index,
    '/publish', publish
)
If you would like to try running the server now, you can do so with python server.py. Once running, open your browser to http://localhost:8080/ and you should see the text “Publish & Subscribe sample” and box with “input message”, try it out.
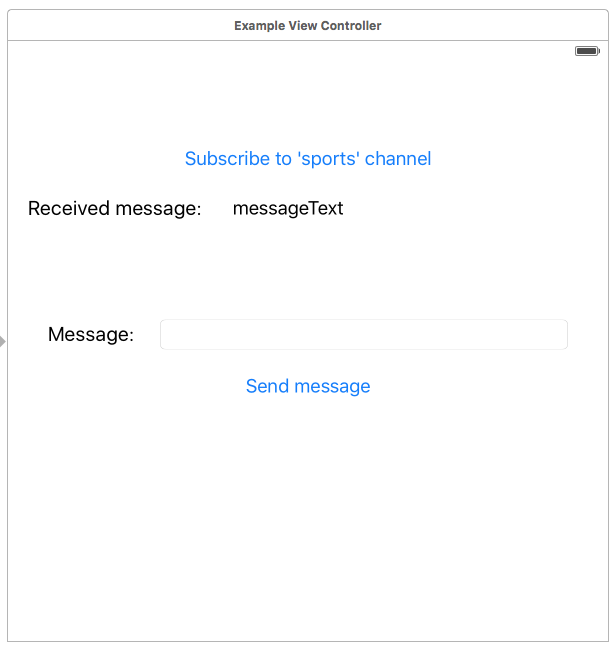
In this step add another UIButton and bind it to action named “publishAction”. Also, add one more UILabel and an UITextField – bind it in your code as “messageText” . Thanks to that users will be able to write their own messages.
Your view should now look like this:
You can also check if an error occurred while sending the message.
Add this code to previously added IBAction:
Swiftchannel.publish("update", data: messageText.text) { error in
  guard error == nil else {
    return self.showAlert("Error", message:
                          "There was an error while sending the message. \(error)")
  }
}To add publishing, change our main function to be the following:
Gofunc main() {
    client, err := ably.NewRealtimeClient(ably.WithKey("INSERT-YOUR-API-KEY-HERE"))
    if err != nil {
      panic(err)
    }

    channel := client.Channels.Get("sport")

    _, err := channel.SubscribeAll(context.Background(), func(msg *ably.Message) {
      fmt.Printf("Received message with data '%v'\n", msg.Data)
    })
    if err != nil {
      err := fmt.Errorf("subscribing to channel: %w", err)
      fmt.Println(err)
    }

    res, err := channel.Publish("team", "Man United")
    // await confirmation of publish
    if err = res.Wait(); err != nil {
        panic(err)
    }
}
Due to the range iteration across sub.MessageChannel() being a blocker, we’re adding our publish code inbetween that and our actual channel.Subscribe().
You have now learned how to instantiate the Ably client, subscribe to a channel, and publish messages on that channel.
Download tutorial source code
The complete source code for each step of this tutorial is available on Github.
We recommend that you clone the repo locally:
Shell scriptgit clone https://github.com/ably/tutorials.gitCheckout the tutorial branch:
Shell scriptgit checkout publish-subscribe-javaThen you can run project inside your console. Be sure to switch into the project’s directory and then use these commands in your terminal:
Shell script./gradlew assemble
./gradlew run
Don’t forget to replace your ExampleActivity#API_KEY field with Ably API key.
The complete source code for each step of this tutorial is available on Github.
We recommend that you clone the repo locally:
Shell scriptgit clone https://github.com/ably/tutorials.gitCheckout the tutorial branch:
Shell scriptgit checkout history-androidAnd then run the demo on your Android device. Check Android Developers website if you are not familiar on how to run an Android Project. Don’t forget to replace your ExampleActivity#API_KEY field with Ably API key.
The solution code for this tutorial is available on Github.
To run the demo, perform the following tasks:
1. Clone the repo locally:
Shell scriptgit clone https://github.com/ably/tutorials.git2. Add your Ably API key to example.html by replacing YOUR_ABLY_API_KEY with your own API key.
3. In a new browser tab, open your browser’s developer tools.
4. Open the example.html file in the browser tab and inspect the console output.
The complete source code for each step of this tutorial is available on Github.
We recommend that you clone the repo locally:
Shell scriptgit clone https://github.com/ably/tutorials.gitCheckout the tutorial branch:
Shell scriptgit checkout publish-subscribe-nodejsAnd then run the demo locally by adding your Ably API key to example.js and running the demo node example.js
The complete source code for each step of this tutorial is available on Github
We recommend that you clone the repo locally:
Shell scriptgit clone https://github.com/ably/tutorials.gitCheckout the tutorial branch:
Shell scriptgit checkout publish-subscribe-rubyAnd then run the demo locally by adding your Ably API key to example.rb and running the demo bundle exec ruby example.rb
The complete source code for each step of this tutorial is available on Github
We recommend that you clone the repo locally:
Shell scriptgit clone https://github.com/ably/tutorials.gitCheckout the tutorial branch:
Shell scriptgit checkout publish-subscribe-phpAnd then run the demo locally by adding your Ably API key to ably.php, install composer dependencies with:
Shell scriptcomposer installand run the web server php -S 0.0.0.0:8000.
The complete source code for each step of this tutorial is available on Github
We recommend that you clone the repo locally:
Shell scriptgit clone https://github.com/ably/tutorials.gitCheckout the tutorial branch:
Shell scriptgit checkout publish-subscribe-swiftIn the project directory simply run:
Shell scriptpod installOpen example.xcworkspace and build the demo on your preferred iPhone simulator or device. Don’t forget to replace your ExampleViewController#API_KEY field by adding your Ably API key to ExampleViewController.swift.
The complete source code for each step of this tutorial is available on Github
We recommend that you clone the repo locally:
Shell scriptgit clone https://github.com/ably/tutorials.gitCheckout the tutorial branch:
Shell scriptgit checkout publish-subscribe-pythonAnd then run the demo locally by adding your Ably API key to server.py, install the required libraries:
Shell scriptpip install ably web.pyAnd run the web server python server.py.
The complete source code for each step of this tutorial is available on Github.
We recommend that you clone the repo locally:
Shell scriptgit clone https://github.com/ably/tutorials.gitCheckout the tutorial branch:
Shell scriptgit checkout publish-subscribe-goAnd then run the demo locally by adding your Ably API key to example.go and running the demo go run example.go
Next steps
1. If you would like to find out more about how channels, publishing and subscribing works, see the Realtime channels and messages documentation
2. Learn more about Ably features by stepping through our other Ably tutorials
3. Gain a good technical overview of how the Ably realtime platform works
4. Get in touch if you need help